This page covers the two commands that draw the pedestrian access at a corner: the dropped kerb and the tactile paving that goes with it.
| Commands | CAPCAD_ROAD_KERB_DROPPED (dropped kerb) and CAPCAD_ROAD_TACTILE (tactile paving) |
| Shortcut | none, on either |
| Ribbon | CapCad tab › Traffic Control panel › Transverse split button › Dropped Kerb and Tactile |
| Category | NEW, on both |
| Forms | GuiaRebaixadaForm "Dropped Curb" · TactileForm "Tactiles", tabs Ending and Path. Both are modeless: the drawing stays live while they are open |
| Hosts | AutoCAD, BricsCAD, GstarCAD, ZWCAD, ARES Commander |
| Also opened by | the Crossings form has a button that runs CAPCAD_ROAD_KERB_DROPPED |
The drop comes out of the kerb height and the ramp gradient, not out of a guessed measurement. Type the kerb height and the gradient as a percentage and the grade length appears ready made — and the field turns pink when the gradient goes past the accessibility limit.
- Two ways of saying where. One point on the kerb plus a length, or two points on the kerb.
- The side transition is a choice. No transition, an angular fan, or a square step with a run along the kerb.
- Skew. The ramp can be turned relative to the kerb; the angle can be read off a line in the drawing.
- The calculation runs both ways. Type the gradient and out comes the length; type the length and out comes the gradient.
- Live preview. Every change erases the previous drawing and rebuilds it.
- The tactile paving is a 0.40 m grid, with the body, the tail and the combs built over the kerb and the two stud lines you select.
What it does
Dropped kerb
You select the kerb (the kerb line) and mark the stretch to drop. From there the command assembles the drop:
- the stretch of kerb between the two points is offset into the footway by the grade length, and that offset line is the edge of the ramp next to the carriageway;
- the two end faces link that edge back to the perpendicular feet on the kerb;
- if there is a side transition, it is added at each end.
The ramp comes out on the side opposite the clicked point: click slightly to the carriageway side and it goes into the footway. Flip side (7) swaps it.
The grade length is computed on its own from the kerb height and the gradient: c = h × 100 / i. Typing the length runs the calculation the other way and recomputes the gradient. Above 8.33 % — the maximum gradient of the accessibility norm of the active country profile — the gradient box turns pink.
There is no accept button: closing the form is the accept. Whatever is drawn stays.
Tactile paving
You select the kerb and the two stud lines that bound the crossing. The command works out, by intersection, the origin corner, the direction pointing at the kerb, the width between the two lines and the depth of the comb, and from that frame it draws the tactile grid. Everything is a 0.40 m grid — the figure is fixed; there is no field for it.
The drawing has five parts: the transverse comb, the longitudinal comb, the body rows, the body cross lines and the tail. The colour chosen decides the layer: TACTILE_RED (controlled), TACTILE_YELLOW (uncontrolled) or TACTILE_CHARCOAL.
Workflow
Dropped kerb
- Run
CAPCAD_ROAD_KERB_DROPPED. - Type the Curb H (11) and pick the Slope (12); the Grade length (9) is computed.
- Choose the method: 1 point + length (2) or 2 points (1). In the first, fill in the Length (13).
- Click Selecionar guia… ("select kerb…", 4) and pick the kerb and the point or points. The drop is drawn at once.
- Adjust the side transition (21, 22, 25) and the skew (17), pressing Enter in each field.
- To change the length along the kerb, type the Length (13), pick the anchor (14 to 16) and press Enter.
- If the drop came out on the wrong side, click Flip side (7); to move it to the other side of the first point, along the kerb, Reverse direction (3).
- Pick the Layer (28) and close the form.
Tactile paving
- Run
CAPCAD_ROAD_TACTILE. - Fill in Body rows (44), Tail rows (47) and Tail columns (48).
- Click Select (32) and pick, in this order, the kerb, the first stud line and the second.
- Pick the style (50, 51, 52) and the draw method (41, 42, 43). Every change redraws.
- Reset (53) erases the drawing and keeps the selection, so the next change rebuilds it.
The form
The numbers on this page are unique: 1 to 30 on the Dropped Curb form and 31 to 60 on Tactiles. 61 and 62 are two controls of the Dropped Curb form that only show while there is a skew.
The Tactiles screenshots below were captured in a Portuguese session; the control numbering is the same in every language, and the tables quote the English captions. On the Dropped Curb form the main button (4) keeps a Portuguese caption, quoted here with a gloss.
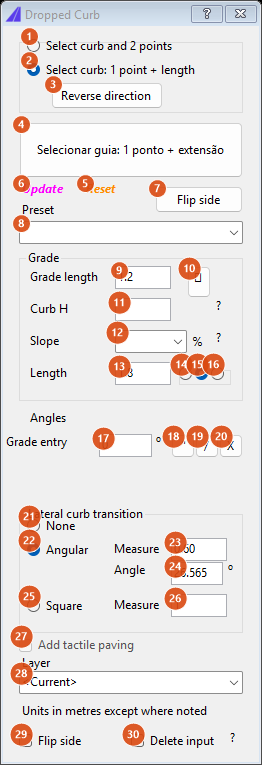
The whole form. Units are metres unless stated otherwise.
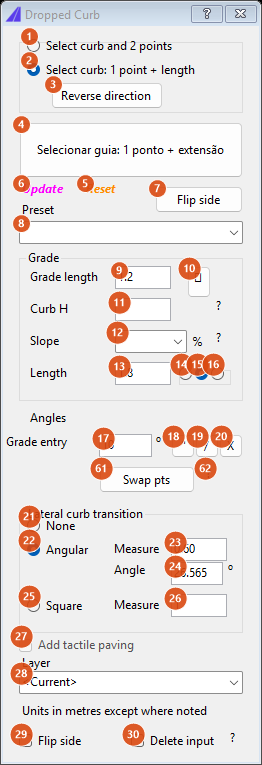
With the skew (17) different from zero, the Swap pts button (61) and the ? (62) appear.
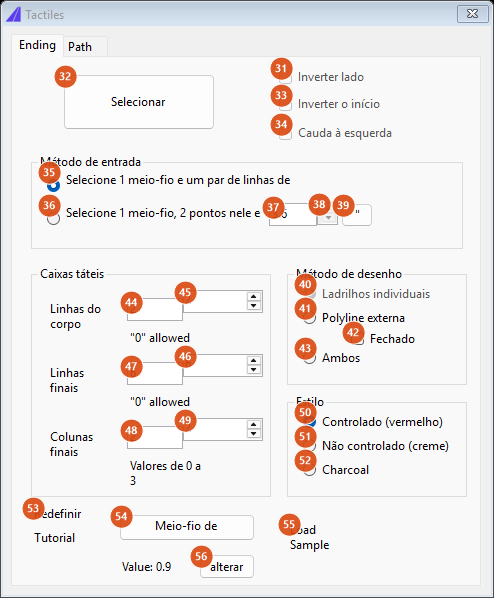
Tab 1: Ending — the crossing. The greyed-out controls are inert; see the table.
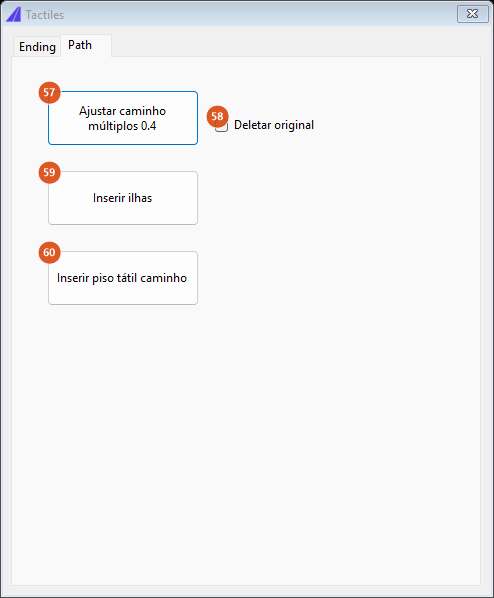
Tab 2: Path — three actions along a path, not available in this version.
Dropped kerb — selection
| # | Control | What it does |
|---|---|---|
| 1 | Select curb and 2 points | The stretch to drop is defined by two clicks on the kerb. |
| 2 | Select curb: 1 point + length | One click on the kerb plus the Length (13). This is the default. |
| 3 | Reverse direction | Moves the drop to the other side of the first point, along the kerb: the first point stays where it is, the second goes to the opposite side at the distance in Length (13), and the ramp stays on the same side of the kerb. If there is not enough kerb on that side, nothing changes and a warning appears in the form title. |
| 4 | Selecionar guia… (select kerb…) | Hides the form and asks for the kerb and the point or points. The caption follows 1 and 2. The drop comes out on the side opposite the clicked point; the two points are ordered by their position along the kerb. In one-point mode, a point off the kerb or a length that overruns the kerb is refused with a warning in the form title. |
| 5 | Reset | Clears the skew and erases the drawn drop. |
| 6 | Update | Redraws with the current values. |
| 7 | Flip side | Toggles box 29 and redraws. |
| 8 | Preset | Picks a side transition type. The presets that ship today are Brazilian and are listed on the Portuguese page: two of them only select the Angular or the Square transition, and a third is not available in this version — choosing it only writes a warning in the form title and changes nothing. |
Dropped kerb — ramp
| # | Control | What it does |
|---|---|---|
| 9 | Grade length | The ramp length, measured across the kerb. Editing it and pressing Enter recomputes the gradient (12) and the transition angle (24). |
| 10 | ! | Measures the length in the drawing: two clicks, and the distance goes into 9 (recomputing the gradient). |
| 11 | Curb H | The kerb height. Unlike every other field, it recomputes on every keystroke, not only on Enter. |
| 12 | Slope (%) | 8.33, 6.25 or 5.00, or whatever you type. It recomputes the Grade length. Above 8.33334 % the box turns pink: that is the maximum of the accessibility norm of the active country profile. |
| 13 | Length | The length of the drop along the kerb. In one-point mode it is the measurement used by the selection. With a drop drawn, typing a value and pressing Enter lengthens or shortens the stretch, keeping in place the part chosen in 14 to 16. After each draw the field is rewritten with the length actually measured. |
| 14, 15, 16 | (anchor) | Three unlabelled radio buttons, with the tooltips "Anchor on the left", "Anchor in the middle" and "Anchor on the right". They say which part of the stretch stays in place when the Length (13) is changed: the first end, the middle (both ends move equally) or the last end. The default is the middle. |
Dropped kerb — angles
| # | Control | What it does |
|---|---|---|
| 17 | Grade entry (°) | The skew: the stretch of kerb is turned by this angle before becoming the ramp. With a value other than zero, 61 and 62 appear. |
| 18 | " | Not available in this version. |
| 19 | / | Asks for a line in the drawing and writes into 17 its angle relative to the selected stretch of kerb, measured at the clicked point of the line and folded into the range −90° to 90°. A line parallel to the kerb gives zero. |
| 20 | X | Clears the skew and redraws. |
| 61 | Swap pts | Swaps the two points, so that the skew turns about the other end. The ramp stays on the same stretch and on the same side of the kerb. |
| 62 | ? | Shows a note: with a skew, the ramp length refers to the first point, and button 61 swaps the points. |
Dropped kerb — side transition
| # | Control | What it does |
|---|---|---|
| 21 | None | No transition: the ramp ends at the two end faces. |
| 22 | Angular | A fan at each end, thrown from the ramp edge to the kerb, at the angle in 23/24. This is the default. |
| 23 | Measure | The projection of the transition onto the kerb. Editing it recomputes the angle (24). |
| 24 | Angle (°) | The fan angle. Editing it recomputes the measurement (23). The default 26.565° is the angle whose tangent is 0.5. |
| 25 | Square | A step perpendicular to the kerb at each end, plus a run along it with the measurement in 26. |
| 26 | Measure | The length of the square joint's run. |
Dropped kerb — footer
| # | Control | What it does |
|---|---|---|
| 27 | Add tactile paving | Disabled; tactile paving is the CAPCAD_ROAD_TACTILE command. |
| 28 | Layer | <Current> draws on the current layer. The other options come from the catalogue: GUIA_REBAIXADA and the _IMP, _MAN and _REM variants, created with the right colour if they do not exist. |
| 29 | Flip side | The grade length is applied to the other side of the kerb. It does the same as button 7. |
| 30 | Delete input | Ticked, it erases the selected kerb from the drawing; unticked, it brings the kerb back. It acts at the moment of the click, on the kerb of the last selection. |
Tactile paving — Ending tab
| # | Control | What it does |
|---|---|---|
| 31 | Flip side | Disabled; not available in this version. |
| 32 | Select | Hides the form and asks, in this order, for the kerb, the 1st stud line and the 2nd. It resolves the frame and draws. If the stud lines do not cross the kerb, or if the distance between them is zero, the reason appears in the form title and on the command line. |
| 33 | Invert beginning | Disabled; not available in this version. |
| 34 | Tail at left side | Disabled; not available in this version. |
| 35 | Select 1 kerb and pair of stud lines | The input method. This is the default. |
| 36 | Select 1 kerb, 2 points on it, angle | Saved with the form; in this version the Select button asks for the kerb and the two stud lines whichever method is chosen. |
| 37 | (angle) | The angle box of the second method. |
| 38 | (spinner) | Disabled; not available in this version. |
| 39 | " | Not available in this version. |
| 40 | Individual tiles | Disabled; not available in this version. |
| 41 | Outer polyline | Adds the outline polyline to the drawing. |
| 42 | Closed | Marks the outline as closed. Saved with the form; not used by this version. |
| 43 | Both | Identical to Outer polyline. |
| 44, 45 | Body rows | How many rows the body has. Zero is allowed. The box and the spinner move together, with the value clamped between 0 and 999. |
| 46, 47 | Tail rows | How many rows the tail has. Zero is allowed. |
| 48, 49 | Tail columns | How many columns the tail has. Zero skips the whole tail. The label asks for values 0 to 3. |
| 50 | Controlled (Red) | Layer TACTILE_RED. This is the default. |
| 51 | Uncontrolled (Buff) | Layer TACTILE_YELLOW. |
| 52 | Charcoal | Layer TACTILE_CHARCOAL. |
| 53 | Reset | Erases what was drawn and keeps the selection, so the next change rebuilds it. |
| 54 | Transitional kerb... | Not available in this version: it writes a warning to the command line. |
| 55 | Load Sample | Downloads and opens the sample drawing sample-uk.dwg. |
| 56 | change | Asks for the transitional-kerb value and saves it to the preferences. The default is 0.9, and zero is accepted. The current value appears beside it, under "Value:". |
Tactile paving — Path tab
| # | Control | What it does |
|---|---|---|
| 57 | Ajustar caminho múltiplos 0.4 (fit path to multiples of 0.4) | Not available in this version. |
| 58 | Deletar original (delete original) | The option that would go with 57. |
| 59 | Inserir ilhas (insert islands) | Not available in this version. |
| 60 | Inserir piso tátil caminho (insert tactile paving along path) | Not available in this version. |
How the options combine
The figures below came out of the engines themselves. The kerb is a straight line, the dropped stretch runs from 10 to 16 m, and the grade length is 1.20.
Side transition

Transition None: the ramp edge and the two end faces, and nothing else.

Transition Angular, angle 26.565°: a fan at each end, thrown to the kerb.

Transition Square, measurement 1.00: a step perpendicular to the kerb plus the run along it.
Tactile paving
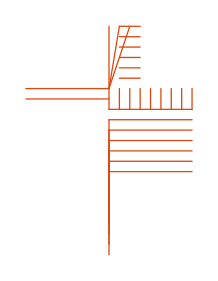
The engine run over a sample frame — 3.20 m between the stud lines, 2.40 m deep, 2 body rows, 6 tail rows and 2 tail columns. Everything is a 0.40 m grid. Note the tail: the posts converge on a single point instead of running parallel — see the note below.
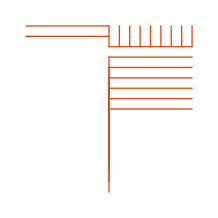
The same frame with Tail columns at zero: the whole tail disappears.
Remembered between sessions
Dropped kerb: selection method, transition type, transition measurement and angle, square-joint measurement, grade length, kerb height, length and gradient. The layer is saved under a key of its own. The transition measurement is saved, but recomputed on opening.
Tactile paving: only the input method (35 or 36). The transitional-kerb value is saved separately and survives between drawings.
Notes
- Closing the dropped-kerb form is the accept: only Reset erases the drawing.
- The tactile paving tail draws a fan. Every tail post is run to one fixed point instead of running parallel to its neighbours, so the tail spreads out like a fan. It is visible in the figure above.
- On a curved kerb spanning more than one segment, the ramp edge comes out as a straight chord between the two ends.
- When the angular transition does not meet the kerb, or when the square joint lands on a negative measurement, the drop comes out partial — and a warning appears in the form title and on the command line.
- The tactile combs are not trimmed against the kerb: every tooth comes out at its nominal length.
- The tactile form is titled "Tactiles" and its sample button reads "Load Sample" in every language.