| Command | CAPCAD_SIGN_INSERT |
| Shortcut | IV |
| Ribbon | CapCad tab › Sinalização Vertical panel › Vertical split button › Insere Vertical + Opções & Gerenciamento |
| Category | Vertical |
| Form | VerticalForm (modeless: the drawing stays live while it is open) |
| Hosts | AutoCAD, BricsCAD, GstarCAD, ZWCAD, ARES Commander |
| Sibling commands | CAPCAD_SIGN_INSERT_SIMPLE (shortcut IP) and CAPCAD_SIGN_INSERT_STOP_SIGN (shortcut R1) — no form, described at the end of the page; -CAPCAD_SIGN_INSERT is the command-line variant for scripts |
| Also opens this form | no other command |
All the sign placement of a road project in one window: pick the sign, pick the action, click in the drawing. With the CAD's own commands every sign is an INSERT, a ROTATE, a MOVE and a round of manual attribute filling. Here the sign arrives positioned, rotated, with its support, on the right layer and with its data already inside it.
- Three libraries in one list. Official signs, common signs and the project's own signs, plus the blocks already defined in the drawing, with thumbnails, a filter and a description.
- The sign aligns itself to the alignment. In the perpendicular method the sign lands at the foot of the perpendicular, at the tangent angle, on the curb side and reading direction you chose, at a fixed offset or one measured from the entities between your click and the alignment.
- The action is part of the insertion. Insert, Remove, Keep and Replace choose the sign's layer and its graphic representation: in colour, grey, or grey with an X, according to the project style.
- The sign carries its data. Code, chainage, latitude/longitude, coordinates, side, alignment, area and action go into the attributes at insertion time, ready for the reports and the take-off.
- The support comes with it. Single, double, triple or no column, chosen automatically from the sign's size, with the material/code you type and its own action when it differs from the sign's.
- The same tool on five CADs. AutoCAD, BricsCAD, GstarCAD, ZWCAD and ARES Commander.
What it does
CAPCAD_SIGN_INSERT opens the Insert Vertical window, which stays beside the drawing while you work. You pick a sign in the library, choose how it is to be positioned (the Method) and click one of the four actions. The form hides, the command asks for points in the drawing, and inserts one sign per click until you press Esc.
Each insertion produces, in one go:
- the sign block, loaded from the library dwg if it is not already in the drawing;
- the support (post), inserted before the sign and linked to it;
- the layer for that action —
ROAD_SIGN_NEW,ROAD_SIGN_KEEP,ROAD_SIGN_REMOVE,ROAD_SIGN_REPLACE,ROAD_SIGN_RELOCATEorROAD_SIGN_<ACTION>for a custom action, always resolved through the active style's layer catalogue; - the sign's graphic representation for that action (colour, grey, grey with an X…);
- the sign's attributes: code, chainage, latitude/longitude, coordinates, side, alignment name, area and action;
- a link between sign and support (xdata
vertical.sign/vertical.post), which the other vertical commands use to treat the pair as one unit.
Three ideas behind the command
The alignment. The alignment (eixo) is the project's centre line, set in the Alignment Manager. With an active alignment, the Perpendicular to alignment method positions and rotates the sign for you and fills in the chainage. With no alignment, the point methods still work: the sign is inserted standalone and the chainage is left blank.
The project style. The style (set in the Project Manager: a CapCad default, an urban one, and the country-specific ones) decides the layer names and colours, the representation of each action, and the support's default representation. Changing the style changes the next insertions, not the ones already made.
The three sign libraries. The folders are set in the Project Manager, and each source on the form reads one of them:
| Source | Folder | Contents |
|---|---|---|
| Official | conventional signs | the signs regulated by the norm of the active country profile, one dwg per code, organised in sub-folders |
| Common | common signs | signs that are not official but recur across projects: composite warning signs with text, educational signs, work-zone guidance |
| Project | proposed signs | the signs specific to this project, created in PlacaPro or saved from a dwg; starts empty |
| Blocks | — | the blocks already defined in the current drawing (anonymous blocks, layouts and xrefs excluded) |
A sign is looked for in this order: among the blocks already defined in the drawing, then in the conventional folder, the common folder, the proposed folder, and finally in the immediate sub-folders of those three. If the code comes in without a hyphen the command retries with one inserted. If nothing is found, it inserts the GENERICA sign in its place and records the original code.
Workflow
- Before you start, set the working alignment in the Alignment Manager and confirm the style in the Project Manager. With no active alignment the Use active (84) and Use main km (87) options are disabled and the form opens on Select standalone (86).
- Run
CAPCAD_SIGN_INSERT(or typeIV). The window opens beside the drawing; it is a single window, and running the command again only brings it to the front. - Choose the source (7 to 10) and the sign in the thumbnail grid (12). Right-clicking the grid switches between Large icons, List and Details. The selected sign's description appears at (17) and the item count beside (16).
- Choose the Method (75, 76, 77, 79 or 82).
- Adjust what you need: support (53 to 61), curb / direction / traffic side (66 to 72), scale (31), conventional area (73) and, in the perpendicular method, the Alignment (84 to 90) and Alignment offset (91 to 96) frames.
- Click Insert (36), Remove (37), Keep (38) or Replace (39). The form hides.
- Click in the drawing, once per sign. Depending on the method the command asks for a point or an entity, and may ask for the rotation afterwards (the sign follows the cursor).
Escends the loop and the form comes back. - Close the window when you are done. The preferences are written on closing.
Double-clicking a sign in the grid is the same as Insert.
The form's footer has a status line with the result of the last insertion; the messages are also written to the CAD command line, which is the only visible surface while the window is hidden.
The form
The numbers are the same in every screenshot of this page: one numbering across the six top tabs and the three inner tabs of the Main page. A control that only appears on one tab keeps its number. The screenshots are of the Portuguese interface; the tables below name each control as an English session shows it.
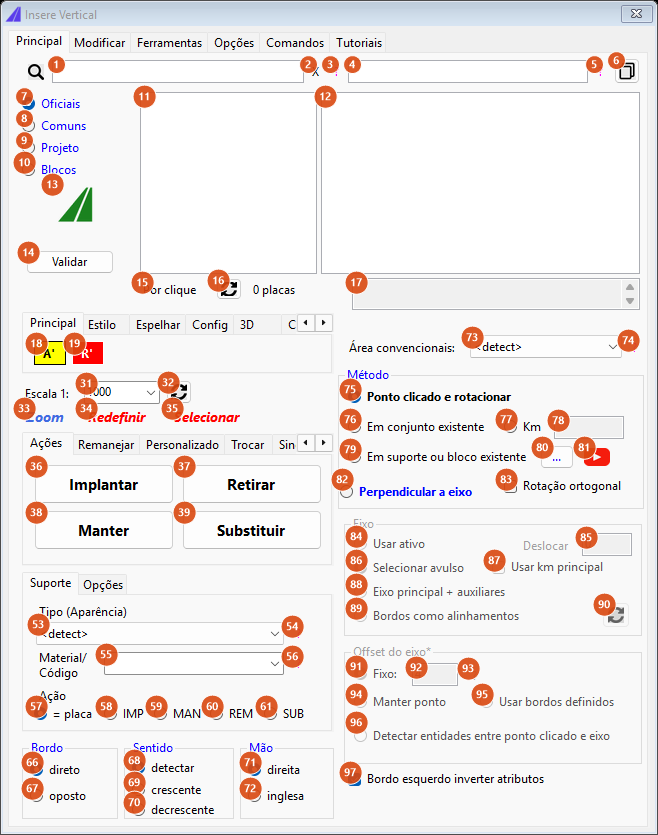
Opening state: the Main tab, method Clicked point and rotate, inner tabs on Main, Actions and Support. The Alignment and Alignment offset frames are disabled because they only apply to the perpendicular method.
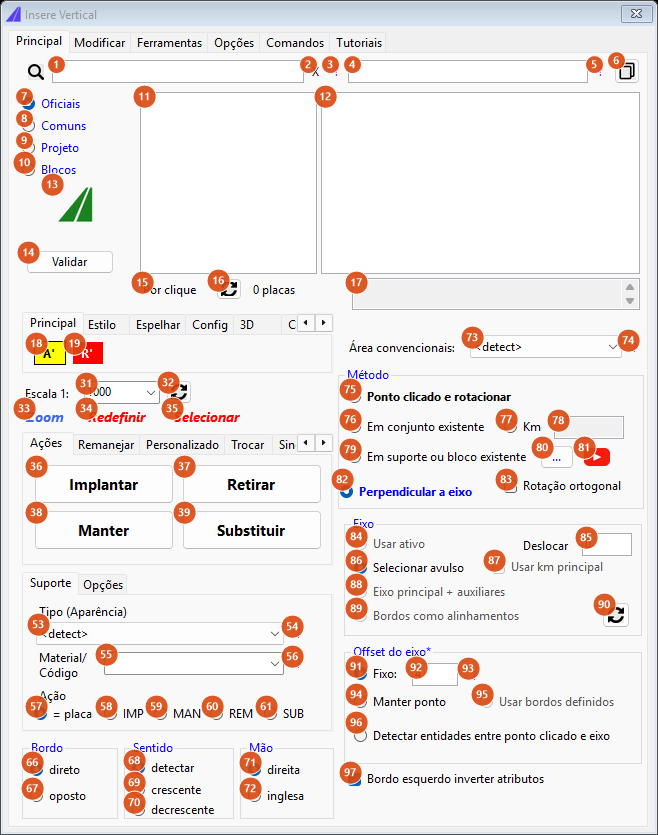
Method Perpendicular to alignment (82) selected: the Alignment and Alignment offset frames become live. Use active (84), Use main km (87), Main alignment + auxiliaries (88), Curbs as alignments (89) and Use defined curbs (95) stay greyed — the first two because there is no active alignment in this drawing, the last three because they are not available in this version.
Search and library (top of the Main tab)
| # | Control | What it does |
|---|---|---|
| 1 | Filter | Filters the list by the part of the name you type, without changing folder. Case-insensitive. |
| 2 | X | Clears the filter (1). |
| 3 | ? | Help label. No text in this version. |
| 4 | Search | A content search field (each sign's registered text). Not available in this version: typing only refreshes the count. |
| 5 | ? | Help label. No text in this version. |
| 6 | ⧉ (CapSign) | CapSign: create a new sign from the selected one. Not available in this version. |
| 7 | Official | Lists the conventional (official) sign folder. Default. |
| 8 | Common | Lists the common sign folder. |
| 9 | Project | Lists the project's proposed sign folder. |
| 10 | Blocks | Lists the blocks already defined in the current drawing, without thumbnails. A sign chosen here is inserted by its block name. |
| 11 | Folder tree | The chosen source's folder and its immediate sub-folders. A source whose folder is not set, does not exist or holds no dwg appears in orange with the explanation in its tooltip. |
| 12 | Sign grid | The signs in the selected folder. The thumbnail comes from an image beside the dwg (.png, .jpeg, .jpg or .bmp with the same name); failing that, from the preview embedded in the dwg; failing that, just the name. Thumbnails load progressively, a few at a time, so the list appears at once even on a network library. Double-click = Insert. |
| 13 | PlacaPro (logo) | Create a new sign in PlacaPro. Not available in this version. |
| 14 | Validate | Validation of the library sign before inserting. Not available in this version. |
| 15 | By click | Identify a sign already in the drawing and select it in the list. Not available in this version. |
| 16 | ⟳ | Reloads the current source's list. |
| 17 | Description | Read-only: the description of the selected sign, read from a .txt file beside the dwg (plain text, or JSON with the key capsign.text.content) or, failing that, from a PlacaPro .plc file of the same name. |
Inner tab Main / Style / Mirror / Config / 3D / Assembly
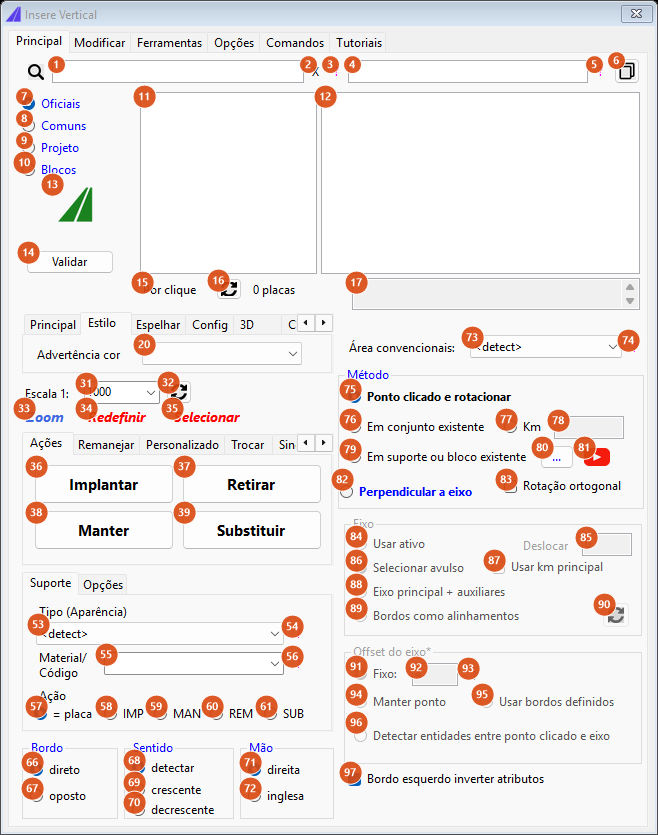
Inner tab Style: the colour variant of warning signs.
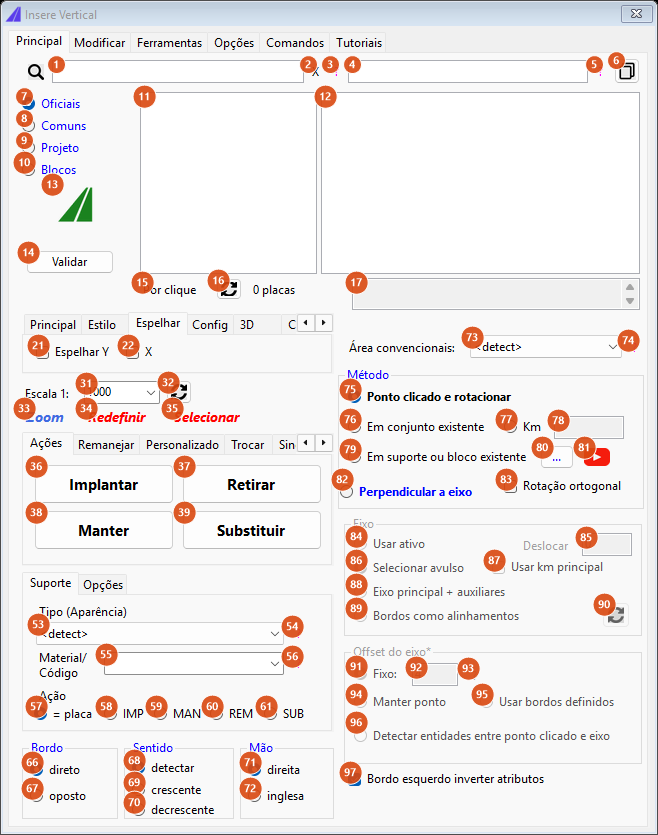
Inner tab Mirror.
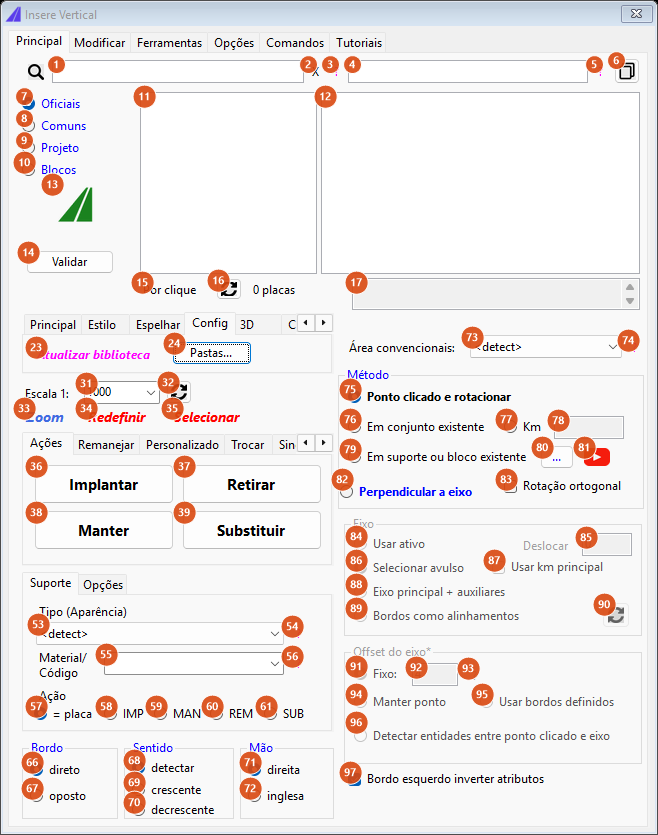
Inner tab Config: library update and access to the folders.
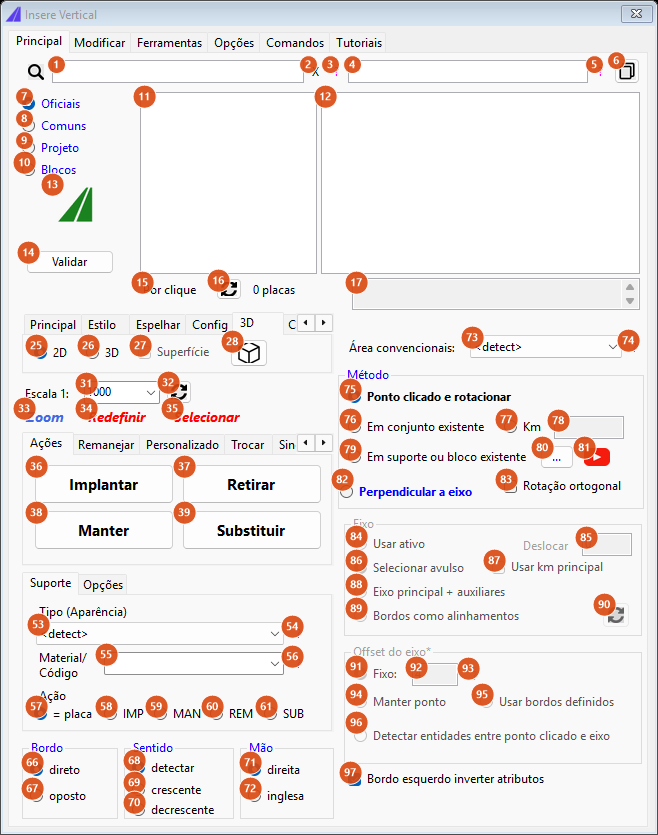
Inner tab 3D.
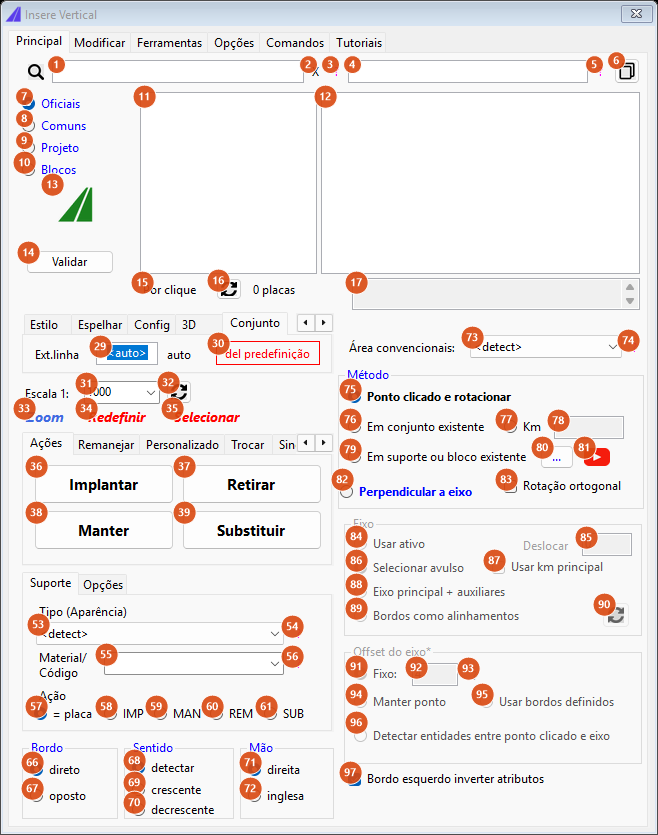
Inner tab Assembly: the spacing between the signs of an assembly.
| # | Control | What it does |
|---|---|---|
| 18 | A's | Opens the picture chart of warning signs. Click the sign you want: the filter is cleared, the source goes back to Official and the sign is selected in the list. If it is not in the library, the command asks whether you want to check the folders and opens the Project Manager. When the chart image cannot be found, the hotspots show their own codes, so the picker still works. |
| 19 | R's | The same for the regulatory sign chart. |
| 20 | Warning colour | Colour variant of a warning sign: empty (the standard yellow), road works or fluorescent green (the list is obra / lima-limão in a Portuguese session). Not available in this version: choosing a value only prints a notice on the command line. See the note on colour variants further down. |
| 21 | Mirror Y | Mirroring in Y. Not used by this version. |
| 22 | X | Mirroring in X. Not used by this version. |
| 23 | Update library | Checks the server for updates to the official signs (new signs and revised ones) and downloads whatever is out of date into the project's conventional folder, comparing sizes and offering at the end to remove local dwg files that no longer exist on the server. If the folder is not set, it says so and offers to open the Project Manager. When it finishes it relists the signs. |
| 24 | Folders... | Opens the Project Manager and relists the signs on return. |
| 25 | 2D | 2D insertion. Not used by this version. |
| 26 | 3D | 3D insertion. Not used by this version. |
| 27 | Surface | Rest the 3D signs on a surface. Enabled only in Civil 3D with a surface in the drawing; not used by this version. |
| 28 | ◰ | Opens the 3D assistant (CAPCAD_3D_ASSISTANT) to turn 2D blocks into 3D. |
| 29 | Ext.line | Spacing between the signs of an assembly; <auto> lets the command work it out. Not used by this version: the In existing assembly method uses the reference block's height plus 5 units. |
| 30 | del preset | Deletes the assembly preset. Not available in this version. |
Scale
| # | Control | What it does |
|---|---|---|
| 31 | Scale 1: | The drawing scale used to size the sign and its support: 200, 250, 500, 1000 or 2000, and it also accepts a typed value. It is the basis of the whole size calculation, together with the exaggeration factors on the Options tab. Stored in the preferences. |
| 32 | ⟳ | Change the scale of existing signs: says which scale will be applied, asks for a selection in the drawing and rescales the selected signs (with their support and the assembly line, where there is one). The form hides during the selection. |
| 33 | Zoom | Frames the last sign inserted. Not available in this version. |
| 34 | Reset | Undo the last insertion. Not available in this version. |
| 35 | Select | Select the last sign inserted. Not available in this version. |
Inner tab Actions / Rearrange / Custom / Swap / Sync
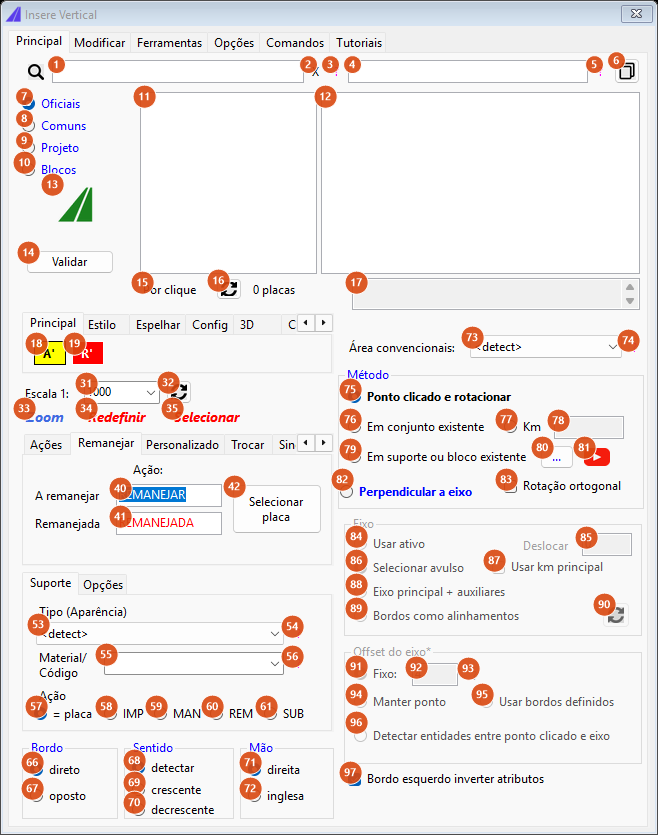
Inner tab Rearrange.
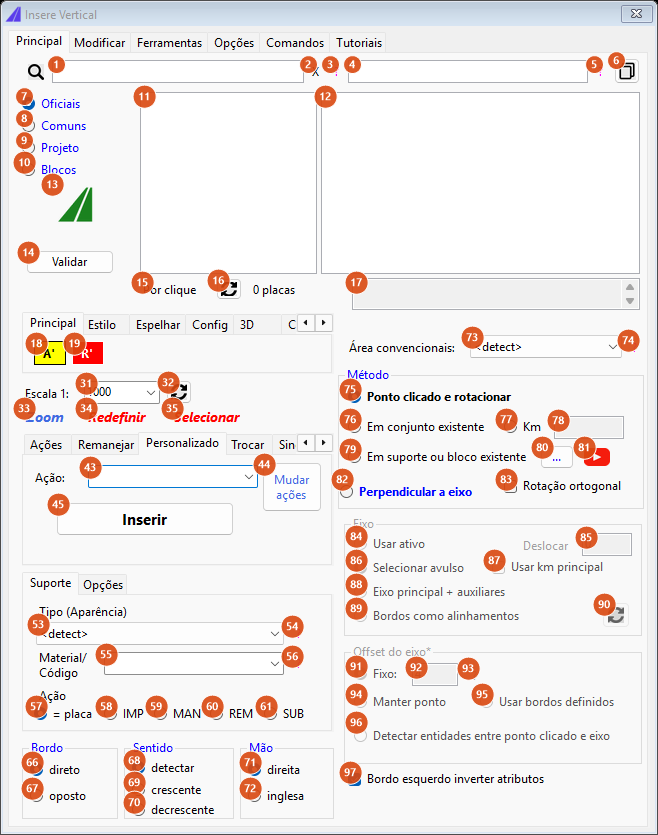
Inner tab Custom: the custom actions.
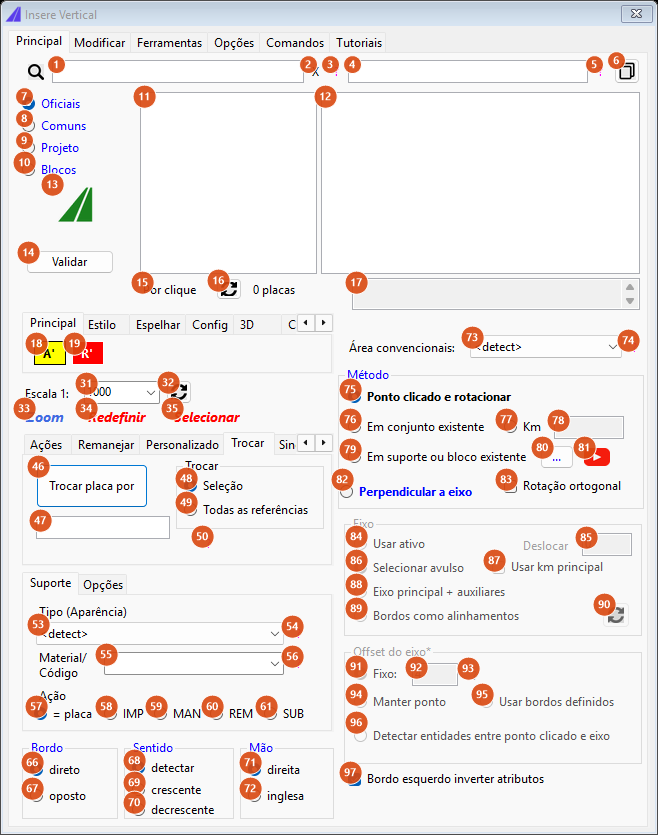
Inner tab Swap.
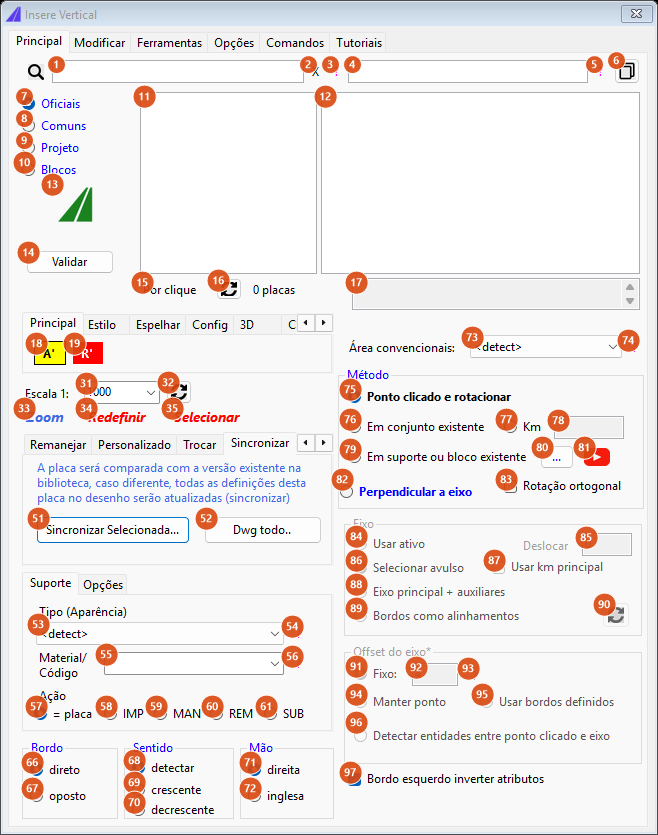
Inner tab Sync.
| # | Control | What it does |
|---|---|---|
| 36 | Insert | Starts the insertion loop with the IMP action: a new sign to install, layer ROAD_SIGN_NEW (blue in the default style), representation in colour. |
| 37 | Remove | Action REM: a sign to be taken out, layer ROAD_SIGN_REMOVE (red), representation grey with an X over it in the default style. The support also loses its fill (the visibility goes from "(Preenchido)" to the hollow state). |
| 38 | Keep | Action MAN: an existing sign that stays, layer ROAD_SIGN_KEEP (yellow), representation grey. |
| 39 | Replace | Action SUB: layer ROAD_SIGN_REPLACE (cyan). In the default style the representation goes back to Normal, that is, in colour like an inserted sign. |
| 40 | To rearrange | Text of the relocation's source action. Not used by this version. |
| 41 | Rearranged | Text of the destination action. Not used by this version. |
| 42 | Select sign | Mark the sign to be relocated in the drawing. Not available in this version. |
| 43 | Action: (custom) | The list of custom actions. In an English profile: DAMAGED, CONFIRMA, PRIORITY (in Spanish DAÑADA, CONFIRMAR, PRIORIDADE; the Portuguese list is longer). See the note on custom actions. |
| 44 | Change actions | Opens the action panel (CAPCAD_ACTION_PANEL) to change the action of signs already inserted — see Sign actions. |
| 45 | Insert (custom) | Starts the insertion loop with a custom action. See the note: in this version the value chosen at (43) is not used. |
| 46 | Swap sign for | Swaps the sign selected in the drawing for another code, keeping position, rotation, scale, layer and attributes (CAPCAD_SIGN_SWAP), or every reference of that sign in the drawing (CAPCAD_SIGN_SWAP_MULTI) according to (48)/(49). The new code is asked for by the command itself, on the command line — see Swap and replace signs. |
| 47 | New code | The destination code box. Not used by this version: the command asks for the code. |
| 48 | Selection | Swap only the selected sign. |
| 49 | All references | Swap every reference of that sign in the drawing. |
| 50 | ? | Help label. No text in this version. |
| 51 | Sync Selected... | Compares the selected sign with the library version and, if they differ, redefines the block in the drawing from the library dwg, putting every reference back at the same position, rotation, scale and layer, with the attributes and the action preserved. |
| 52 | Whole dwg.. | The same for every sign in the drawing, with the report in a text window. |
Inner tab Support / Options
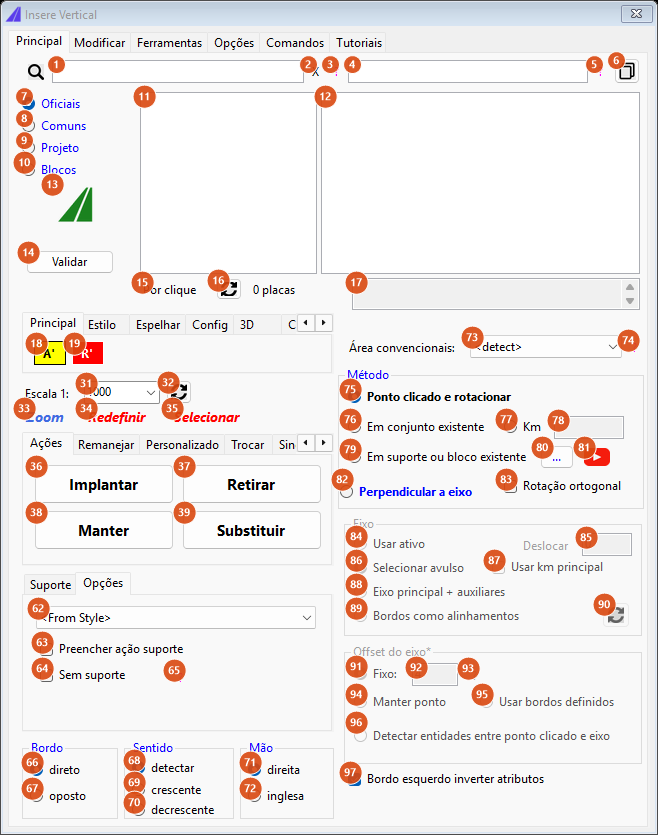
The support's Options inner tab: the support representation and the two exception boxes.
| # | Control | What it does |
|---|---|---|
| 53 | Type (Appearance) | The support's column count: <detect>, COLUNA SIMPLES (Preenchido), COLUNA DUPLA (Preenchido), COLUNA TRIPLA (Preenchido), Outro (Preenchido) or Sem (the block's own visibility state names, which are Portuguese in every language). With <detect> the command decides from the sign's size: signs under 1.5 m wide get a single column and wider ones a double column (in a Portuguese profile every conventional sign gets a single column). Sem leaves the support unfilled and without a material code. |
| 54 | ? | Help label. No text in this version. |
| 55 | Material/Code | Free text written into the support's first attribute: the material (timber, steel, recycled), the section, or the authority's support code. It may be left blank. In this version the list does not come pre-filled — type the value. |
| 56 | ? | Help label. No text in this version. |
| 57 | = sign | The support gets no action attribute of its own: it follows the sign's action (default). |
| 58 to 61 | IMP / MAN / REM / SUB | Writes that action into the support's SUP_ACAO attribute regardless of the sign's action. Useful when the sign is new but the post is reused, or the other way round. |
| 62 | Support representation | How the support is drawn relative to the alignment: <From Style> (whatever the project style says), ParalelaAoEixo_LinhaSuporteQuebrada, ParalelaAoEixo_LinhaSuporteDireta, PerpendicularAoEixo, the five leader-line variants, Quadrado and QuadradoInferior (the identifiers are Portuguese in every language). The choice is written to the Placa.Estilo preference at once and applies to every method. The leader-line and square options are not available in this version: the command says so and inserts the sign with the default support. |
| 63 | Fill support action | Fill in the support's action attribute. Not used by this version (use 58 to 61). |
| 64 | No support | Insert the sign only. Not used by this version; for the same visual result choose Sem at (53). Stored in the preferences. |
| 65 | ? | Help label. No text in this version. |
Curb, Direction and Traffic
| # | Control | What it does |
|---|---|---|
| 66 | direct | Right-hand curb: the sign sits on the side the traffic runs on. Default. |
| 67 | opposite | Left-hand curb: the sign is moved to the other side of the alignment, the attributes are marked as inverted, and the support gets the dynamic parameter that turns its arm to the right side. |
| 68 | detect | Detect the direction. Not used by this version — treated as increasing. |
| 69 | increasing | The sign is read in the direction of increasing chainage. The effective default. |
| 70 | decreasing | Turns the insertion angle by 180°: the sign is read by traffic running the other way. |
| 71 | right | Right-hand traffic (default). |
| 72 | left | Left-hand traffic: inverts the curb side chosen at (66)/(67). |
Right column: area, method, alignment and offset
| # | Control | What it does |
|---|---|---|
| 73 | Conventional area: | The value written into the sign's area/dimension attribute: empty, <detect>, or one of a short list of side and diameter presets (L=0.35m, L=0.50m, L=0.90m, L=1.00m, %%C=0.75m, %%C=1.00m). With <detect> and an official sign, the command applies a built-in default table that maps a handful of short codes to one of those presets; for other codes nothing matches and the field stands as you left it. Choosing the size by road class or street type is not available in this version. |
| 74 | ? | Help label. No text in this version. |
| 75 | Clicked point and rotate | Inserts at the clicked point with a zero angle and then asks for the rotation: the sign and its support follow the cursor until you click the angle. |
| 76 | In existing assembly | Instead of a point, asks for a sign already inserted. The new sign is stacked above it, at the same rotation, without a support of its own, and inherits that sign's chainage, latitude/longitude, extra text and scale. |
| 77 | Km | Insertion by a typed chainage from (78). Not available in this version: choosing it makes the command behave like Clicked point and rotate. |
| 78 | Km (value) | The chainage for option (77). Not used by this version. |
| 79 | In existing support or block | Asks for a block in the drawing — an existing support, a gantry, a projecting arm. See the detailed description below. |
| 80 | ... | Opens the device inserter (CAPCAD_DEVICE_INSERT) to insert a block-type support, and leaves method (79) selected. |
| 81 | ▶ | Opens the Vertical tutorial video on YouTube. |
| 82 | Perpendicular to alignment | Projects your click onto the alignment and inserts at the foot of the perpendicular, at the tangent angle. It is the method that fills in the chainage and the side. It enables the Alignment and Alignment offset frames. |
| 83 | Rotate orthogonal | Perpendicular method only: after inserting aligned to the alignment, it turns on the CAD's ortho mode and asks for a rotation in 90° steps. One warning-marker code always asks for this rotation whether the box is ticked or not, and the command tells you to point it in the reading direction. |
| 84 | Use active | Uses the project's active alignment. Disabled when the project has none; the form then opens on (86). |
| 85 | Shift | Shifts the insertion along the alignment, in metres, from the foot of the perpendicular (positive advances in the increasing direction). With a non-zero value the reading direction comes from the side you clicked on rather than from the Direction buttons. A point shifted off the end of the alignment stops the insertion with a "point not on the alignment" message. |
| 86 | Select standalone | Instead of the project alignment, use any curve in the drawing: the command asks for the curve on the first insertion and reuses it afterwards. With a standalone alignment, entity detection (96) is ignored. |
| 87 | Use main km | Use the main alignment's chainage when the sign lands on an auxiliary alignment. Not available in this version. |
| 88 | Main alignment + auxiliaries | Not available in this version. |
| 89 | Curbs as alignments | Not available in this version. |
| 90 | ⟳ | Reloads the project's alignment list. Not available in this version. |
| 91 | Fixed: | The lateral offset from the alignment is the value at (92). Default. |
| 92 | fixed offset | The offset in metres. Default 4. Written to the preferences whenever the form closes, and reused by the IP and R1 commands. |
| 93 | ? | Help label. No text in this version. |
| 94 | Keep point | No offset at all: the sign stays exactly at the clicked point, only turned to the alignment's angle. |
| 95 | Use defined curbs | Offset computed from the curbs defined in the project. Not available in this version. |
| 96 | Detect entities between clicked point and alignment | Measures the offset from the drawing: it draws a line from the foot of the perpendicular to your clicked point, looks for the furthest crossing with lines, polylines and arcs (ignoring entities on layers whose name contains "eixo") and uses that distance plus 4 m. Crossings beyond 50 m are discarded; with no crossing at all it falls back to the fixed value at (92). It only works with the project alignment, not with a standalone one. |
| 97 | Left curb invert attributes | Invert the attributes on the left-hand curb. Not used by this version. |
Modify tab
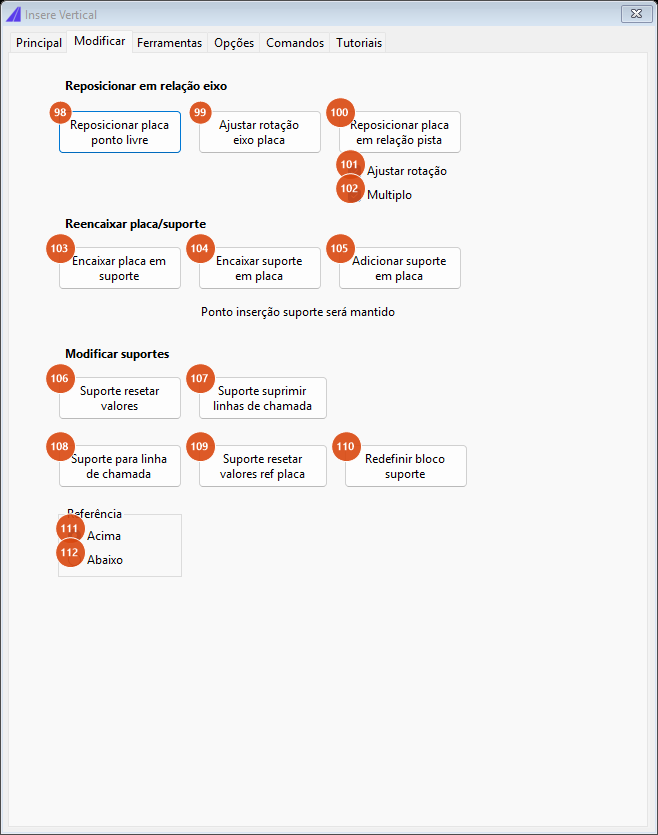
The Modify tab: reposition, refit and adjust the supports of signs already inserted.
| # | Control | What it does |
|---|---|---|
| 98 | Reposition sign free point | Not available in this version. |
| 99 | Adjust rotation to alignment | Not available in this version. |
| 100 | Reposition sign relative to road | Not available in this version. |
| 101 | Adjust rotation | An option of (100). |
| 102 | Multiple | An option of (100). |
| 103 | Fit sign to support | Reconnects a sign to its support: select the sign, then the support; the sign goes to the top of the support with its rotation corrected. If the support has no Position2 dynamic parameter the command says so and leaves the sign where it is. The form hides during the selections. |
| 104 | Fit support to sign | The opposite: the support first, then the sign — the support is brought to the sign. |
| 105 | Add support to sign | Not available in this version. |
| 106 | Support reset values | Returns the selected support to its original dynamic values. Defined only for the SUP2 support. |
| 107 | Support suppress leader lines | Suppresses the selected support's leader lines. |
| 108 | Support to leader line | Turns the selected sign's support into a leader line, above or below according to (111)/(112), and keeps asking for the next sign until you cancel. A sign with no associated support ends the loop with a warning. |
| 109 | Support reset values ref sign | Resets the support's values by putting the sign back on top of it. Here the selection accepts any block, not only a sign. |
| 110 | Redefine support block | Not available in this version. |
| 111 | Above | Leader-line reference for (108): above. Default. |
| 112 | Below | Leader-line reference for (108): below. |
Tools tab
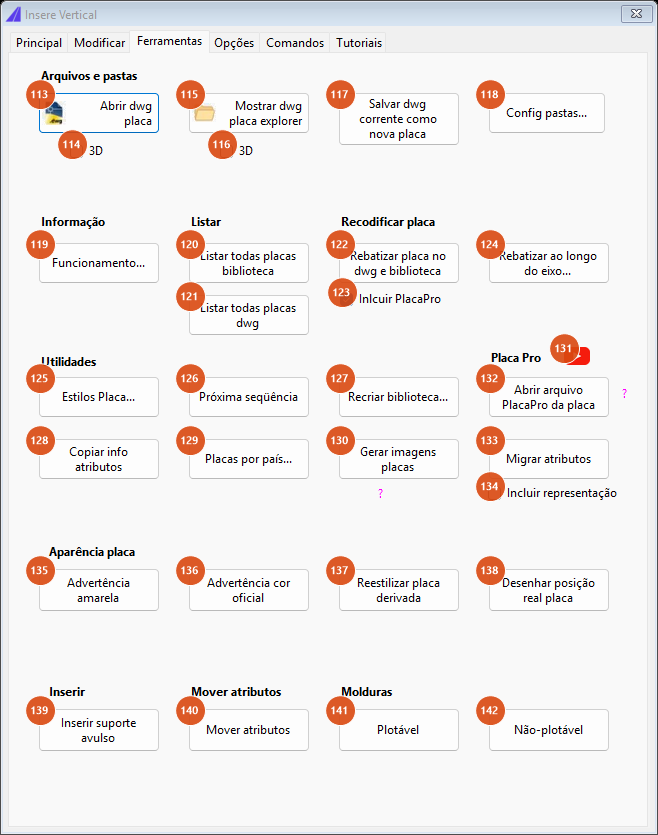
The Tools tab: files, listings, recoding, appearance and frames.
| # | Control | What it does |
|---|---|---|
| 113 | Open sign dwg | Opens the selected library sign's dwg in the CAD. With no sign selected, says so on the command line. |
| 114 | 3D | Open the 3D version. Not used by this version. |
| 115 | Show sign dwg in explorer | Opens Windows Explorer with the sign's dwg selected. |
| 116 | 3D | The same for the 3D version. Not used by this version. |
| 117 | Save current dwg as a new sign | Not available in this version. |
| 118 | Config folders... | Opens the Project Manager. |
| 119 | How it works... | Not available in this version. |
| 120 | List all signs in library | Not available in this version. |
| 121 | List all signs in dwg | Not available in this version. |
| 122 | Rename sign in dwg and library | Not available in this version. |
| 123 | Include PlacaPro | An option of (122). |
| 124 | Rename along the alignment... | Not available in this version. |
| 125 | Sign styles... | Not available in this version. |
| 126 | Next sequence | Not available in this version. |
| 127 | Rebuild library... | Not available in this version. |
| 128 | Copy attribute info | Not available in this version. |
| 129 | Signs by country... | Opens the CapCad profile manager to change country / download that country's sign pack. On return it relists the signs and re-evaluates the active alignment, because changing the profile clears the project's official folder and changes the culture. |
| 130 | Generate sign images | Not available in this version. |
| 131 | ▶ | Opens the Vertical tutorial video on YouTube. |
| 132 | Open the sign's PlacaPro file | Opens the PlacaPro shortcut (CAPCAD_SIGN_PLACAPRO). |
| 133 | Migrate attributes | Not available in this version. |
| 134 | Include representation | An option of (133). |
| 135 | Yellow warning | Not available in this version. |
| 136 | Warning official colour | Not available in this version. |
| 137 | Restyle derived sign | Not available in this version. |
| 138 | Draw sign real position | Not available in this version. |
| 139 | Insert standalone support | Not available in this version. |
| 140 | Move attributes | Not available in this version. |
| 141 | Plottable | Plottable frame. Not available in this version. |
| 142 | Non-plottable | Non-plottable frame. Not available in this version. |
Options tab
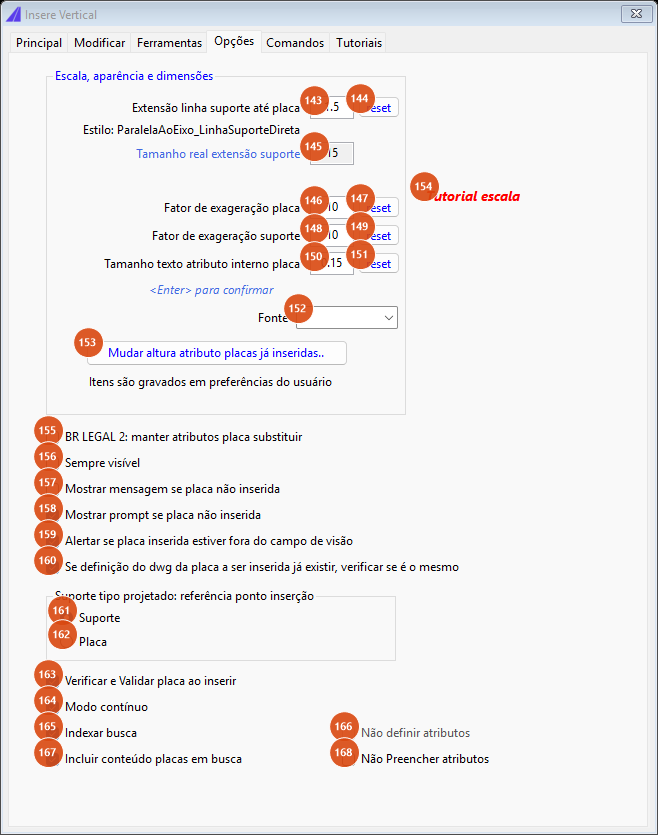
The Options tab: scale, exaggerations, attributes and the behaviour of the insertion.
| # | Control | What it does |
|---|---|---|
| 143 | Support line extension to sign | Length, in drawing units, of the stretch of support between the alignment line and the sign, in the simplified support representations. Default 1.5. Confirm with <Enter>. |
| 144 | reset | Returns (143) to 1.5. |
| 145 | Real size of support extension | Read-only: the value of (143) already multiplied by the scale, that is, the size the extension will have in the drawing. |
| 146 | Sign exaggeration factor | Multiplier for the sign's size. 10 is natural scale; 20 draws the sign at twice the size, so that it is legible in plan. Default 10. |
| 147 | reset | Returns (146) to 10. |
| 148 | Support exaggeration factor | The same for the support. Default 10. |
| 149 | reset | Returns (148) to 10. |
| 150 | Sign internal attribute text size | Height of the attribute text inside the sign block. Default 0.15. |
| 151 | reset | Returns (150) to 0.15. |
| 152 | Font | Attribute font: empty, Romans or Arial. Stored in the preferences. |
| 153 | Change height on inserted signs.. | Applies the height at (150) to the signs already in the drawing. Not available in this version. |
| 154 | Scale tutorial | A video about scale. Not available in this version. |
| 155 | (the checkbox naming a country programme) | A stored preference, read by the sign-replacement flow of the paradigm its caption names. |
| 156 | Always visible | A preference. Not used by this version. |
| 157 | Show message if sign not inserted | A preference. Not used by this version. |
| 158 | Show prompt if sign not inserted | A preference, ticked by default. Not used by this version. |
| 159 | Warn if inserted sign is outside view | A preference, ticked by default. Not used by this version. |
| 160 | If the sign dwg definition to be inserted already exists, check whether it is the same | A preference, ticked by default. The check is what the Sync buttons (51, 52) do on demand. |
| 161 | Support | On a projected-type support, the insertion point is the support's. Default. Stored in the preferences. |
| 162 | Sign | The insertion point is the sign's. |
| 163 | Check and validate sign on insert | A preference, ticked by default. The validation itself (14) is not available in this version. |
| 164 | Continuous mode | A preference, ticked by default. In this version the insertion is always continuous: the command repeats the point prompt until Esc. |
| 165 | Index search | A preference of the content search. Not used by this version. |
| 166 | Do not set attributes | Disabled on the form. |
| 167 | Include sign content in search | A preference of the content search. Not used by this version. |
| 168 | Do not fill attributes | A preference. Not used by this version. |
Commands tab
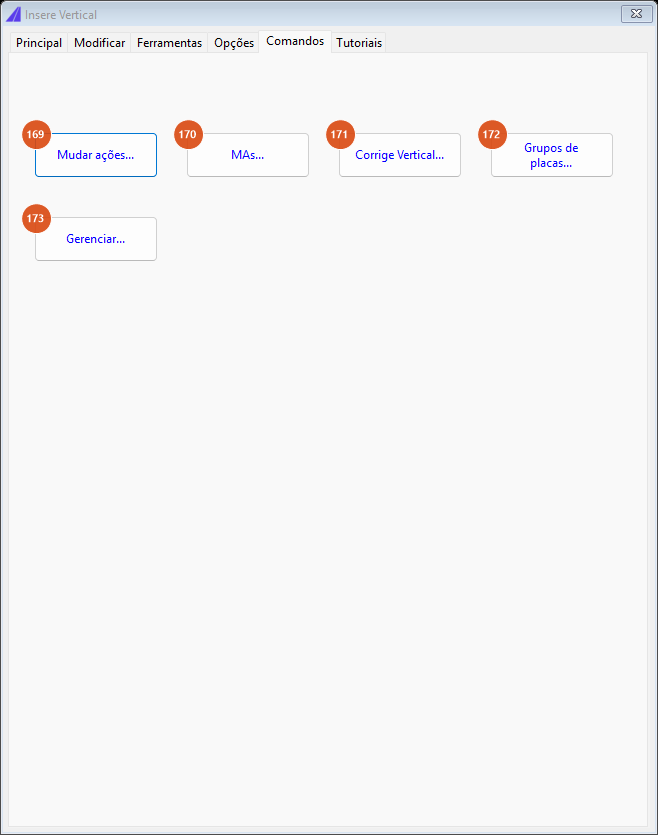
The Commands tab: shortcuts to the other vertical-signing commands.
| # | Control | What it does |
|---|---|---|
| 169 | Change actions... | Opens the action panel (CAPCAD_ACTION_PANEL). |
| 170 | MAs... | Opens the batch alignment markers (CAPCAD_MA). |
| 171 | Vertical Tools... | Opens Vertical Tools (CAPCAD_SIGNS_FIX). |
| 172 | Sign groups... | Not available in this version. |
| 173 | Manage... | Opens Manage vertical signing (CAPCAD_SIGN_MANAGE). |
Tutorials tab
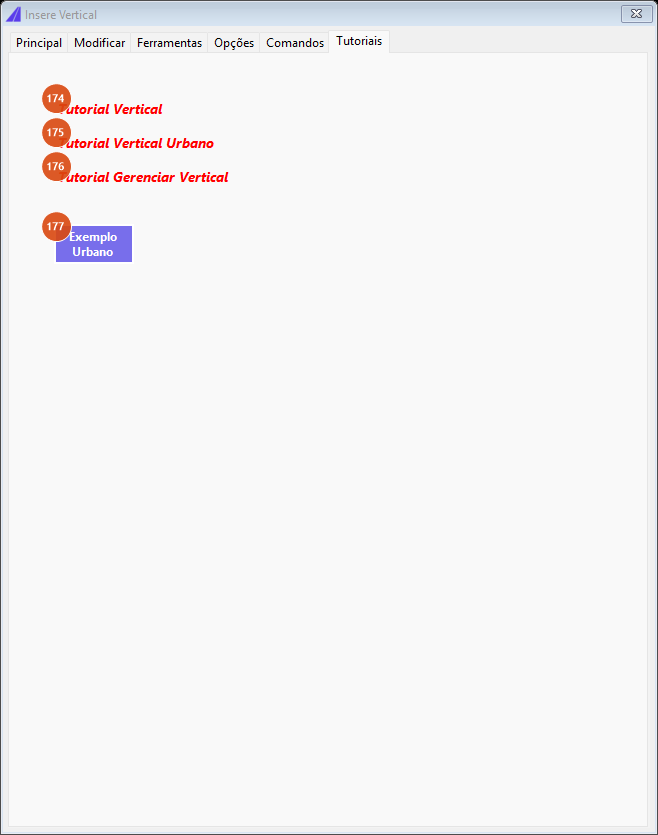
The Tutorials tab.
| # | Control | What it does |
|---|---|---|
| 174 | Vertical tutorial | Opens the video on YouTube. |
| 175 | Urban Vertical tutorial | Opens the video on YouTube. |
| 176 | Manage Vertical tutorial | Opens the video on YouTube. |
| 177 | Urban example | Loads a sample urban drawing. Not available in this version. |
How the options combine
This page has no generated figures: a sign's geometry comes from the library dwg and the insertion needs an open drawing (blocks, attributes, dynamic properties, selection).
The five methods, step by step
| Method | What the command asks for | Where the sign lands | Angle | Support |
|---|---|---|---|---|
| Clicked point and rotate (75) | a point, then the rotation | at the clicked point | zero, then the angle you drag out | its own |
| In existing assembly (76) | a sign already inserted | above it, in the direction of its rotation + 90°, at a distance of the block height (hatches excluded) times the scale, plus 5 units | the same as the reference sign | none: the new sign gets no support |
| Km (77) | (not available) | behaves like Clicked point and rotate | — | its own |
| In existing support or block (79) | a block | at the block's insertion point if it really is a support (it has SUP_COD/POST_CODE); on any other block — a gantry, say — at the point you clicked |
the chosen block's + 90°, followed by an orthogonal rotation | Sem; the sign is tied to the chosen block by xdata |
| Perpendicular to alignment (82) | a point | at the foot of the perpendicular to the alignment, offset laterally per the Alignment offset frame | the alignment's tangent at the foot of the perpendicular, turned 180° when the direction is decreasing | its own |
In the In existing support or block method, when the chosen block is a projecting arm (its support visibility starts with "BRAÇO PROJETADO EM SPU" or "BRAÇO PROJETADO EM COLUNA"), the final rotation is not asked for: the sign takes the arm's direction.
The perpendicular method in detail
- The click is projected onto the alignment chosen at (84)/(86). The foot of the perpendicular must be within 200 m of the click; beyond that, or with no alignment there at all, the command asks whether to insert the sign standalone. Yes inserts at the clicked point and asks for the rotation; No ends the command.
- The angle is the alignment's tangent at the foot of the perpendicular. With decreasing (70) ticked, 180° is added.
- The offset comes from the Alignment offset frame: a fixed value (91/92), measured from the entities (96), or none at all (94, Keep point, which leaves the sign at the clicked point).
- The sign of the offset follows the side you clicked on: the sign goes to whichever side of the alignment the cursor is on, not to a fixed side.
- Shift (85) moves the insertion along the alignment. When it is used, the reading direction is worked out from the click side and the Direction buttons are ignored.
Actions, layers and representation
| Button | Action stored | Layer | Representation in the default style |
|---|---|---|---|
| Insert (36) | IMP |
ROAD_SIGN_NEW (blue, ACI 5) |
Normal — the sign's own colours |
| Keep (38) | MAN |
ROAD_SIGN_KEEP (yellow, ACI 2) |
GrayShaded — the sign in greys |
| Remove (37) | REM |
ROAD_SIGN_REMOVE (red, ACI 1) |
XShapedGray — grey with an X over the sign; the support loses its fill |
| Replace (39) | SUB |
ROAD_SIGN_REPLACE (cyan, ACI 4) |
Normal |
| Custom insert (45) | the custom action | ROAD_SIGN_<ACTION> |
per the style, Normal if it says nothing |
The names and colours above are those of the default layer catalogue for an English profile; a style may rename them, prefix them and change the colours, and another culture uses another family of names (SINA_VERT_* in Portuguese, SENA_VERT_* in Spanish). The representation of each action also comes from the style: Placa.ImplantarStyle, Placa.ManterStyle, Placa.RemoverStyle and the open map Placa.AcaoStyles, which accepts any action.
Scale and exaggeration
The final size comes from three multiplied values:
- the drawing scale (31), 1000 by default;
- the sign exaggeration factor (146) — the scale is multiplied by factor ÷ 10, so 10 is natural size and 20 doubles the sign;
- the support exaggeration factor (148), which acts the same way on the support.
For urban work the usual scale is 1:500 rather than 1:1000; to re-adjust signs that are already inserted, use the ⟳ (32) beside the scale.
Colour variants of warning signs
There are three variants of the yellow warning sign: the standard one, OBRA (orange, ACI 30) and LIMA (fluorescent lime green, ACI 60). In this version they are inserted by picking the corresponding dwg in the library — the -OBRA or -LIMA suffix is part of the file name, and the command recognises those suffixes when it normalises the name. The Warning colour box (20) is not available in this version: choosing a value only prints a notice on the command line.
Sign assemblies and composite signs
Assemblies — two or more signs on the same support — are built with the In existing assembly method (76): insert the first sign normally, then, with method (76) on, pick the sign already inserted as the reference to stack the next one on. The new sign inherits the reference sign's chainage, latitude/longitude, extra text and scale.
In this version the connecting line between the two signs of an assembly is not available (the insertion reports ConjuntoLineDeferred), and the Ext.line field (29) is not used: the spacing is the reference block's height times the scale, plus 5 units.
Composite signs (a warning sign with a text plate under it, for instance) are not a mechanism of their own: they are whole signs from the common library (source 8), inserted exactly like any other.
Custom actions
Beyond the four standard actions, the Custom inner tab offers a list of extra actions — in an English profile DAMAGED, CONFIRMA and PRIORITY. An action that is not one of the known ones passes through the normalisation untouched and becomes a layer of its own, ROAD_SIGN_<ACTION>, which lets you separate and check those groups in the drawing.
The Insert button (45) stamps the action chosen in the list (43) and uses the matching layer. With the list empty it warns and inserts nothing. To stamp a custom action on signs already inserted, use Change actions (44 or 169), which opens the action panel.
Changing the action of signs already inserted
Outside the form, four commands change the action of signs and supports already drawn. Each asks for a selection — the sign, the support or both — which you confirm with Enter:
| Command | Shortcuts | Action |
|---|---|---|
CAPCAD_ACTION_IMPLANT |
IMP, COL |
Insert (place, in urban vocabulary) |
CAPCAD_ACTION_MAINTAIN |
MAN, EXI |
Keep (existing) |
CAPCAD_ACTION_REMOVE |
REM, RET |
Remove |
CAPCAD_ACTION_RELOCATE |
— | Relocate |
SUB calls the sign replacement and TRO the sign swap. All of these are described on Sign actions and Swap and replace signs.
Urban mode
Urban mode is not an option of the form: it follows from the project style. A handful of style paradigms put the project into urban mode. In the Project Manager, select the style and save; the insertions after that use it.
In urban mode the support code is written with the action attached (IMP <code>, and <code> EX for an existing one), and the actions change name in the project's vocabulary: Insert becomes Place, Keep becomes Existing. The usual scale goes from 1:1000 to 1:500. To re-adjust signs already inserted to the new scale, use the ⟳ (32).
Moving signs without losing the coordinates
The sign and the support are linked by xdata, and the coordinate and chainage attributes are written at insertion time. When you move a sign + support assembly, select both, by the joint between them: the pair stays consistent. If you move only the sign and leave the support where it is, the stored coordinates and chainage still hold — they describe the support's point, which has not moved. Once the support has moved, the coordinates must be recomputed with Vertical Tools (CAPCAD_SIGNS_FIX, shortcut CV, also reachable from button 171).
Reconnecting a sign to its support
If a sign drifts off its support, go to the Modify tab and use Fit sign to support (103): select the sign and then the support, and the position and rotation are corrected automatically. Fit support to sign (104) does the reverse and asks for the support first.
The two commands without a form
The two sibling commands insert a sign without opening the window. Both use the same preferences (the scale, the fixed offset and the exaggeration factors come from whatever Insert Vertical last stored).
CAPCAD_SIGN_INSERT_SIMPLE — shortcut IP
Asks for the sign code on the command line and inserts; then asks again, in a loop, until you cancel. Enter at the code prompt repeats the last sign used, which is remembered between sessions.
For each sign the flow is:
- One speed-limit code triggers a speed prompt first (
Enterleaves it for later); it does not fire on other profiles' speed-limit signs. - With no alignment in the project, it says so, asks for the point and inserts with interactive rotation.
- With an alignment, the prompt is
Placa para eixo ou <Enter> para [Avulsa/EixoRotacionarApos]: - clicking a point projects the sign onto the physical sub-alignments, gives it the tangent angle, the chainage read from the reference sub-alignment, the latitude/longitude of the project's coordinate system and the stored fixed offset (default 2 m). A click more than 1000 m from any alignment is refused, with an explanation of the possible causes;
Avulsaor a bareEnter: clicked point and interactive rotation;EixoRotacionarApos: a point that is evaluated against the first element of the alignment only; the sign stays at the click, with the tangent angle. Here the chainage and the latitude/longitude are not filled in.
The detect and defined curbs offset modes are not available by this route: the command says so and uses the fixed value.
CAPCAD_SIGN_INSERT_STOP_SIGN — shortcut R1
The same flow, with the sign fixed to the stop sign of the active country profile. One insertion per run.
-CAPCAD_SIGN_INSERT — for scripts
The command-line variant, with no window and no clicks beyond the point: it asks in sequence for the sign, the action (Implantar / Manter / Remover), Eixo or PontoClicado, the point, the direction (Crescente / Decrescente / Identificar), the offset (a number or Detectar, which uses the distance from the click to the alignment), whether it is the left-hand curb, and finally an attribute/value loop ended by Enter. It requires an active alignment. Choosing PontoClicado only reads the point and ends. The keywords are Portuguese in every language.
Remembered between sessions
Written when the window closes and restored the next time it opens:
- the scale (31) and the support line extension (143);
- the sign (146) and support (148) exaggeration factors, and the attribute height (150) and font (152);
- the fixed offset (92) — always written, whether or not Fixed is selected, because the
IPandR1commands use it too; - the assembly line extension (29);
- Check and validate sign on insert (163), the country-paradigm checkbox (155), No support (64) and the projected support reference (161/162);
- the method chosen (75 to 82), the alignment mode (84/86/88/89) and the offset mode (91/94/95/96);
- the active inner tab of the actions and of the style options;
- the support representation (62), which is written the instant you choose it, not on closing;
- the sign grid's view mode (large icons / list / details).
The IP command separately stores the last sign code typed.
Notes
- The window is single and modeless. Running
IVwith it open only brings it to the front. During the insertion loop it hides and comes back at the end; the command's messages appear on the CAD command line. - No sign selected, no insertion. Clicking an action without choosing a sign only writes "Select a sign" on the status line.
- Sign not found. If the code is in none of the folders and not in the drawing, the
GENERICAsign is inserted in its place, keeping the original code in the code attribute. Check the command line: the insertion reportsGenericInserted. - The attributes filled in at insertion time are, in an English profile,
SIGN_CODE,SIGN_KM,SIGN_LAT,SIGN_LON,SIGN_LAT_LON,SIGN_NORTH,SIGN_EAST,SIGN_X,SIGN_Y,SIGN_X_Y,SIGN_AREA,SIGN_DIM,SIGN_DIM_AREA,SIGN_ALIGNMENT,SIGN_STATE,SIGN_STATE_2,SIGN_EXTRA,SIGN_SIDEand the composite-code tag, whose name is not translated. The prefix isPLACA_in Portuguese andSENAL_in Spanish. - Criteria-driven filling. Filling guided by the project criteria module is not available in this version; where it would be used, the insertion reports
CriteriaFillDeferredand the default values are applied. - Alignment markers. Signs whose code starts with
ma(and theMP-1/MP-2/MP-3family) automatically use the simplified support. To insert them in bulk, use MAs... (170). - Not available in this version: the Km method (77/78), the custom action list (43), the warning colour variant (20), the mirroring (21/22), the insertion's 3D mode (25 to 27), the assembly line extension (29), the content search (4), By click (15), Validate (14), Zoom / Reset / Select (33 to 35), the Rearrange tab (40 to 42), and most of the Tools tab — each unavailable button says so on the command line.
- Some captions and identifiers are Portuguese in every language: the support appearance and representation values (53, 62), the block visibility states, the script variant's keywords, and several command-line replies. The item count beside the list also switches to "N signs" after the first listing, in every language.