| Commands | CAPCAD_ALIGNMENT_DRAW (draw), CAPCAD_ALIGNMENT_AUXILIARY (auxiliary alignments), CAPCAD_ALIGNMENT_SEGMENT_IDENTIFY (identify segment), CAPCAD_ALIGNMENT_TRIM_BREAK (trim / break along the alignment) |
| Shortcut | EIXO for CAPCAD_ALIGNMENT_DRAW |
| Ribbon | CapCad tab › Manage panel › Alignments split button › Desenha Eixo [EIXO], Eixos Auxiliares and Identifica SubElemento; CapCad tab › Horizontal panel › Multi trim/break em eixo |
| Category | Manage: Alignment (the first three); Horizontal: tools (CAPCAD_ALIGNMENT_TRIM_BREAK) |
| Forms | EixoAuxForm — Auxiliary Alignments, modeless, one instance; RoadCleanerForm — Road cleaner, modeless, one instance. CAPCAD_ALIGNMENT_DRAW and CAPCAD_ALIGNMENT_SEGMENT_IDENTIFY have no form |
| Hosts | CAPCAD_ALIGNMENT_DRAW and CAPCAD_ALIGNMENT_TRIM_BREAK: AutoCAD, BricsCAD, GstarCAD, ZWCAD, ARES Commander. The other two: AutoCAD |
| Also opened by | CAPCAD_ALIGNMENT_AUXILIARY is the Auxiliary alignments… button of the Alignment Manager; CAPCAD_ALIGNMENT_DRAW is the Centre line [EIXO] action on the Actions tab of the same form |
The alignment is a file, not an entity — and these are the commands that bring it into the drawing and use it to edit the drawing. Draw the centre line on the right layer, colour and linetype; keep kerbs and other alignments as properties of the alignment; and use the alignment as a ruler to trim and break the markings of a whole stretch.
- One command, the right line.
EIXOdraws the whole alignment on the catalogue's layers, with the colour of each segment's type, and stores the handle of every entity so the geometry can be re-read later. - Auxiliary alignments that stay. Kerbs, offsets, right-of-way limits or any other line are stored inside the alignment, as named properties — they travel with the project and do not depend on the drawing being open.
- The selection's layer is preserved. When an auxiliary alignment is stored, each element carries the layer it was on; drawn back, it returns to the same layer.
- Identify a segment with one click. A click highlights the nearest segment and shows its type, length, radius, centre and internal angle.
- Trim and break by station. Road cleaner cuts the markings between two points — clicked, or given as stations — on every layer you filter, and knows how to cut the other way round.
- Multiple breaks in one pass. A list of stations, one per line, and CapCad breaks everything at each of them, with a per-station success report.
What it does
The four commands on this page work on an alignment that is already defined — see the Alignment Manager for how one is created.
| Command | What it is for |
|---|---|
CAPCAD_ALIGNMENT_DRAW |
Draw the project's centre line into the drawing, on the CapCad layers. |
CAPCAD_ALIGNMENT_AUXILIARY |
Store, list, draw and delete the auxiliary alignments — curves kept as properties of the main alignment. |
CAPCAD_ALIGNMENT_SEGMENT_IDENTIFY |
Find which segment of the alignment lies under a point, and see its geometric data. |
CAPCAD_ALIGNMENT_TRIM_BREAK |
Trim or break the drawing's entities over a stretch delimited by two points on the alignment. |
A word on terminology. CapCad keeps the distinction its Portuguese makes: the alignment (eixo) is the project's centre line, and an auxiliary alignment (alinhamento) is any other reference line stored beside it. That is why the Manager's button reads Auxiliary alignments….
Drawing the alignment
CAPCAD_ALIGNMENT_DRAW (shortcut EIXO) asks for nothing: it draws the whole active alignment.
- Each segment becomes a polyline on the layer the layer catalogue gives to the alignment (
CAPCAD_EIXO-[type-]namein the default style), coloured by type — one-way carriageway = 1, two-way carriageway = 5, access = 93, edge = 4, highway = 2, untyped = 6 — with linetypeSETA_CONT_1at scale 20 and a constant width. - Every drawn entity gets the
DrawnAlignmentxdata, and its handle is written back onto the segment. It is that handle the Reread from polyline button of the Alignment Manager uses later to re-read the edited geometry. - The command line reports how many segments were drawn.
- With no alignment defined, the command asks Não há um eixo definido ou o mesmo é inválido. Favor checar em Gerenciador de Eixos. and offers to open the Alignment Manager there and then.
The sibling command CAPCAD_ROAD_KERB_DRAW does the same with the kerb curves stored on the alignment — left, right and auxiliary kerbs — each on its own style layer. If the alignment carries none of the three, it says so.
Auxiliary alignments
An auxiliary alignment is a curve stored as a property of the main alignment, with a name. That is how kerbs, offsets, right-of-way limits, access alignments and any other reference geometry travel with the project: they live in the .capcad file, not in the drawing.
The form opens even with no alignment defined — in that case the list shows only the three system entries.
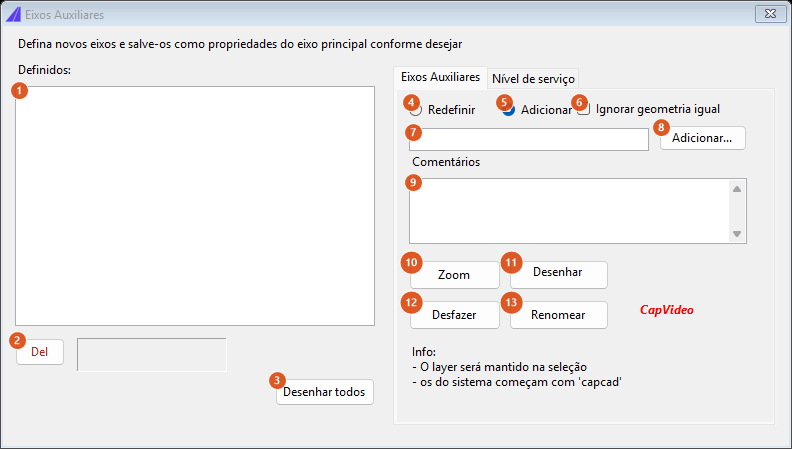
The Auxiliary Alignments form (Portuguese render; the layout is identical in every language): the list of the defined ones on the left, the definition and the actions on the right.
| # | Control | What it does |
|---|---|---|
| 1 | Defined: list | Two columns: the name and the kind. The three system entries come first — capcad.profile (the vertical profile), capcad.alignment.aux (the auxiliary alignment) and capcad.alignment.bordo.aux (the auxiliary kerb) — followed by every other stored curve, alphabetically, marked as Geometry; then the alignment's properties that have the shape of a station,value series, marked as Linear property. Selecting a Geometry row fills the name in (7), brings the stored comments into (9) and shows how many segments it has in the readout beside Del. The Linear property rows are informational here — edit them in Alignment properties. |
| 2 | Del | Deletes the selected property from the alignment, after confirming Tem certeza? Esta ação NÃO é passível de undo. Favor manter um becape de seus eixos. The alignment file is written at once. |
| 3 | Draw all | After confirming Todos os eixos serão desenhados. Deseja continuar?, draws every curve stored on the alignment — on the layer each element carries, or on the current layer when it carries none. It reports how many were drawn. |
| 4 | Redefine | Storage mode: the selection replaces the curve stored under that name, and the comments of (9) are stored with it. |
| 5 | Add | Storage mode (default): the selection is appended to the curve already stored, leaving the stored comments alone. When nothing exists yet under that name, either mode does the same — the first definition wins, comments included. |
| 6 | Ignore same geometry | Not used by this version. |
| 7 | name box | The name of the property to define. Selecting a row of the list fills it; type to create a new one. Left empty, button (8) has no effect. |
| 8 | Add... | Hides the form, you select the entities in the drawing, and they are stored on the alignment under the name of (7), per mode (4)/(5). The layer of each entity is captured with it, so that drawing it back puts it in the same place. The alignment file is written at once. |
| 9 | Comments | Free text stored with the curve. It is only written in Redefine mode (or on the first definition). |
| 10 | Zoom | Frames the selected curve. Empty curve: Não definido. |
| 11 | Draw Selected | Draws the selected curve. The layer captured on each element wins; elements with no captured layer fall back to EIXOS_BORDOS_AUX for the system auxiliary kerb, or to EIXOS_AUX at linetype scale 10 for the system auxiliary alignment; in every other case, to the current layer. The drawn entities are kept for Undo. Empty curve: Não definido. |
| 12 | Undo | Erases the entities of the last Draw Selected (11) run. It does not undo a Draw all. |
| 13 | Rename | Not available in this version. |
| — | CapVideo | Decorative label. It only appears in the Brazilian country profile and has no action. |
| — | Nível de serviço tab | Not available in this version. |
Identifying the segment
CAPCAD_ALIGNMENT_SEGMENT_IDENTIFY asks for a point and looks, across the whole active alignment, for the segment (pair of vertices) whose perpendicular foot is nearest. When it finds one it:
- draws a highlight — a polyline 15 units wide over that segment, on the non-plottable auxiliary layer;
- shows a box with the segment's description;
- erases the highlight as soon as you close the box.
The description gives the type (Line or Arc) and the length; for an arc, also the tangent angle at the end of the segment, the radius, the centre and the internal angle. Nothing found: Sub elemento não encontrado.
The command works on the segment, not on the alignment element: in a polyline with several vertices it isolates the stretch between two consecutive vertices.
Road cleaner: trim and break
CAPCAD_ALIGNMENT_TRIM_BREAK uses the alignment as a ruler to cut the drawing's entities over a stretch. It is the road-marking clean-up command: take the lines out of a stretch where an access comes in, break every line at a station, or erase everything outside a stretch.
The form is modeless and hides itself during the clicks.
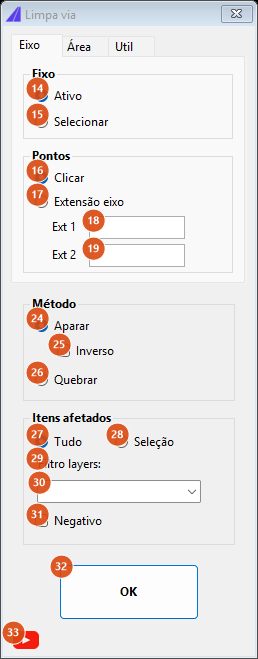
Alignment tab in Trim mode: the two length boxes, Ext 1 and Ext 2, delimit the stretch. (Portuguese render; the layout is identical in every language.)
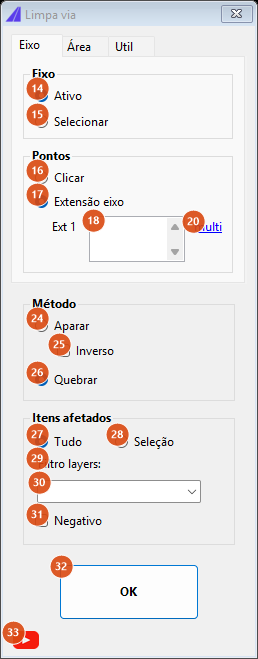
In Break mode, Ext 2 disappears, Ext 1 becomes a multi-line box — one station per line — and the "multi" notice (20) appears beside it.
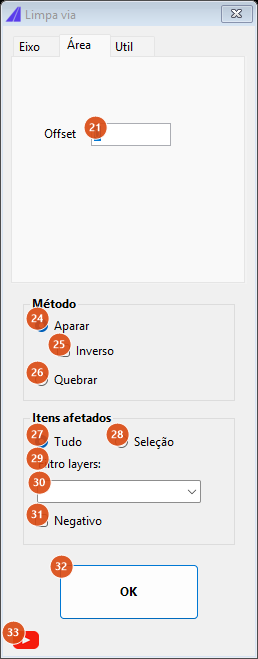
Area tab: a single field, the offset of the area clip.
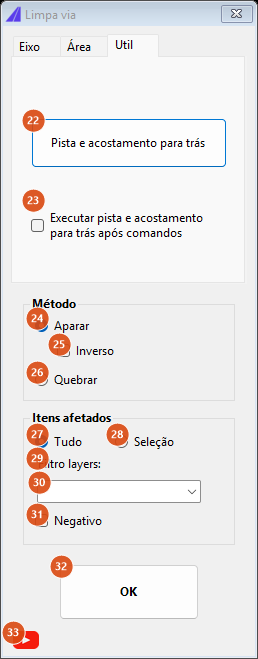
Util tab: send carriageway and shoulder to the back, now or after every command.
Tab 1: Alignment
| # | Control | What it does |
|---|---|---|
| 14 | Active | Uses the drawing's active alignment as the reference. It is disabled when the drawing has no alignment; when it has one, it is always the pre-selected option, even if the last session ended on Select. |
| 15 | Select | Asks for a curve in the drawing (Selecione EIXO referência…) to act as the alignment for that run. |
| 16 | Click | The points that delimit the stretch are clicked in the drawing: Point 1… and, in Trim mode, Point 2…. |
| 17 | Alignment length | The points come from station values typed in (18) and (19), converted into points on the reference alignment. Typing in (18) or (19) selects this option on its own. |
| 18 | Ext 1 | The station of the first point. In Break mode the box accepts several lines: one station per line fires a break at each of them, with a report. Going back to Trim mode keeps only the first line. Empty: Provide value for point 1. |
| 19 | Ext 2 | The station of the second point. It only appears in Trim mode. Empty: Provide value for point 2. |
| 20 | multi | Notice, visible only in Break mode: Para modo break com extensão de eixo, possibilidade de entrar com valores múltiplos. The same text appears as a hover tooltip. |
Tab 2: Area
| # | Control | What it does |
|---|---|---|
| 21 | Offset | With this tab in front, the OK button (32) runs the area clip instead of the alignment cut: the road-marking entities are trimmed against an area, offset by this amount, and the layer filter (29–31) applies the same way. No control of the Alignment tab is read on that path. |
Tab 3: Util
| # | Control | What it does |
|---|---|---|
| 22 | Send carriageway and shoulder back | Sends, there and then, the carriageway and shoulder entities to the back of the display order. |
| 23 | Send carriageway and shoulder back after the commands | Does the same automatically after every OK. |
Method, affected items and OK
| # | Control | What it does |
|---|---|---|
| 24 | Trim | Removes the stretch between the two points from every entity that crosses it, keeping what is outside. The automatic selection is a crossing window around the stretch with 25 units of slack, and the perpendicular reach is 1000 units. After a trim, the carriageway and shoulder are always sent to the back. |
| 25 | Inverse | With Trim: keeps only the stretch between the two points and erases the rest of each entity. |
| 26 | Break | Splits every open entity at the perpendicular foot of one point, keeping both pieces. The perpendicular reach is 100 units; closed entities are not broken. |
| 27 | Everything | The command acts on the whole model space (filtered by 29–31). |
| 28 | Selection | The command asks for a selection on screen before acting, and works only on it. |
| 29 | Layer filter: | Shows the filter explanation: Layer cujo nome contenha o texto serão incluídos. Separar múltiplos com vírgula. The same text appears as a hover tooltip. |
| 30 | (filter box) | Empty, everything is in. Plain text includes the layers whose name contains that text. A comma-separated list includes the layers whose name is exactly equal to one of the items. The comparison ignores case. |
| 31 | Negative | Inverts the filter: keeps the layers that do not match. With an empty filter nothing changes — there is nothing to invert. |
| 32 | OK | Runs. With the Area tab in front, it runs the area clip and stops. Otherwise: it resolves the alignment, asks for the selection if needed, gets the points, and cuts. Before cutting, if the points are off screen, CapCad frames the stretch (Trim) or centres the point (Break) and warns Pontos input fora tela - enquadrando. Two identical points in Break mode raise Pontos iguais providos and the command carries on. Points beyond the perpendicular reach: 1 ou mais pontos inválidos, provavelmente fora do limite (1000 unidades de desenho). |
| 33 | (YouTube icon) | Opens the Road cleaner video. |
How the options combine
The figures below come from the cut engine itself, run on four parallel lines and two clip points.
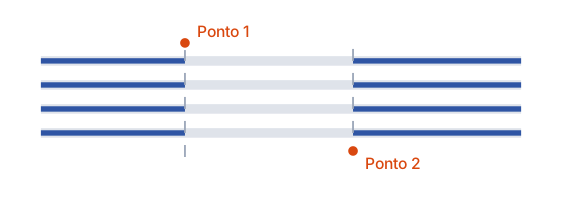
In Trim mode the stretch between the perpendicular feet of the two points is removed from each line (shown in light grey where it was), and the two ends remain. Note that the points need not lie on the entities: each one is cut at its own perpendicular foot.
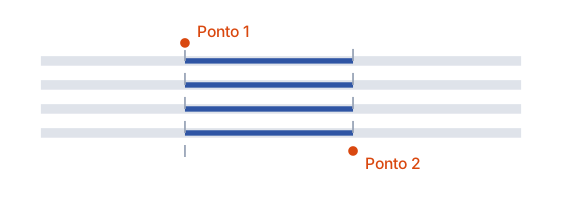
In Trim mode with Inverse ticked, the same clip the other way round — only the middle survives.
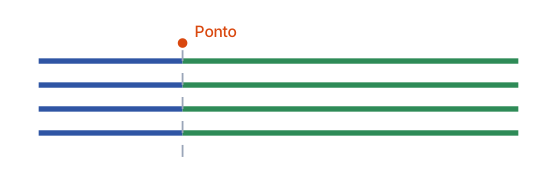
In Break mode, a single point, and every open line becomes two independent pieces (blue and green). The geometry does not change; what changes is that there are now two entities.
Remembered between sessions
- The Road cleaner form saves its options on close, under the key
FORM_LIMPA_VIA: method, affected items, layer filter, negative, the area offset and the Util-tab box come back as you left them. - The exception is the alignment choice: an active alignment is always the default option when the form opens, whatever was saved. With no active alignment, Select takes over.
- The Auxiliary Alignments form saves no preferences.
Notes
CAPCAD_ALIGNMENT_TRIM_BREAKopens with no alignment defined. The form always opens and the Active / Select rule sorts it out.- The cut works by perpendicular foot on each entity, not by a straight cutting line. Entities that do not reach the stretch are left untouched.
- The multiple break (several stations in Ext 1, in Break mode) re-selects the whole model space for each station and shows a report at the end with
OKorFAILper line. On that path the on-screen check is skipped. - Editing the polyline drawn by
CAPCAD_ALIGNMENT_DRAWdoes not change the alignment: the alignment is the file. After editing, use Reread from polyline in the Alignment Manager. - The system entries of the auxiliary-alignment list are recognisable by the
capcadprefix in the name — which is what the form itself notes at the bottom. - Undo (12) only covers the last Draw Selected (11) run; a Draw all (3) has to be undone with the CAD's own undo.
- The prompts and refusals of these commands (Selecione EIXO referência…, Provide value for point 1, Pontos input fora tela - enquadrando, Sub elemento não encontrado, Não definido, the filter and multi hints, and the no-alignment question) read the same in every language; they are quoted above as the software shows them.
- The keyboard alias
BORDOis not available in this version;EIXOpoints atCAPCAD_ALIGNMENT_DRAW.
See also
- Alignment Manager — create the alignment, its segments and its stations.
- Alignment Tools — free chainage and the unifilar diagram.
- Alignment properties — the per-station values.
- Navigating the alignment — zoom, alignment and profile side by side, and driving the stretch.
- Station Navigator — go to a station and identify a point.