| Commands | CAPCAD_SIGN_ASSISTANT (kilometre posts and speed-limit signs) and CAPCAD_MA (alignment markers) |
| Shortcut | CAPCAD_SIGN_ASSISTANT: none · CAPCAD_MA: MAS |
| Ribbon | CapCad tab › Sinalização Vertical panel › Vertical button › Assistente Vertical: MQs em lote and Marcadores de Alinhamento |
| Category | Vertical |
| Forms | VerticalAssistantForm, titled "Vertical Assistant", tabs MQ and R-19 · VerticalMaForm, titled "MAs", tabs MAs and Ferramentas. Both modeless: the drawing stays live while they are open |
| Hosts | AutoCAD, BricsCAD, GstarCAD, ZWCAD, ARES Commander |
| Also opened by | The MAs form is also opened by the Opções MAs... button of CAPCAD_ANALYTICS_CURVES (Curve Utilities), there only to edit the options: automatic insertion by curve classification is done by the curves command itself, with these same options |
Three families of sign that only the alignment can position: CapCad inserts them in one pass, at the right station and on the right edge. No CAD command knows your project's stationing, and it is the stationing that gives every one of these signs its kilometre, its side and its text.
- Kilometre by kilometre, on its own. The assistant walks the project alignment and inserts a post at every whole kilometre, respecting the starting station, the length factor and the alignment's station equations.
- A different sign at the round kilometres. One block for the ordinary kilometre, another for multiples of 5 and another for multiples of 10, chosen automatically.
- Both directions, with a parity filter. Increasing and decreasing, each able to take only even kilometres, only odd ones or both — the alternation most projects use.
- The attributes come filled in. Road number, region, kilometre, station and post coordinates come from the alignment and from the style in use; nothing is typed sign by sign.
- Speed-limit signs from the design speed. Wherever the design speed changes, the command places the pair of speed-limit signs and can also report the ones already in the drawing.
- Alignment markers in batches on a curve. One click near the curve and every delineator goes in at the spacing of the chosen methodology — a formula or one of the stepped tables.
- The same tool on five CADs. AutoCAD, BricsCAD, GstarCAD, ZWCAD and ARES Commander.
What it does
This page covers the three families of sign that are positioned by the alignment, not by a point you click:
- Kilometre post — the sign announcing the road's kilometre. One per whole kilometre, in each direction, offset from the alignment towards the shoulder.
- Speed-limit sign — the assistant inserts it wherever the design speed recorded on the alignment changes value.
- Alignment marker, or delineator — the small sign that follows a curve and shows the driver where it goes. Several per curve, spaced as a function of the radius.
All three depend on one common concept: the project's alignment. A CapCad alignment is not merely a polyline — it carries the stationing (starting station, length factor and station equations), a type (one-way carriageway, two-way carriageway, road, access, edge) and a series of per-station properties, among them the design speed. Define the alignment in the Alignment Manager before running either of these commands; with no project alignment, both simply report that they could not find one.
Three things come from the alignment on every insertion:
- The station. The position is computed in station space and returned as a measure along the alignment. The value goes into the sign's station/km attribute.
- The side. The point is displaced perpendicular to the alignment by the offset value. A sign facing the increasing direction goes to the right-hand edge of a driver going up the stationing (tangent − 90°); the decreasing one goes to the opposite edge.
- The layer. It comes from the sign's action (implant, keep, remove, substitute) through the layer catalogue of the style in use — the same rule as for any sign CapCad inserts.
CAPCAD_SIGN_ASSISTANT opens the Vertical Assistant, with the MQ tab (kilometre posts) and the R-19 tab (speed-limit signs). CAPCAD_MA opens the MAs form. Both are modeless and keep their options for as long as the CAD session lasts.
Workflow
Kilometre posts
- Define the project alignment and run
CAPCAD_SIGN_ASSISTANT. The form opens on the MQ tab, with the project name at the top and the list of alignments in the footer (31), in the form1: 0 a 10512— alignment index, starting station and end station. - If the alignment name contains a road number, the BR field (13) comes prefilled and highlighted in pale blue.
- Check the three sign blocks (1, 2, 3), the road number and region (13, 15), the Offset eixo (16) and the directions and parities under Inserir (4 to 9).
- Click Criar (30). The form disappears while the command runs.
- At the end a summary appears with one line per alignment:
Trecho 1: 12 marcos quilométricos inseridos. - If the result is not what you wanted, click Redefinir (26): the signs and posts drawn by the last run are erased.
Speed-limit signs
- Record the alignment's design speed through the Alignment Properties command (the
VelocidadeDiretrizproperty, indexed by station). - In the Vertical Assistant, go to the R-19 tab and choose Adicionar R-19s (28).
- Click Criar (30). The command reads the speed stretches of the first alignment in the project and inserts a pair of signs at each change of band.
- To check what is already in the drawing, choose Relatório R-19s (29) and click Criar: a text window opens with the speed-limit signs found, grouped by direction and by kilometre.
Alignment markers
- Run
CAPCAD_MA(shortcutMAS). The MAs form opens on the MAs tab. - Choose the Metodologia (32 to 39), the Representação (56, 57) and the Offset (68).
- Under Eixo, choose Corrente (66) to use the project alignment or Selecionar (67) to pick a curve in the drawing. The big button's caption follows the choice.
- Click Inserir MAs em curva (71). If you chose Selecionar, the command asks for the curve.
- Click near the curve you want to sign. The command finds the segment nearest to the click and inserts the markers for that whole curve.
- The command keeps asking for clicks: sign one curve after another. Esc ends it and brings the form back.
The click has to land on a segment with curvature. On a straight stretch the command answers "Curva não encontrada no ponto (segmento reto)" and waits for the next click. If the nearest curve is more than 1000 m from the click, it asks before going on.
The form: Vertical Assistant
Numbers are the same in every screenshot of this page; controls 30 and 31 sit outside the tabs and appear on both.
These forms show Portuguese captions in every language, so the tables below quote the caption you will see and give its English meaning beside it.
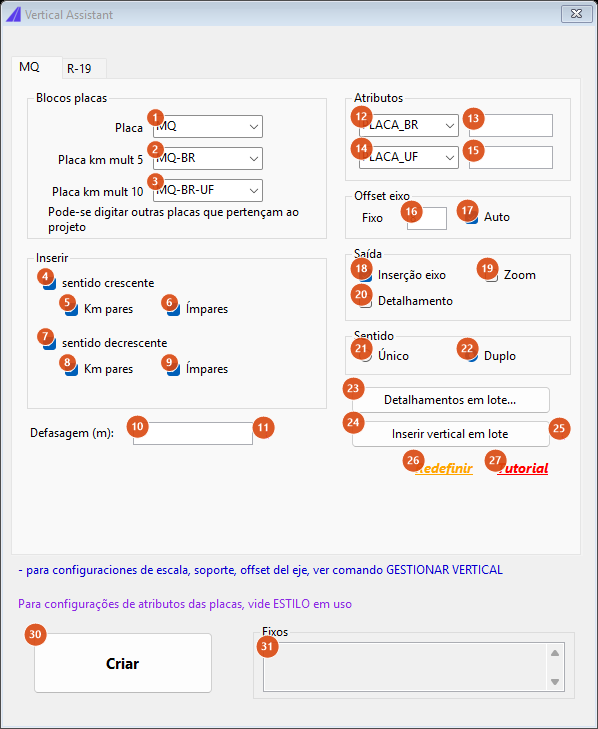
The MQ tab, default state: the three sign blocks, the two directions with both parities ticked, fixed offset 8 and the Duplo direction mode.
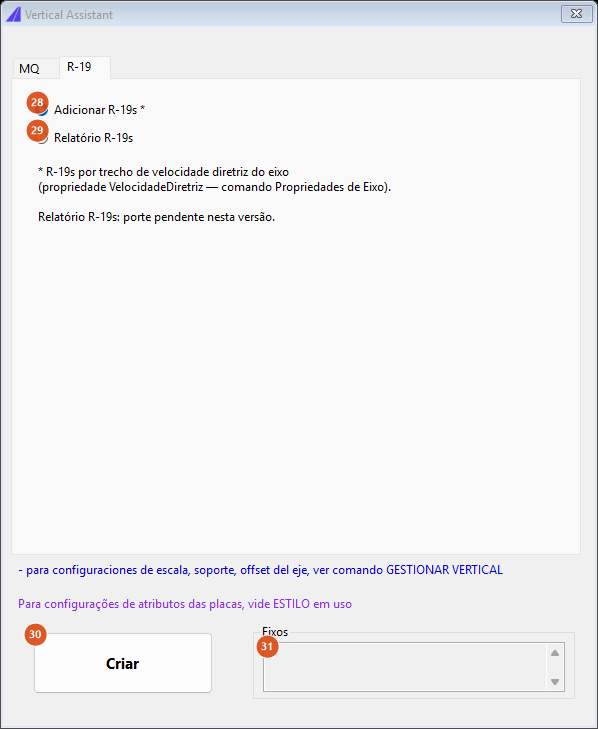
The R-19 tab: two options and the same Criar button in the footer.
MQ tab · Blocos placas (sign blocks)
| # | Control | What it does |
|---|---|---|
| 1 | Placa (Sign) | Block used for ordinary kilometres. The list offers MQ, MQ-BR, MQ-BR-UF, MQ-UF and MQ-UF-2, but the field is editable: any sign belonging to the project can be typed. Default MQ. |
| 2 | Placa km mult 5 | Block used for kilometres that are multiples of 5 but not of 10. Default MQ-BR. |
| 3 | Placa km mult 10 | Block used for kilometres that are multiples of 10 — and also for km 1, which is an exception in the command. Default MQ-BR-UF. |
Before drawing anything, the command looks for the three blocks in the project's sign folders. If any is missing, nothing is inserted and the list of the missing ones appears, with a message saying the blocks defined here must live in one of the sign folders defined by you or your CapAdmin.
The default block names are the Brazilian profile's. The three fields are free text, so under another country profile type the names of your own kilometre-post blocks; the command does not derive them from the active profile.
MQ tab · Inserir
| # | Control | What it does |
|---|---|---|
| 4 | sentido crescente (increasing direction) | Inserts the post facing a driver travelling in the direction of increasing stations, on the right-hand edge of that direction. |
| 5 | Km pares (even km, increasing) | Restricts the increasing-direction posts to even kilometres. |
| 6 | Ímpares (odd, increasing) | Restricts the increasing-direction posts to odd kilometres. Ticking 5 and 6 together gives every kilometre a post. |
| 7 | sentido decrescente (decreasing direction) | Inserts the post facing the opposite direction of travel, on the opposite edge. |
| 8, 9 | Km pares, Ímpares (decreasing) | The same filter for the decreasing direction. |
The two directions cannot both be unticked: the command answers "Selecionar sentido crescente e/ou decrescente". And a ticked direction needs at least one of the two parities — otherwise "Alternância par/ímpar válida" appears and the four parity boxes turn pale blue to draw your eye.
The classic use is exactly the crossed one: increasing on odd kilometres only and decreasing on even ones (or the other way round), so that the road gets one post per kilometre, alternating sides.
MQ tab · Defasagem (offset of the chainage)
| # | Control | What it does |
|---|---|---|
| 10 | Defasagem (m) | Shifts the kilometre numbering relative to the alignment's stationing. A positive value brings the kilometres forward: with an offset of 250, the km 2 post is inserted at station 1750 of the alignment, and 1750 is what goes into the station attribute. Negative values are accepted. Empty or zero = no offset. |
| 11 | ? | Help text: for situations where the kilometre posts do not follow the stationing; accepts positive and negative values, and arithmetic expressions. |
The offset can be applied to one alignment at a time only. If the project has more than one alignment and the field is filled in, the command warns "Para modo defasagem, rodar comando em um eixo de cada vez" and asks on the command line for the alignment index (1 to N, the same indices as the Eixos box).
MQ tab · Atributos
| # | Control | What it does |
|---|---|---|
| 12 | Nome do atributo da BR (road-number attribute tag) | Attribute tag that receives the road number. Default PLACA_BR; the field is editable. |
| 13 | BR | The value written into that attribute. Filled automatically from the alignment name when it contains a road number; when the automatic fill happens, the field takes a pale blue background. |
| 14 | Nome do atributo da UF (region attribute tag) | Attribute tag that receives the region. Default PLACA_UF, also editable. |
| 15 | UF | The value written into that attribute. |
If one of the three chosen blocks has BR in its name and the BR field is empty, the command asks before continuing, with Prosseguir (continue) and Cancelar buttons. The same question exists for UF. Inside the run itself, with either field empty, one more confirmation appears.
Besides the road number and the region, every post receives:
- K0, K1, K2, K3 — the first four digits of the kilometre number, one per attribute (used by the kilometre-post blocks of some country profiles; on blocks that do not carry those tags they are simply ignored).
- the kilometre in the sign's extra-text attribute;
- the station (the post's station minus the offset), the post coordinates and the alignment name, filled in by the same mechanism as for any CapCad sign, according to the style in use.
One project paradigm also rewrites the sign code, stripping the road/region suffixes and appending the kilometre with three digits.
MQ tab · Offset eixo
| # | Control | What it does |
|---|---|---|
| 16 | Fixo (Fixed) | Perpendicular distance between the alignment and the post, in drawing units. Default 8; leaving it at zero also gives 8. |
| 17 | Auto | Detect the offset from the alignment's defined edges. Not available in this version: the command uses the fixed value (16). |
MQ tab · Saída (output)
| # | Control | What it does |
|---|---|---|
| 18 | Inserção eixo (Insert on the alignment) | Draws the signs. Unticked, the command walks the alignment but inserts nothing. |
| 19 | Zoom | Zoom to each sign as it is inserted. Not available in this version. |
| 20 | Detalhamento (Detail sheet) | Generate the detail sheet for each post. Not available in this version; the final summary changes wording, but no sheet is produced. |
The final summary carries, in square brackets, a tag for each ticked option that is not available in this version — that is how the command tells you a ticked option had no effect.
MQ tab · Sentido (direction mode)
| # | Control | What it does |
|---|---|---|
| 21 | Único (Single) | Treats the alignment as a one-way carriageway: the decreasing post is inserted by the left-edge convention, which also marks the sign's attributes as inverted and moves the sign a little further from the post. |
| 22 | Duplo (Double) | The default. The decreasing post is inserted as a decreasing-direction sign on the opposite edge. |
This choice only applies to alignments with no type defined: an alignment of type one-way carriageway forces Único and one of type two-way carriageway forces Duplo, whatever is ticked here.
MQ tab · Buttons and links
| # | Control | What it does |
|---|---|---|
| 23 | Detalhamentos em lote... (Batch detail sheets) | Not available in this version: writes a line into the status bar saying so. |
| 24 | Inserir vertical em lote (Batch sign insertion) | Not available in this version: writes a line into the status bar saying so. |
| 25 | ? | Reminder: for other combinations, use the batch sign insertion command. |
| 26 | Redefinir (Reset — orange) | Erases the signs and posts drawn by the last kilometre-post run and reports how many entities were removed. Entities already deleted by hand are ignored without error. Speed-limit signs are not on that list. |
| 27 | Tutorial (red) | Opens the tutorial video in the browser. |
R-19 tab
| # | Control | What it does |
|---|---|---|
| 28 | Adicionar R-19s (Add speed-limit signs) | Inserts the speed signs at the changes of design speed along the alignment (see below). |
| 29 | Relatório R-19s (Speed-limit sign report) | Sweeps the drawing and lists the speed-limit signs already inserted, by direction and kilometre. |
With Adicionar R-19s the command reads the design-speed property of the first alignment in the project, which is a series indexed by station; every station with a value opens a speed stretch (empty values are ignored). At every change of stretch, at the station where the stretch ends, it inserts two signs:
- one facing the increasing direction, carrying the speed of the next stretch — the sign the driver going up the stationing sees on entering the new stretch;
- one facing the decreasing direction, carrying the speed of the current stretch.
At the end of the alignment there is only the decreasing sign, closing the last stretch. The offset from the alignment is fixed at 8 units and the speed goes into the sign's extra-text attribute. If the alignment has no design speed recorded, the status line answers "R-19: propriedade VelocidadeDiretriz não definida no eixo."
With Relatório R-19s the command looks in model space for every block whose name starts with the speed-limit code, pairs each with its post, projects the post's point onto the alignment (discarding anything more than 100 units away), rounds to the whole kilometre and reads the speed from the extra-text attribute. The side is decided by the cross product between the alignment tangent and the vector from the foot to the post. The result appears in a text window with two lists, CRESCENTE and DECRESCENTE, each line carrying the kilometre and the speed. With no usable sign, "Relatório R-19 sem dados." appears.
The speed-limit code is always
R-19. Both the insertion and the report use that code regardless of the active country profile. Under another profile this tab will insert a sign of that code, and its report will find nothing. Insert the speed-limit signs of your own profile through the ordinary sign insertion command instead.
Footer (on both tabs)
| # | Control | What it does |
|---|---|---|
| 30 | Criar (Create) | Runs whatever the selected tab asks: the kilometre-post insertion on the MQ tab, the speed-sign insertion or the report on the R-19 tab. |
| 31 | Eixos (Alignments — read-only) | One alignment per line, index: start station to end station. It is by this index that the offset mode asks for the alignment. |
Above the button sit two fixed reminders: the scale, post and alignment-offset settings live in the sign management command, and the sign attribute settings live in the style in use. Below, a grey status line shows progress and the command's messages.
The form: MAs
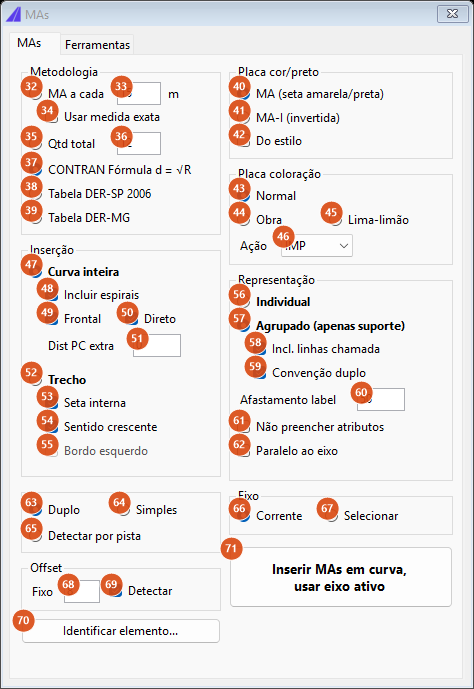
The MAs tab, default state: the √R formula methodology, grouped representation, double markers and the current alignment.
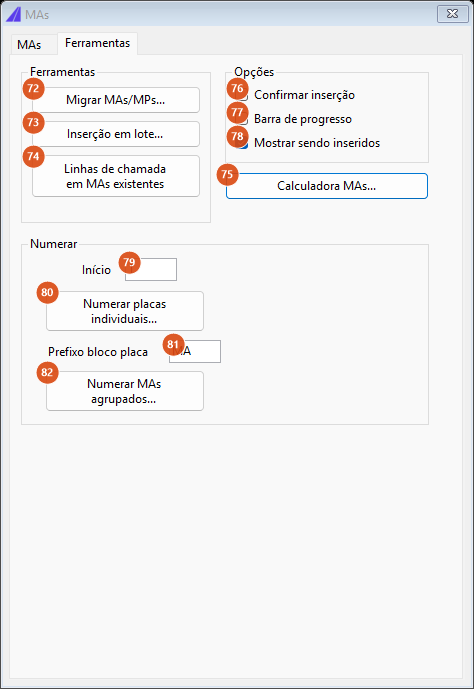
The Ferramentas tab: insertion options and the numbering utilities.
Metodologia
| # | Control | What it does |
|---|---|---|
| 32 | MA a cada (One marker every) | A spacing you type. The number of divisions of the curve becomes the arc length divided by that value, rounded. |
| 33 | MA a cada value | The distance, in metres. Default 15. |
| 34 | Usar medida exata (Use the exact measure) | Belongs to the Trecho (stretch) mode; no effect on whole-curve insertion in this version. |
| 35 | Qtd total (Total count) | A fixed number of markers per curve, whatever the radius. |
| 36 | Qtd total value | The count. Default 12. The curve is divided into count − 1 parts, which gives exactly that many markers counting both ends. |
| 37 | d = √R formula | The default. The spacing is the square root of the curve radius, in metres. |
| 38 | First stepped table | Spacing by radius band, from 5 m on the tightest curves up to 30 m on the flattest. Curves of 15 m radius or less get no markers. |
| 39 | Second stepped table | The same bands as the first up to a mid radius; above that radius the table foresees no markers, and the curve gets none at all. |
The captions of controls 37, 38 and 39 name the Brazilian regulator and two Brazilian state highway authorities; the exact radius bands of the two tables are on the Portuguese edition of this page. Outside Brazil, use MA a cada (32) with the spacing your own norm gives, or Qtd total (35).
Once the methodology is chosen, the number of markers is the curve length divided by the spacing, rounded; the curve is then divided into that many equal parts and both ends are included. A curve that comes out with a single division gets only the two ends.
Two confirmations guard against a click on an enormous curve: above 100 divisions the command asks "Inserir N MAs (raio R)?", and above 120 markers (or always, if Confirmar inserção is ticked) it asks again with the final count.
Placa cor/preto and Placa coloração (marker block and colouring)
| # | Control | What it does |
|---|---|---|
| 40 | MA (seta amarela/preta) (normal delineator) | The ordinary delineator. The block comes from the active country profile — see the table below. |
| 41 | MA-I (invertida) (inverted delineator) | The inverted variant. Only the Brazilian profile has one; under every other profile this choice does not change the block. |
| 42 | Do estilo (From the style) | Applies the project's graphic style to the label sign of the grouped mode. Unticked (the default), the label sign ignores the style. The station markers always ignore it. |
| 43 | Normal | The delineator's default colour. |
| 44 | Obra (Roadworks) | Uses the -OBRA variant of the block (roadworks orange). |
| 45 | Lima-limão (Lime) | Uses the -LIMA variant of the block. |
| 46 | Ação (Action) | The sign's action: IMP (implant), MAN (keep), REM (remove) or SUB (substitute). It decides the layer the sign and the post are drawn on. |
The -OBRA and -LIMA variants require the matching block to exist in the sign folders; otherwise the generic sign is used.
The delineator block per country profile. The MA command derives the block from the active profile and accepts no other code:
| Country profile | Block | Inverted variant |
|---|---|---|
| Brazil | MA |
MA-I |
| Peru | P-61 |
— |
| Mexico | od-12_45x60 |
— |
| Uganda | W62 |
— |
| every other profile | CHEVRON (the generic chevron shipped in Support) |
— |
Inserção
| # | Control | What it does |
|---|---|---|
| 47 | Curva inteira (Whole curve) | The only mode available in this version: each click signs the whole curve you clicked on. |
| 48 | Incluir espirais (Include spirals) | Extend the curve into the transition spirals. Not available in this version; insertion uses the arc only. |
| 49 | Frontal | The side the markers are inserted on, relative to the alignment. |
| 50 | Direto (Direct) | The direction the markers are inserted in, relative to the stationing. Reversing it also swaps the side. |
| 51 | Dist PC extra | Extends the curve before the PC and after the PT by this distance, along the alignment, before dividing it. Zero = use the exact arc. If the extension cannot be built, the tag DistPcExtraFailed appears in the status line. |
| 52 | Trecho (Stretch) | Stretch insertion mode: not available in this version. Selected, the insert button only answers "Modo Trecho: porte pendente — use Curva inteira." |
| 53 | Seta interna (Inner arrow) | Belongs to the Trecho mode; no effect in this version. |
| 54 | Sentido crescente (Increasing direction) | Belongs to the Trecho mode; no effect in this version. |
| 55 | Bordo esquerdo (Left edge) | Belongs to the Trecho mode; disabled on the form. |
Representação
| # | Control | What it does |
|---|---|---|
| 56 | Individual | Each station gets the sign and the post, like any other traffic sign. |
| 57 | Agrupado (apenas suporte) (Grouped — post only) | The default. Each station gets the post only (with the dynamic arm adjusted), and the curve gets one label sign in the middle, offset sideways, carrying the kilometre range of the stretch (start km to end km). It is the drafting convention that avoids repeating the sign dozens of times on the plan. |
| 58 | Incl. linhas chamada (Include leader lines) | Draws a line from each post to the label sign, on layer CAPCAD_VERTICAL_MA_CHAMADA (colour 8), created if missing. Grouped mode only. |
| 59 | Convenção duplo (Double convention) | In grouped mode with Duplo, duplicates the label sign displaced and mirrored, with its attributes cleared, to represent both directions. Works only together with Paralelo ao eixo (62); in any other combination the tag ConvencaoDuploParaleloOnly appears in the status line and the copy is not made. |
| 60 | Afastamento label (Label offset) | Distance between the middle of the curve and the label sign. Default 50; values below 1 are treated as 100. |
| 61 | Não preencher atributos (Do not fill attributes) | Inserts the station markers without filling their attributes. |
| 62 | Paralelo ao eixo (Parallel to the alignment) | Turns the label sign to sit parallel to the alignment instead of perpendicular, with the corresponding position compensation. |
The label sign always has its coordinate attributes (PLACA_X and PLACA_Y) cleared: it represents a stretch, not a point.
Duplo, Eixo and Offset
| # | Control | What it does |
|---|---|---|
| 63 | Duplo (Double) | The default. Each station gets a second marker on the same post, facing the opposite direction, with no post of its own and no extra offset. |
| 64 | Simples (Single) | One marker per station. |
| 65 | Detectar por pista (Detect from the carriageway) | Decides from the alignment type: an alignment of type two-way carriageway gets double, any other gets single. |
| 66 | Corrente (Current) | Uses the project alignment. |
| 67 | Selecionar (Select) | Asks for a curve in the drawing and works on it. |
| 68 | Fixo (Fixed, offset) | Perpendicular distance between the alignment and the marker. Default 8. |
| 69 | Detectar (Detect) | Detect the offset from the defined edges. Not available in this version; the fixed value is used. |
| 70 | Identificar elemento... (Identify element) | Not available in this version: answers "Função pendente de porte nesta versão." |
| 71 | Inserir MAs em curva / usar eixo ativo | Starts the click loop. The caption follows controls 47/52 and 66/67. |
Ferramentas tab
| # | Control | What it does |
|---|---|---|
| 72 | Migrar MAs/MPs... | Not available in this version. |
| 73 | Inserção em lote... (Batch insertion) | Not available in this version. |
| 74 | Linhas de chamada em MAs existentes (Leader lines on existing markers) | Not available in this version. |
| 75 | Calculadora MAs... (Marker calculator) | Not available in this version. |
| 76 | Confirmar inserção (Confirm insertion) | Makes the command ask for confirmation before inserting each curve's markers, even when the count is small. |
| 77 | Barra de progresso (Progress bar) | No effect in this version. |
| 78 | Mostrar sendo inseridos (Show them being inserted) | No effect in this version. |
| 79 | Início (Start, for numbering) | First number of the numbering. Belongs to the numbering features, not available in this version. |
| 80 | Numerar placas individuais... (Number individual signs) | Not available in this version. |
| 81 | Prefixo bloco placa (Sign block prefix) | Prefix of the block to number. Belongs to the numbering features, not available in this version. |
| 82 | Numerar MAs agrupados... (Number grouped markers) | Not available in this version. |
The four buttons and the two numbering boxes write "Função pendente de porte nesta versão." into the status line and change nothing in the drawing.
How the options combine
The figures below were produced by running the commands' own engines — the kilometre-post station generator and the marker spacing engine — over sample alignments and curves.
Where the kilometre posts fall
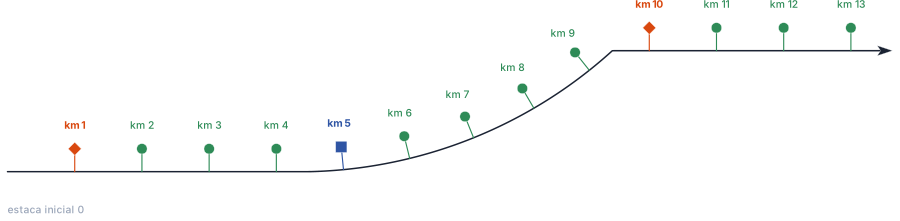
An alignment 13.45 km long starting at station 0. One post per whole kilometre: green = ordinary block, blue = multiple-of-5 block, orange = multiple-of-10 block. Km 1 uses the multiple-of-10 block (the command's exception) and km 0, at the start of the alignment, gets no post.
The first post
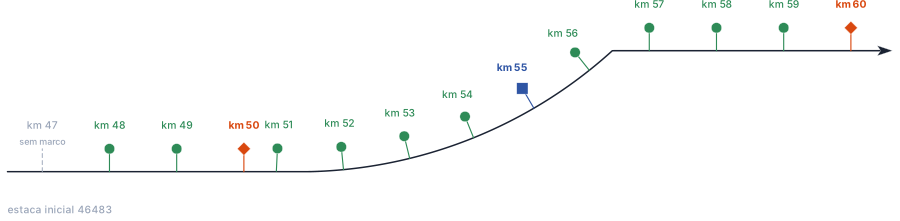
The same alignment with a starting station of 46483. The first post falls a whole kilometre after the alignment's first round kilometre: km 47 (station 47000, 517 m from the start) gets no post and the first post is km 48, 1517 m from the start.
That is the station generator's rule in every case: the kilometre the alignment starts in never gets a post. On an alignment starting at station 0, the first post is km 1; on one starting at station 46483, the first is km 48. If that first kilometre's post is needed, insert it with the ordinary sign insertion command, or extend the alignment backwards.
With station equations, the alignment is split into affine stretches between the equations and each stretch is treated the same way: the kilometre a stretch starts in also gets no post.
Chainage offset
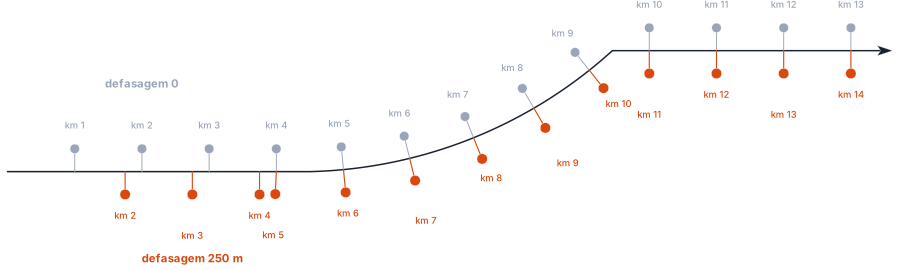
Grey: offset 0, posts km 1 to 13 at stations 1000, 2000 … Orange: offset 250 m, posts km 2 to 14 at stations 1750, 2750 … The kilometre numbering runs 250 m ahead of the stationing, and the station recorded on each sign is the alignment's real station.
Direction and edge
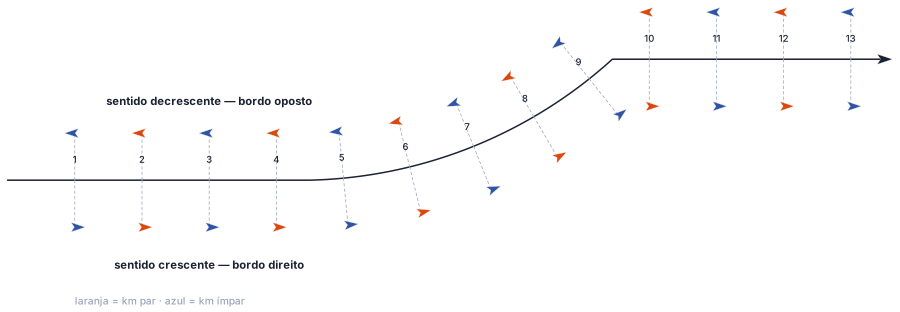
The increasing-direction post goes to the right-hand edge of a driver going up the stationing; the decreasing one goes to the opposite edge, facing the other way. The offset is exaggerated in the figure so that it fits; in the command it is the value of the Offset eixo field.
The parity filters
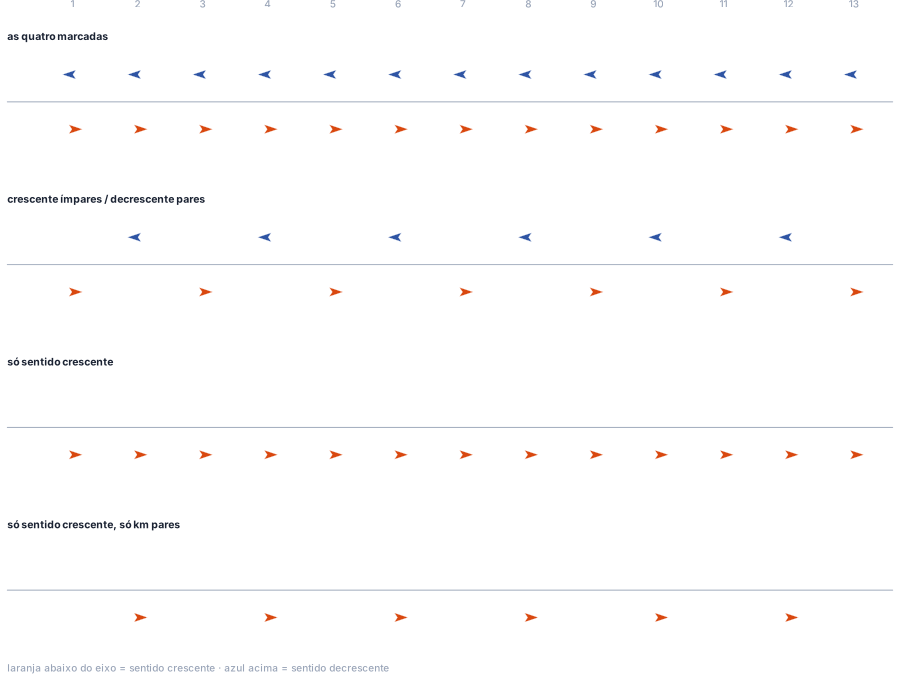
The same 13 stations with four combinations of the Inserir boxes. The second row is the classic alternation: increasing on odd kilometres, decreasing on even ones — one post per kilometre, changing sides at each one.
Alignment marker spacing
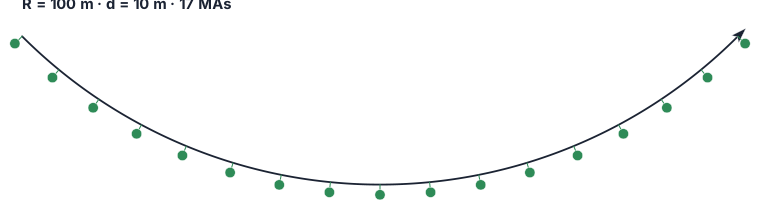
A curve of radius 100 m and 90°, length 157 m. The √R formula: d = √100 = 10 m, 16 divisions, 17 markers counting both ends.
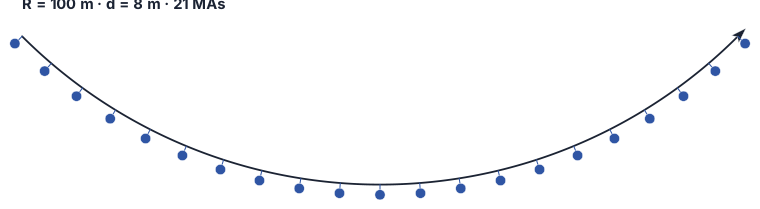
The same curve under the first stepped table: the radius falls in a band that gives d = 8 m, 20 divisions, 21 markers.

A curve of radius 500 m and 40°, length 349 m, under the first stepped table: d = 20 m, 18 markers.

The same curve under the second stepped table: no markers at all, because that table stops below this radius.
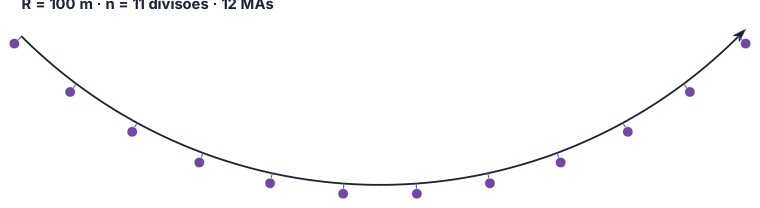
A curve of radius 100 m with Qtd total = 12: the radius stops mattering and the curve gets exactly 12 markers, counting both ends.
Remembered between sessions
Both forms keep their options for as long as the CAD is open: closing the form syncs everything you typed, and reopening it gives the same values back. Nothing is written to a configuration file — restarting the CAD returns both forms to their defaults (blocks MQ / MQ-BR / MQ-BR-UF, attributes PLACA_BR / PLACA_UF, offset 8, all directions and parities ticked, Duplo, and on the MAs form the √R methodology, Agrupado, Duplo, label offset 50 and the Corrente alignment).
The BR field is the practical exception: it is refilled from the alignment name every time the assistant opens, as long as it is empty.
Notes
- Posts are only inserted on carriageway alignments. Elements of type access, road and edge are skipped — they still appear in the summary, with a count of zero (
Trecho 3: 0 marcos quilométricos inseridos.). - When the project mixes an alignment of type road with carriageway alignments, the stationing is that of the first alignment, and each station is projected perpendicularly onto the alignment being signed. That is how the carriageways of a dualling get their posts at the same cross sections.
- An alignment with negative stations produces posts with negative kilometre numbers; the command warns at the end.
- Each kilometre-post run tags the signs of one alignment with a group identifier, so that
CAPCAD_SELECT_GROUPcan reselect the set later. The markers of each curve also get their own. - Redefinir only knows the last kilometre-post run, and only that: speed-limit signs and markers never go on the list. Closing and reopening the form does not clear the list, but a new run replaces it.
- The speed-limit report decides the direction from which side of the alignment the post is on, not from the sign's angle: a sign turned the wrong way on its own post is listed by the side it is found on.
- The marker options on the MAs form are shared with the Curve Utilities command (
CAPCAD_ANALYTICS_CURVES): there the same methodology, the same block and the same representation are applied automatically to the curves classified as sharp, signable or other, with no click per curve. That is the route to signing a whole alignment in one go. - On the assistant's form, the blue footer line appears in Spanish.