| Commands | CAPCAD_AREA_TRIM · CAPCAD_AREA_TRIM_MARKING · CAPCAD_WIDTH_TO_HATCH · CAPCAD_WIDTH_TO_REGION · CAPCAD_BBOX · CAPCAD_CIRCLE_WIDTH · CAPCAD_COPY_IN_PLACE · CAPCAD_ROTATION_MATCH · CAPCAD_ROTATION_ADD |
| Shortcuts | CX (copy in place) · MR (match rotation) |
| Ribbon | CapCad tab › CAD Utilities panel › Geometry split button (CAPCAD_AREA_TRIM, CAPCAD_WIDTH_TO_HATCH, CAPCAD_WIDTH_TO_REGION) and Draw & Modify split button (CAPCAD_BBOX, CAPCAD_CIRCLE_WIDTH, CAPCAD_COPY_IN_PLACE, CAPCAD_ROTATION_MATCH, CAPCAD_ROTATION_ADD). CAPCAD_AREA_TRIM_MARKING lives elsewhere: Roadway panel › Library split button › Area Trim: Marking |
| Category | Cad Utils: Draw & Modify |
| Form | none: they all ask for the selection and the values on the command line |
| Hosts | AutoCAD, BricsCAD, GstarCAD, ZWCAD and ARES Commander, except CAPCAD_AREA_TRIM_MARKING, CAPCAD_WIDTH_TO_HATCH and CAPCAD_WIDTH_TO_REGION, which are AutoCAD only (on ARES Commander they are not available in this version and say so) |
| Also opened by | CAPCAD_AREA_TRIM does the same as the trim-inside / trim-outside buttons of the curve-utilities form |
Trim dozens of markings against a kerb line in one click, and turn a polyline's width into real geometry. These are the operations that, done with the native TRIM, EXPLODE and BOUNDARY, cost an afternoon.
- Trim by area, not by intersection. You choose a closed boundary and what survives is the side you asked for — inside or outside — across the whole selection at once.
- The boundary can grow. In the road-marking trim, an offset fattens or shrinks the boundary before the cut, to leave the clearance the marking needs.
- The selection makes itself. In that same command, everything the boundary crosses is trimmed: you select nothing.
- Width becomes a boundary. A polyline with constant width becomes its own outline plus a solid hatch — or a region, when a surface is what you want.
- Correct rings. On a closed polyline with width you get the two rings and the hatch between them, not a solid blob.
- The details the CAD is missing. Bounding boxes in bulk, circles and splines converted to polylines so they can take a width, an exact copy in place, and rotation copied from one entity to another.
Trim by area
CAPCAD_AREA_TRIM
Asks first for the boundary and then for what to trim, and deletes whatever falls inside the boundary, keeping what lies outside. The original entities go and are replaced by the pieces that survived.
| Prompt | What to give |
|---|---|
Select the EDGE (closed boundary): |
a closed polyline (or a curve that can be closed). A plain straight line is refused: "The edge must be a closed boundary, not a single straight line." |
Select entities to trim: |
everything that should be trimmed |
Two rules decide the result:
- The cut is by region, not by intersection. Each entity is split at the points where it crosses the boundary, and each piece is classified as inside or outside.
- An entity wholly inside the boundary is preserved. The command removes what crosses the boundary; what never touches it is left as it is, even when it sits in the removal zone.
The command line closes with Area Trim Inside: kept N part(s).
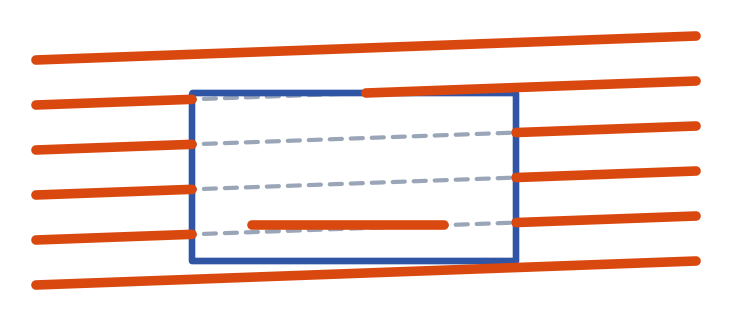
Boundary in blue; dashed, what was there before; orange, what remains. The two lines that never touch the boundary stay whole, and the short segment entirely inside it survives too.
The same trim, called from the curve-utilities form in its outside mode, keeps the inverse:
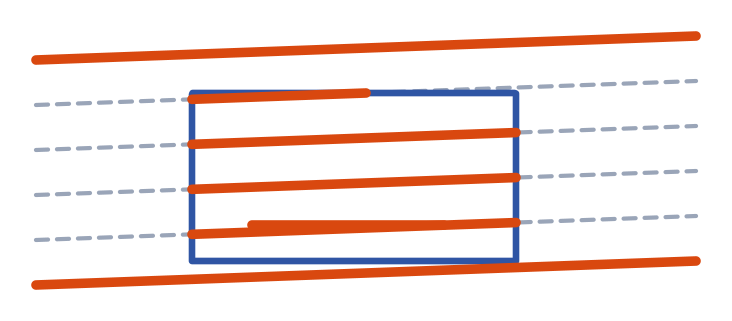
Keeping what is inside: every line that crosses the boundary is cut at it and only the middle survives.
CAPCAD_AREA_TRIM_MARKING
The variant for road markings. There is no selection here: the command asks for an offset and a boundary, and trims everything that boundary crosses.
| Prompt | What to give |
|---|---|
Offset value <last value>: |
how much the boundary should grow before the cut. Enter accepts the last value used; 0 uses the boundary as it is. |
Edge... |
the boundary |
How it works: the command walks the boundary as a fence, collects every entity it crosses — the boundary itself excluded — offsets the boundary by the amount asked for, and trims what fell inside. It closes with Area Trim Horizontal: kept N part(s).; if nothing crosses the boundary, Nothing crosses the edge.
The offset is remembered between runs and between sessions. A boundary that cannot be offset is used as it stands, with the warning Could not offset the edge — using it as-is.
Width into a boundary
A polyline with constant width draws a band, but the CAD stores only the centreline and the number. These two commands turn the band into real geometry. In both, the selection can be made before the command, and the source entity is erased when the conversion succeeds. The original's layer and colour are copied onto the result.
| Command | What it produces |
|---|---|
CAPCAD_WIDTH_TO_HATCH |
The band's outline as a closed polyline, plus an associative solid hatch inside it. |
CAPCAD_WIDTH_TO_REGION |
The outline converted into a CAD region. |
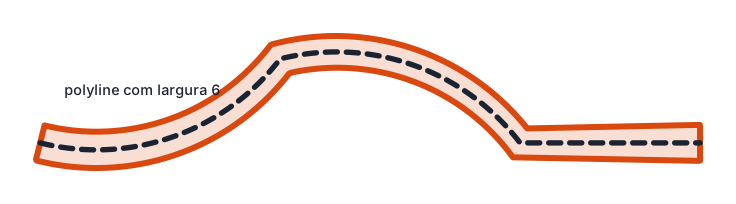
The centreline with width 6 (dashed — the label reads "polyline com largura 6", polyline with width 6) and the closed outline that comes out of it: the two sides offset by half the width, joined at the ends.
On a closed polyline the result is different: you get the two rings (inner and outer) and, in the hatch case, the hatch is created between them — an annulus, not a disc.
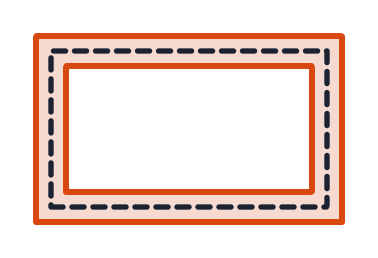
Closed rectangle with width 5: the two rings and the hatch only between them.
When it finishes, the command line reports N converted and, when some entity had no usable width, , M without a usable width. An entity without a constant width is neither converted nor erased.
Boxes, circles, copies and rotations
CAPCAD_BBOX — bounding boxes
Asks for a selection and draws the enclosing rectangle. With more than one entity selected, it asks for the method (Method [All/Individual]:):
| Option | Result |
|---|---|
All (default) |
One rectangle around the whole selection. |
Individual |
One rectangle per entity. |
The rectangles come out as closed polylines on the current layer. Entities with no geometric extents are skipped. At the end: N bounding box(es) drawn.
CAPCAD_CIRCLE_WIDTH — circle, ellipse and spline to polyline
The selection accepts only circles, ellipses and splines. Each is erased and redrawn as the equivalent polyline — with arcs, in the case of the circle and the ellipse. The point is to be able to give the entity a width, which a circle and a spline will not accept.
The command line sums up what was converted and reminds you of the next step: N entity(ies) converted to polyline (…) — set the width via PEDIT or Properties. With nothing eligible: No circles, ellipses, or splines found.
CAPCAD_COPY_IN_PLACE (CX) — copy in place
Duplicates entities without moving them. The behaviour depends on when you select:
| How you use it | What happens to the copy |
|---|---|
| Selecting before running the command | The copy goes onto the current layer, with colour ByLayer, and is brought to the top of the draw order. |
| Running the command first and selecting afterwards | The copy is identical to the original: same layer, same colour, same order. |
The asymmetry is intentional. At the end: N entities created.
The first case is the everyday use: select the marking, switch to the destination layer, run CX, and the copy is born on the right layer and on top.
CAPCAD_ROTATION_MATCH (MR) — copy the rotation
Asks for two entities:
| Prompt | What to give |
|---|---|
Entity to get the angle FROM: |
where the angle comes from |
Entity to APPLY the angle to: |
what receives it |
Where the angle is read from:
- A curve (line, polyline, arc): the tangent at the point you clicked — click near the stretch whose direction matters.
- A block, text or mtext: the entity's own rotation.
What can receive it: a block, a text or an mtext. Anything else answers Target has no rotation to set. The command line confirms with the applied angle in degrees.
CAPCAD_ROTATION_ADD — add an angle to the rotation
Warns that it affects texts and blocks, asks for the angle in degrees (Enter angle to add (degrees):) and then for the selection. Every text, mtext or block in the selection turns about its own insertion point — which is different from the native ROTATE, which turns everything about one common point. An angle of zero ends the command. At the end: Rotated N entity(ies) by X°.
This is the command for straightening labels: select them all and add 90°, each one turning where it stands.
Neighbours in the same ribbon group
Two other commands sit in the Draw & Modify split button and are covered elsewhere in the manual:
CAPCAD_ANGLE_QUERY— click a curve and the command line reports the tangent angle at that point, in degrees, together with the extension along the curve.CAPCAD_LAYER_UNLOCK_ALL— unlocks every layer in the drawing and reports how many were unlocked. See Layer Tools.
Remembered between sessions
One value only: the offset of CAPCAD_AREA_TRIM_MARKING, offered as the default on the next run, including after the CAD is closed.
Everything else starts from scratch: CAPCAD_BBOX goes back to All, and CAPCAD_ROTATION_ADD suggests no angle.
Notes
CAPCAD_AREA_TRIMneither filters by layer nor offsets the boundary. The command goes straight into a trim-inside with no offset and no filter; for those options use the curve-utilities form, orCAPCAD_AREA_TRIM_MARKINGfor road markings.- The offset boundary is not self-trimmed. A concave boundary with a large offset can produce loops; check the result before carrying on.
- Width-to-region does not subtract the hole. On a closed polyline you get two regions, one per ring, not an annulus; SUBTRACT them in the CAD if you want the void. With the hatch, the annulus comes out correctly.
- The hatch can fail without losing the boundary. When the CAD refuses the hatch, the outline already drawn stays and the conversion still counts as a success.
- The prompts and answers are in English in every language —
Select the EDGE (closed boundary):,Method [All/Individual]:,N entities created.and the rest.