| Command | CAPCAD_MARKING_CROSSING_TSRGD |
| Shortcut | none |
| Ribbon | CapCad tab › Traffic Control panel › Transverse split button › Crossings (simplified) (in the United Kingdom ribbon, under the Pedestrian Cross split button); tooltip Zebra Crossing Simplified |
| Category | NEW |
| Form | ZebraCrossForm (modeless: the drawing stays live while it is open) |
| Hosts | AutoCAD, BricsCAD, GstarCAD, ZWCAD, ARES Commander |
| Also opened by | The Airport form's "zebra crossing" action runs this command |
A zebra crossing in two clicks. Pick the crossing line from kerb to kerb and the stripes, the give-way lines and the stud lines are drawn together, TSRGD style, and redrawn every time you change a value.
- Live preview. Every change on the form erases the previous result and draws it again.
- Edge stripes handled. The pattern is centred between the kerbs and the piece next to each kerb is kept at or above the minimum you set.
- Give-way and stud lines included. Both sides at once, at the distance you set, on their own layers, with the give-way lines pulled back from the kerbs.
- Black contrast for the white stripes when the surface needs it.
- Anchors. Decide whether the line you pick is the centre of the crossing, a stripe edge or a give-way line.
- The same tool on five CADs. AutoCAD, BricsCAD, GstarCAD, ZWCAD and ARES Commander.
What it does
The command draws a pedestrian zebra crossing across a straight line you pick with two points, one kerb to the other:
- stripes: white quads (2D solids) along the line, each as wide as the gap between them, extending Length across the road, optionally with black quads in the gaps;
- give-way lines: one polyline on each side of the crossing, at Distance from the stripes, Width wide, optionally shortened from each kerb;
- stud lines: one polyline 0.1 wide on each side, at Gap from the stripes, on the studs layer.
The line you pick is drawn in red as a reference; the marking is regenerated every time a value changes. Closing the form removes the red line and leaves the marking in the drawing.
Workflow
- Run
CAPCAD_MARKING_CROSSING_TSRGD. The form opens beside the drawing. - Choose a preset in the Presets box (25) if one fits (Zebra complete is the full TSRGD layout).
- Click 2 points (1) and pick the crossing line from one kerb to the other. The red line is drawn and the preview appears; the status line at the bottom shows how many elements were drawn.
- Adjust the stripe width (4), the length (5), the minimum edge stripe (7), the give-way and stud lines (17 to 24). Each Enter in a box or click on a check box redraws.
- If the give-way lines land on the wrong feature, pick another anchor (8 to 14) or Invert line (3).
- Close the form. The marking stays; the red reference line is removed.
The form
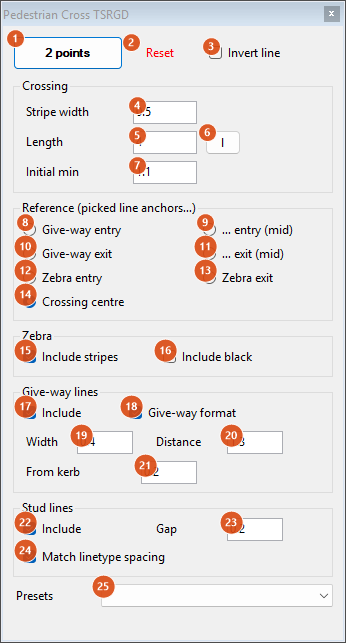
Default state. The form has no hidden panels; the numbers are the same in the Portuguese screenshot.
Top row
| # | Control | What it does |
|---|---|---|
| 1 | 2 points | Hides the form and asks Point 1: and Point 2: (rubber-banded). The line between them is the crossing line. A previous preview is kept: picking a new line starts a new crossing. |
| 2 | Reset | Erases the preview and the red reference line and forgets the line. Status: Reset. |
| 3 | Invert line | Reverses the picked line, which swaps the entry and exit sides used by the anchors. |
Crossing
| # | Control | What it does |
|---|---|---|
| 4 | Stripe width | Width of each white stripe along the line; the gaps between stripes have the same width. Applied on Enter. |
| 5 | Length | Extent of the stripes across the road (transversal to the picked line). |
| 6 | l | Measures the length in the drawing: Base point: then Distance:. |
| 7 | Initial min | Minimum width of the piece next to each kerb. The stripe pattern is centred on the line and the leftover shared between the kerbs; when it is less than this value it grows in half-pattern steps. 0 puts the first stripe flush with the kerb. TSRGD asks for edge pieces of at most 1.3 m, hence the default 1.1. |
Reference (picked line anchors…)
Which feature of the crossing sits on the line you picked:
| # | Control | What it does |
|---|---|---|
| 8 | Give-way entry | The outer edge of the entry give-way line. |
| 9 | … entry (mid) | The centre of the entry give-way line. |
| 10 | Give-way exit | The outer edge of the exit give-way line. |
| 11 | … exit (mid) | The centre of the exit give-way line. |
| 12 | Zebra entry | The entry edge of the stripes. |
| 13 | Zebra exit | The exit edge of the stripes. |
| 14 | Crossing centre | The centre line of the stripes (default). |
Entry is the side towards which the crossing is shifted for the entry anchors; Invert line (3) swaps it.
Zebra
| # | Control | What it does |
|---|---|---|
| 15 | Include stripes | Draws the white stripes (layer of the white crossing stripes). Off: only the lines. |
| 16 | Include black | Adds a black quad in every gap and patches the run so it ends on black at both kerbs (layer of the black stripes). |
Give-way lines
| # | Control | What it does |
|---|---|---|
| 17 | Include | Draws a give-way line on each side of the crossing. |
| 18 | Give-way format | On: the lines go on the give-way layer ROADMARK_WHITE_GIVEWAY and are shortened by From kerb at both ends. Off: a plain full-width line on the white marking layer. |
| 19 | Width | Width of the give-way lines (0.4 by default; TSRGD zebra give-way lines are 0.2). |
| 20 | Distance | Distance from the stripes to the give-way lines. |
| 21 | From kerb | How much each give-way line is pulled in from each kerb, with Give-way format on. |
Stud lines
| # | Control | What it does |
|---|---|---|
| 22 | Include | Draws a stud line on each side, 0.1 wide, on ROADMARK_WHITE_GIVEWAY_STUDS. |
| 23 | Gap | Distance from the stripes to the stud lines. |
| 24 | Match linetype spacing | Not available in this version: the status line adds (spacing match pending linetype defs) and the lines are drawn as they are. |
Presets
| # | Control | What it does |
|---|---|---|
| 25 | Presets | Loads a preset and redraws. |
| Preset | Sets |
|---|---|
| Zebra complete | Stripe 0.5, length 4, initial min 1.1, stripes and black on, give-way on with width 0.2, distance 1.3, from kerb 0.2, format on, studs on with gap 0.2, spacing match on. |
| Only zebra | Stripes on, give-way and studs off. |
| Only studs | Stripes and give-way off, distance 0, studs on with gap 0, spacing match on. |
| Only give way | Stripes and studs off, give-way on, from kerb 0, distance 0, width 0.2, format on. |
| Simple line | Stripes and studs off, give-way on, from kerb 0, distance 0, format off (a plain line). |
| Cycle cross | As Only give way with width 0.4. |
The status line under the presets shows n element(s). after each redraw.
How the options combine
All figures were produced by running the command's own engine on a line 10 units long picked from kerb to kerb. Colours follow the layers (white stripes, black contrast, white lines); the stud lines are shown dotted because the layer's linetype gives them their pattern, in the drawing they are plain polylines 0.1 wide. The magenta dashed line is the picked line.
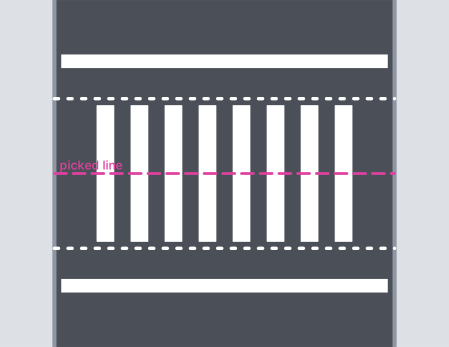
Defaults: stripes 0.5 wide and 4 long, initial min 1.1 (edge pieces of 1.25), give-way lines 0.4 wide at 1.3 from the stripes pulled in 0.2 from each kerb, stud lines at 0.2.
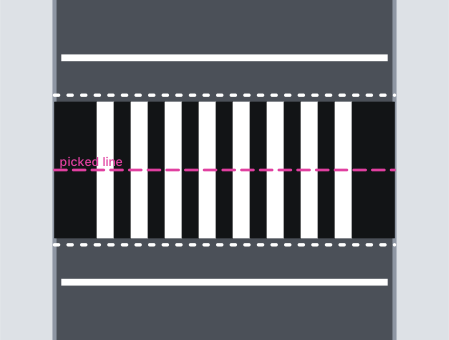
"Zebra complete": black contrast on, give-way lines 0.2 wide.
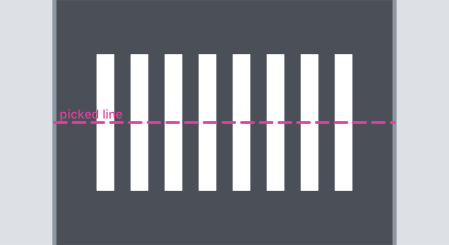
"Only zebra".
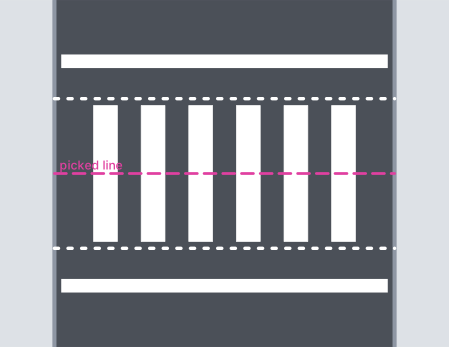
Stripe width 0.7: fewer, wider stripes; the edge pieces grow to keep the pattern centred.
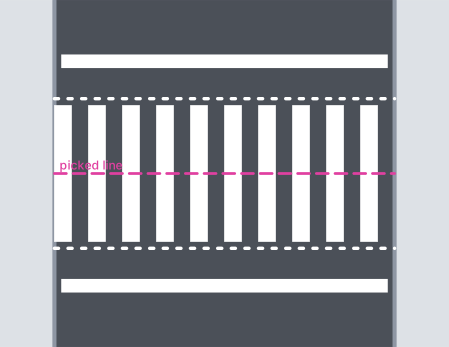
Initial min 0: the first stripe starts at the kerb.
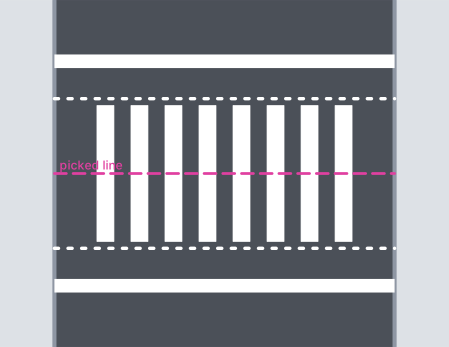
Give-way format off: plain full-width lines on the white marking layer.
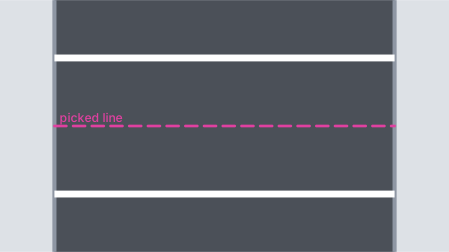
"Only give way": two give-way lines 0.2 wide, at the stripe edges (distance 0), full width.
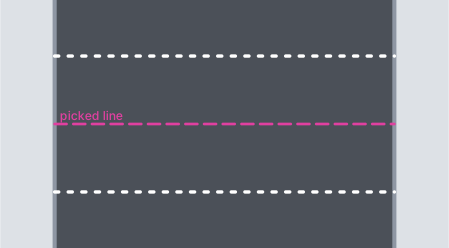
"Only studs": two stud lines at the stripe edges.
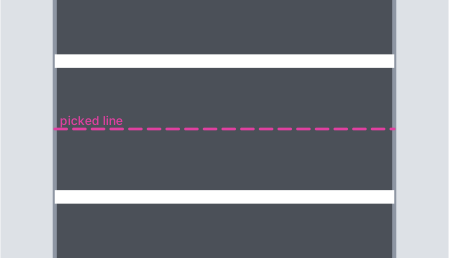
"Simple line": two plain lines 0.4 wide.
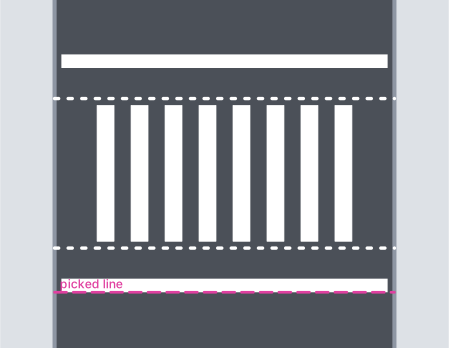
Anchor "Give-way entry": the picked line is the outer edge of the entry give-way line, the crossing is shifted away from it.
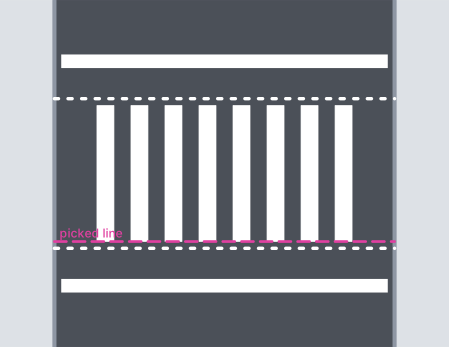
Anchor "Zebra entry": the picked line is the entry edge of the stripes.
Remembered between sessions
Saved when the form closes: stripe width, length, initial min, give-way distance and width, the anchor, and the four check boxes Include stripes, Include black, give-way Include, stud Include and Match linetype spacing. From kerb, stud Gap and Give-way format are not saved and start at 0.2, 0.2 and on.
Notes
- Layers: white stripes
SINA_HOR_BR_FTP, black contrastSINA_HOR_PR_FTP, give-way linesROADMARK_WHITE_GIVEWAY(plain line:SINA_HOR_BRANCA), stud linesROADMARK_WHITE_GIVEWAY_STUDS. Missing layers are created; the black layer gets colour 250 and the others colour 7. - Stripes and black quads are 2D solids; the give-way and stud lines are polylines with constant width. The crossing tags every stripe with
TIPO=BRANCOorPRETO. - Stripe and gap always share one width (4); there is no separate gap value here.
- For the Brazilian and European crossings with stop lines, teeth, approach lanes and legends use Crossings,
CAPCAD_MARKING_CROSSING.