| Commands | CAPCAD_CAPSIGN (interactive editor) · CAPCAD_CAPSIGN_TEMPLATES (templates) · CAPCAD_CAPSIGN_AI (image recognition) · CAPCAD_SIGN_PLACAPRO (shortcut to PlacaPro) |
| Shortcut | none |
| Ribbon | CapCad tab › Sinalização Vertical panel › CapSign group: CapSign, CapSign: AI Image recognition and Atalho para PlacaPro |
| Category | NEW |
| Forms | CapsignTemplatesForm ("Templates CapSign") and CapsignAiForm ("CapSign AI"), both modeless; the editor is a WPF window ("CapSign"), also modeless |
| Hosts | CAPCAD_CAPSIGN_TEMPLATES: AutoCAD, BricsCAD, GstarCAD, ZWCAD and ARES Commander. CAPCAD_CAPSIGN (editor), CAPCAD_CAPSIGN_AI and CAPCAD_SIGN_PLACAPRO: AutoCAD (see the note on the other CADs at the end of the page) |
| Also called by | the LISP function (capcad-capsign-editor "C:/job/P-014.capsign") opens the editor with a file already loaded; the Open in editor button of CapSign AI uses the same path |
Design the sign, not the geometry. A guide sign drawn by hand in the CAD is an exercise in rectangles, offsets and text that nobody can review. In CapSign you type the message and the sign assembles itself, at the sizes the norm asks for.
- Real alphabet metrics. The signing series carry the metrics of the norm itself, letter by letter — width, advance and spacing. It is not a font that looks similar: it is the series.
- The norm does the arithmetic. Line spacing at 3/4 of the letter height, border thickness, breathing gap and corner radius from the plate area, rounding to the commercial sheet grid. You choose the message and the letter height; the rest comes out finished.
- Composition by relations, not by coordinates. Every element anchors to another one ("my top on his bottom, with this gap"). Change one line and the whole sign recomposes — there is nothing to reposition by hand.
- A photograph becomes a sign. Point the AI at a photo of an existing sign and it returns the definition; one click draws the new sign, already laid out.
- The sign joins the project library. The result is saved as a project sign and appears in the sign insertion command like any other, with an optional detail sheet.
- The sign stays editable. The document is a plain-text
.capsignfile: reopen it, change one line and the whole layout is redone — no rectangle-by-rectangle repositioning.
What it does
CapSign is CapCad's sign layout tool: it assembles a traffic sign from its content instead of from drawn lines. There are three doors into the same tool, plus a shortcut to a third-party designer that feeds the same library:
| Command | What it is for |
|---|---|
CAPCAD_CAPSIGN |
Opens the interactive editor: you compose the sign on screen, element by element, and send it to the CAD. |
CAPCAD_CAPSIGN_TEMPLATES |
Opens the templates form: you fill in fields (messages, distances, place names…) and the sign comes out assembled. It is also the door to saving the sign into the project and generating the detail sheet. |
CAPCAD_CAPSIGN_AI |
Recognises a photograph of a sign with AI and returns the sign definition, which can be drawn or opened in the editor. |
CAPCAD_SIGN_PLACAPRO |
Shortcut to PlacaPro, a third-party designer; not part of CapSign, but it feeds the same project-signs folder. |
The sign model, in design terms
A sign is a stack of modules. A module is a plate — the rectangle painted in the background colour — plus the border (the fillet running round the plate) and the content.
In a stack of modules, each module's border opens on the joining side and a seam bar is drawn between them: that is how a sign built from two or more plates is represented. This can be switched off (the Module seams option in the editor), and then each module becomes an independent sign with a closed border.
Inside a module, the content is made of elements:
| Element | What it is |
|---|---|
| Text | One message line, measured with the real alphabet of the series (not with a screen font). |
| Box | A generic rectangle, used as a spacer or to reserve space. |
| Picto | A pictogram, a shield, or the geometry of a dwg/dxf block brought inside the sign. |
| Arrow | A directional arrow. In the file it is stored as a Picto whose source is arrow:<direction> — the same thing seen from another angle. |
| Border | A rounded outline that wraps another element (the frame round a highlight). It can also carry a fill. |
| Background | A filled rounded rectangle behind another element — the colour band that lifts one line off the rest of the sign. |
Relations: what makes the sign recompose itself
No element has coordinates of its own. Each one (except the first in the module) anchors to another, saying which of its nine reference points touches which point of the reference element, with a gap between them. Three refinements sit on top of that:
- Vertical only / horizontal only — align on one axis and leave the other free ("stay below him, but do not move horizontally").
- Compound reference — the element anchors to the bounding box of two or more elements at once ("centred under both lines").
- Displacement — a fine X/Y adjustment applied after positioning.
In the editor you type none of this: drag the element and CapSign infers the relation from where you dropped it — which reference, which pair of points, which gap. The gap is measured from the geometry, not typed. If a drag would create a circular dependency the move is refused with "Move rejected (would create a cycle)".
Delete an element that others depended on and the dependants are re-anchored so they stay where they were ("Deleted (dependents re-homed)").
Series (alphabets)
| Series | Metrics | Note |
|---|---|---|
| Em | from the norm | The standard alphabet for mixed-case messages. |
| D | from the norm | Upper case only — the text is converted to capitals. |
| B, C, E, F | from the font | The other cuts of the family; the widths come from the font, not from a normative table. |
| Arial | from the font | For text that is not signing (titles, notes). |
When you do not choose a series, CapSign detects it: a line entirely in capitals comes out in series D; any lower-case letter sends the line to Em. There is also a rule of its own for "km" and "m": the unit comes out in the lower case of series Em even inside a series-D line, so that "80 km" composes correctly.
There is no series A.
Minimum letter height: 50 mm. Below that CapSign refuses the line and the sign is not assembled.
What the norm decides on its own
Once the content is in place, CapSign computes from the area of the plate:
| Plate area | Border thickness | Breathing gap | Corner radius |
|---|---|---|---|
| up to 1 m² | 0.010 m | 0.010 m | 0.020 m |
| up to 3 m² | 0.020 m | 0.010 m | 0.040 m |
| up to 6 m² | 0.030 m | 0.015 m | 0.065 m |
| above 6 m² | 0.050 m | 0.025 m | 0.095 m |
The default gap between elements is 3/4 of the letter height — the value the editor's 3/4 h button applies and the one the message line spacing uses. The considerations panel of the templates form records the full pair the norm gives: horizontal spacing 3/4 d, vertical 1.5 d.
Once the minimum size is known, width and height are rounded up to the next available sheet value (0.5 · 0.8 · 1 · 1.2 · 1.5 · 2 · 2.5 · 3 · 3.5 · 4 m in the templates form; the 5 cm grid in the editor). The form warns in red when the width or the height exceeds 4 m ("Medidas chapa não OK").
There is also a letter-height-by-speed table, which fills the H field automatically:
| Speed | Rural | Urban |
|---|---|---|
| Pedestrians | 50 mm | 50 mm |
| up to 40 km/h | 150 mm | 125 mm |
| 60 and 70 km/h | 150 mm | 150 mm |
| 80 km/h | 200 mm | 200 mm |
| 90 and 100 km/h | 250 mm | — |
| 110 and 120 km/h | 300 mm | — |
Above 80 km/h in the urban column the table defines no value: the H field is left empty and you choose.
These tables are fixed, not switched per country profile. The area table, the 3/4 h spacing, the sheet-value list and the speed table above are the same whatever the active country profile is. Check them against the norm of your own profile before publishing; where they differ, type the letter height and lock the plate dimensions by hand.
The sign file
The document is saved as .capsign (JSON). CapSign opens two dialects with the same Open command:
- the native format, with the elements, the relations and the sign options — this is what the editor writes;
- the simplified JSON (
sign›modules›lines), which is what the AI produces and what you would type by hand for a quick test. On opening, it is converted into editable elements and relations. The conversion is one-way and partial: pictograms, signs identified only by a catalogue code, and lines with several segments are refused with the reason.
Keep the .capsign with the project: it is what lets you reopen the sign and change its content. The published dwg is the drawn result, not the definition.
Storing the definition inside the drawing is not available in this version: the
.capsignfile is the only place the definition lives.
Workflow
Composing in the editor
- Run
CAPCAD_CAPSIGN. The CapSign window opens beside the drawing. - File › New: choose a model under Start from: and give the Project letter height (mm). Every model produces real elements.
- Add content from the Elements group: Text, Box, Arrow, Picto, Border, Background, Module. Text, Box, Arrow and Picto enter a placement mode: a ghost follows the cursor, the snap is previewed and the click drops the element (Esc cancels). Border and Background ask you to click the element to wrap.
- Adjust in the right-hand panel: sign colour, project letter height, corner radius, and the line-spacing, Sheet-metal values (5 cm) and Module seams options.
- To edit a message, double-click the text on screen: editing happens on the sign itself, in the letters of the series, with the caret drawn at the position CapSign measured. Enter creates the next line, Esc cancels.
F2does the same through the selection. - File › Save writes the
.capsign. - CAD › Draw in CAD draws the sign in the current drawing. If the current drawing is empty the sign is drawn in it; otherwise a new drawing is opened for it.
Publishing the sign into the project
- Run
CAPCAD_CAPSIGN_TEMPLATESand use Importar do editor… (34) to bring the.capsignin — the sign is composed and drawn. - Fill in the Código (29), tick Salvar placa em projeto (30) and, if you want the sheet, Gerar detalhamento (31).
- Salvar (28) writes
<code>.dwginto the project-signs folder, a<code>.txtfile with the searchable content of the sign, and — when asked —DET\<code>-DET.dwg. - From then on the sign appears in the sign insertion command, under project signs, like any other library sign.
Starting from a photograph
- Run
CAPCAD_CAPSIGN_AI, 1. Abrir imagem (37), 2. Analisar imagem com IA (40) and check the JSON that appears in the box (39). - 3. Gerar placa (47) draws the sign that was read, or Abrir no editor (51) takes the definition into the editor, where it becomes an editable sign.
The forms
Numbers are the same in every screenshot of this page; each control keeps its number wherever it appears.
Templates CapSign and CapSign AI show Portuguese captions in every language, so the tables below quote the caption you will see and give the English meaning beside it. The editor is fully translated: its Language box switches between Português, English and Español live, and this page quotes its English captions.
Templates CapSign (CAPCAD_CAPSIGN_TEMPLATES)
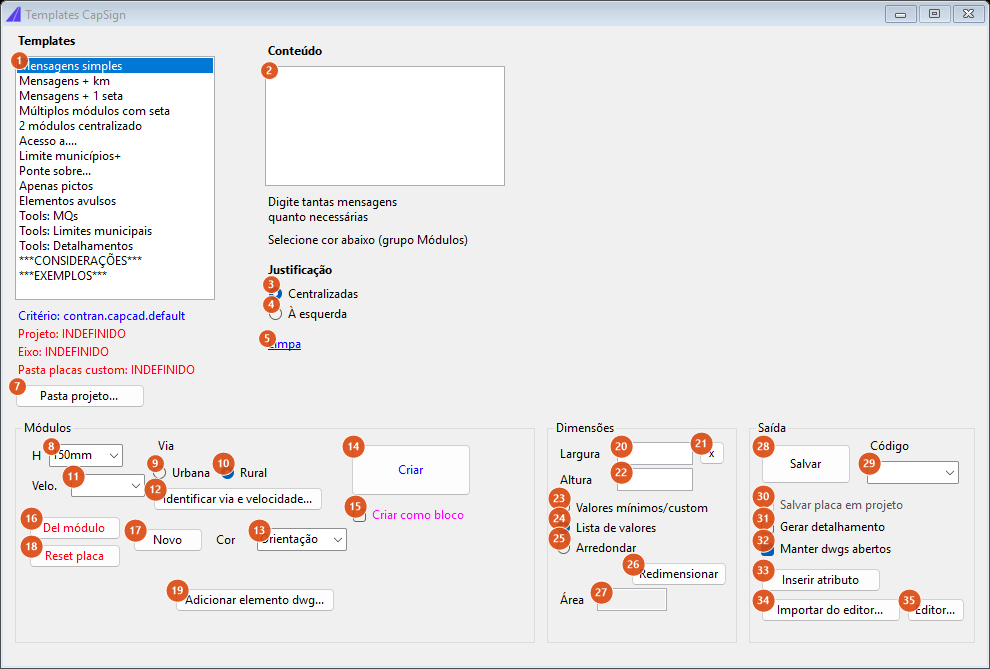
Opening state: the "Mensagens simples" (Simple messages) template selected. The blue strip under the list shows where the criterion, the project, the alignment and the project-signs folder come from — in red when there is no active project.
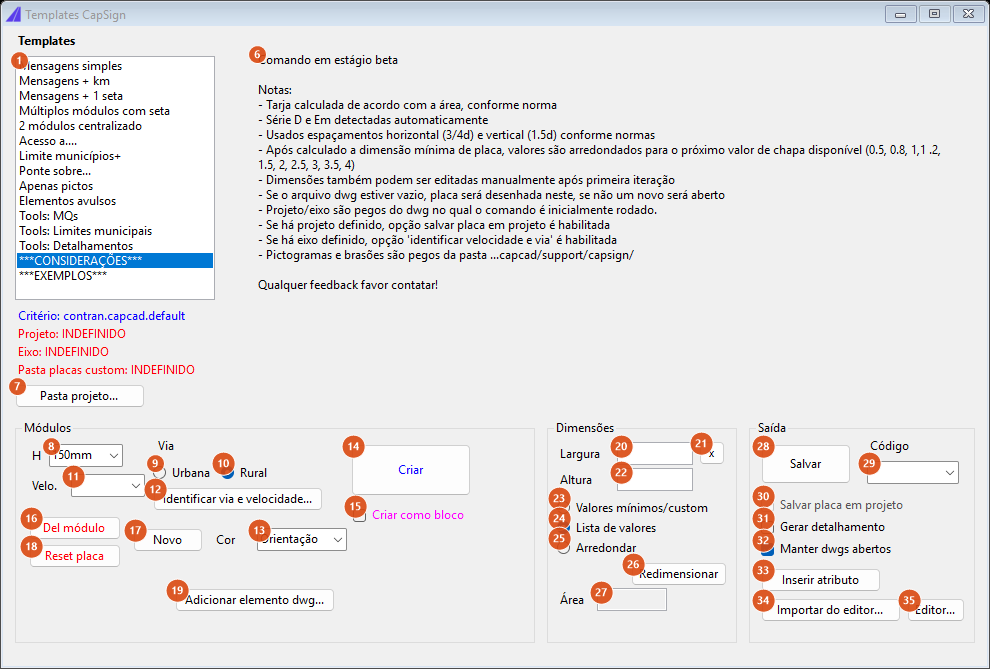
The ***CONSIDERAÇÕES*** item of the list shows, inside the form itself, the rules CapSign applies.
Templates (left column)
| # | Control | What it does |
|---|---|---|
| 1 | Templates (list) | Chooses the fill-in panel on the right. Only "Mensagens simples" (Simple messages) assembles a sign in this version; the other items are not available in this version — clicking Criar with one of them selected returns a notice saying so. See the table below. |
The items of the list, in order:
| Item | English meaning | State |
|---|---|---|
| Mensagens simples | Simple messages | Works: builds one module from the lines you type. |
| Mensagens + km | Messages + distance | Panel drawn (5 lines with message, distance, colour and pictogram); not available in this version. |
| Mensagens + 1 seta | Messages + 1 arrow | Panel drawn (5 lines + a 9-direction arrow grid); not available in this version. |
| Múltiplos módulos com seta | Several modules with arrow | Panel drawn (5 lines with colour, pictogram and arrow); not available in this version. |
| 2 módulos centralizado | 2 modules, centred | Panel drawn (two modules with their own colour and letter height); not available in this version. |
| Acesso a.... | Access to… | Panel drawn (messages + distance); not available in this version. |
| Limite municípios+ | Boundary signs | Panel drawn (entry and exit place names, with a swap, and the boundary / state-line / frontier / built-up-area types); not available in this version. |
| Ponte sobre... | Bridge over… | Panel drawn (watercourse, span, prefix); not available in this version. |
| Apenas pictos | Pictograms only | Panel drawn (pictogram library and selection); not available in this version. |
| Elementos avulsos | Loose elements | Panel drawn with the manual layout tools (text, honeycomb, frame, U-turn, tree arrow, half roundabout, full roundabout); not available in this version. |
| Tools: MQs | Kilometre posts | Panel drawn (road number, region, start and end km, heights, standards); not available in this version. |
| Tools: Limites municipais | Municipal boundaries | Panel drawn (place-name list, abbreviations, batch generation); not available in this version. |
| Tools: Detalhamentos | Detail sheets | Panel drawn (conventional detail sheets); not available in this version. |
| ***CONSIDERAÇÕES*** | Considerations | Read-only text with CapSign's rules (figure above). |
| ***EXEMPLOS*** | Examples | Not available in this version. |
Content (the "Mensagens simples" panel)
| # | Control | What it does |
|---|---|---|
| 2 | Conteúdo (text box) | One message per line. Every line becomes a text line of the module, in the order typed. Empty, Criar warns "Digite as mensagens." |
| 3 | Centralizadas (Centred) | Line justification. Saved with the form; not used by this version: the template always builds the lines centred in the module, whichever option is ticked. |
| 4 | À esquerda (Left) | Same — saved with the form; not used by this version. |
| 5 | Limpa (Clear) | Empties box 2. |
| 6 | Considerações (text) | Only on the ***CONSIDERAÇÕES*** item: the rules text, read-only. |
Modules (bottom left frame)
| # | Control | What it does |
|---|---|---|
| 7 | Pasta projeto... (Project folder) | Not available in this version: answers with a notice saying so. |
| 8 | H | Letter height in mm: 50, 100, 125, 150, 200, 250 or 300. Default 150 mm. Filled automatically when you pick a speed (11). |
| 9, 10 | Urbana, Rural | Road type, used by the letter-height-by-speed table. Default Rural. |
| 11 | Velo. (Speed) | Speed: pedestrians and 40 to 120 km/h. Changing it puts the table value into the H field (8). |
| 12 | Identificar via e velocidade... | Not available in this version: would read the road type and the speed from the active alignment; answers with a notice saying so. |
| 13 | Cor (Colour) | Sign category: Advertência (warning), Indicativa (information), Regulamentação (regulatory), Educativa (educational), Obra (roadworks), Orientação (guidance, the default) or Turística (tourist). The category sets the background colour and the detail colour (border and text). See the colour figure below. |
| 14 | Criar (Create) | Builds the module from the panel's content and adds it to the sign. On the first module it prepares the drawing (the current one if empty, otherwise a new one) and draws. From the second module on, the button becomes Adicionar módulo (Add module) and a Referência list (Abaixo, Acima, Esquerda, Direita — below, above, left, right) and an Emendar (Seam) option appear beside it. The reference is mandatory from the second module on; without it the form warns "Selecione a posição do novo módulo em relação à placa." Every time the sign changes, the previous drawing is erased and redone. |
| 15 | Criar como bloco (Create as block) | Not available in this version. Ticked, it changes button 14's caption, but Criar returns a notice saying so. |
| 16 | Del módulo (Delete module) | Removes the last module of the stack (only acts with two or more), re-centres the sign, gives the closed border back to the first module and redraws. |
| 17 | Novo (New) | Starts a new sign without erasing what is already in the drawing. |
| 18 | Reset placa (Reset sign) | Erases from the drawing the sign this form drew and starts over. |
| 19 | Adicionar elemento dwg... (Add dwg element) | Not available in this version: answers with a notice saying so. |
Dimensions (bottom centre frame)
| # | Control | What it does |
|---|---|---|
| 20 | Largura (Width) | Sign width in metres. After Criar, shows the computed width; the background turns pink above 4 m. Before the first module, a value typed here is used as the requested width. |
| 21 | x | Clears width and height. |
| 22 | Altura (Height) | Sign height, behaving exactly like the width. |
| 23 | Valores mínimos/custom (Minimum / custom values) | No rounding: the sign keeps the minimum size computed for the content. |
| 24 | Lista de valores (Value list) | The default, and the only one that rounds: takes width and height up to the next available sheet value (0.5 · 0.8 · 1 · 1.2 · 1.5 · 2 · 2.5 · 3 · 3.5 · 4 m) and redistributes the leftover height into the line spacing. |
| 25 | Arredondar (Round) | Rounding by increment. Behaves like Minimum values in this version. |
| 26 | Redimensionar (Resize) | Applies the sizes typed in 20 and 22 to the first module, re-centres and redraws. This is how the dimensions are edited after the first pass. |
| 27 | Área (Area) | Sign area in m², read-only. Beside it, Aproveitamento chapa OK in blue or Medidas chapa não OK in red. |
Output (bottom right frame)
| # | Control | What it does |
|---|---|---|
| 28 | Salvar (Save) | Writes the sign. Requires the sign to be assembled ("Crie a placa primeiro."), at least one of boxes 30 and 31 ticked, a project-signs folder defined in the project ("Projeto sem pasta de placas propostas — defina no PROJ.") and a Código filled in ("Informe o código da placa."). Saves <code>.dwg in the project-signs folder and, beside it, <code>.txt with the sign's text content and letter height — that file is what makes the sign searchable by text. |
| 29 | Código (Code) | The sign code; it becomes the file name. |
| 30 | Salvar placa em projeto (Save sign into project) | Only enabled when there is an active project with an existing project-signs folder; in that case it is already ticked. |
| 31 | Gerar detalhamento (Generate detail sheet) | Besides the sign dwg, produces DET\<code>-DET.dwg: an A4 portrait sheet with the FORMATO_A4P_SIGN title block and four frames — the sign with its code and the line Dimensões: W m x H m (Área=… m²), the internal dimensions (the dimensioned wireframe, all dimensions in millimetres), the outlines (the border section with radius, breathing gap and thickness) and the messages (the letter-by-letter spacing ladder). |
| 32 | Manter dwgs abertos (Keep dwgs open) | Ticked (default), the detail drawing stays open at the end; unticked, it is closed after being saved. |
| 33 | Inserir atributo (Insert attribute) | Not available in this version: answers with a notice saying so. |
| 34 | Importar do editor... (Import from editor) | Opens a .capsign or .json written by the editor, composes the sign the same way and draws it. The sign colour becomes the document's. From then on Salvar and Gerar detalhamento work as for any template-made sign. |
| 35 | Editor... | Opens the interactive editor window (CAPCAD_CAPSIGN), integrated with the CAD. One window per session: calling it again only brings it to the front. |
Controls that appear only after the first module, and are therefore not numbered in the screenshots: the Referência list (Abaixo, Acima, Esquerda, Direita, on a light blue background) and the Emendar box, both beside button 14.
CapSign AI (CAPCAD_CAPSIGN_AI)
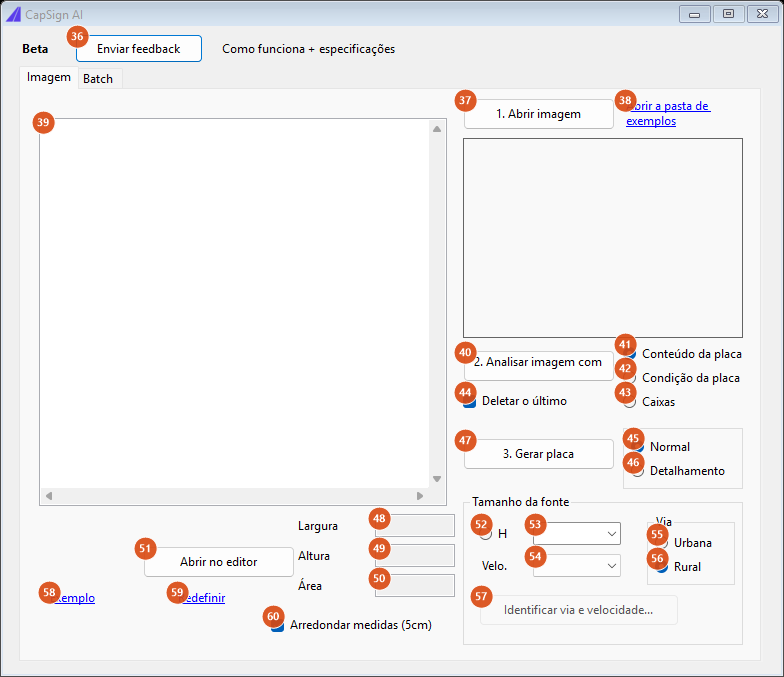
The Imagem (Image) tab: one photograph at a time — open, analyse, generate.
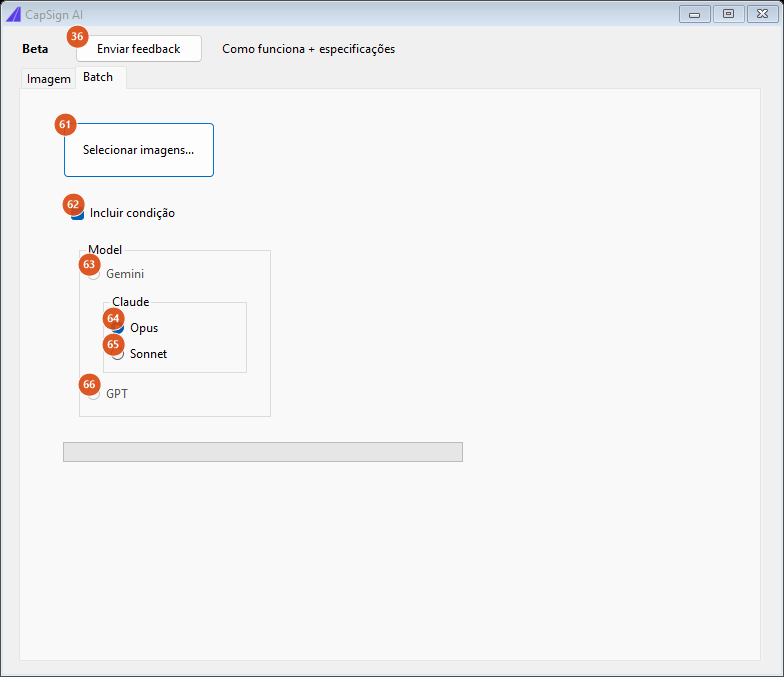
The Batch tab: up to ten photographs at once, each sign drawn 3 units above the previous one, with the photo beside it.
Header
| # | Control | What it does |
|---|---|---|
| 36 | Enviar feedback (Send feedback) | Opens CapCad's feedback command. Beside it, the Beta label and the "how it works + specifications" note. |
The Imagem tab
| # | Control | What it does |
|---|---|---|
| 37 | 1. Abrir imagem (Open image) | Chooses the photograph (jpg, jpeg, png, webp, gif). The image is loaded by bytes, so the file is not locked. The path appears above the box and the photo in the frame on the right. |
| 38 | Abrir a pasta de exemplos (Open the examples folder) | Opens in Explorer the folder of sample images installed with CapCad. |
| 39 | JSON (text box) | The sign definition. It is filled in by the analysis, but you can type or paste your own. This box is what Gerar placa and Abrir no editor consume. |
| 40 | 2. Analisar imagem com IA (Analyse image with AI) | Sends the photo and the chosen prompt (41 to 43) to the model and writes the answer into 39. With no image, it warns. While it answers, the box shows Analyzing.... |
| 41 | Conteúdo da placa (Sign content) | The recognition prompt: returns the sign definition as JSON. This is the default. One post-processing rule is applied to the result: on a boundary sign, the header line is reduced to 5/6 of the largest size among the other lines (the place names), rounded down. |
| 42 | Condição da placa (Sign condition) | The physical-condition assessment prompt. The answer is a text/JSON report, not a sign: Gerar placa does not understand it. |
| 43 | Caixas (Boxes) | The boxes prompt (the rectangular skeleton of the sign). Only recognition is available in this version: clicking Gerar placa with this option ticked returns "Boxes: somente reconhecimento nesta etapa." |
| 44 | Deletar o último (Delete the last one) | Ticked (default), erases from the drawing the sign drawn by the previous run before drawing the new one. |
| 45 | Normal | Draws the face of the sign. |
| 46 | Detalhamento (Detail sheet) | Draws the detail sheet instead of the face. |
| 47 | 3. Gerar placa (Generate sign) | Reads the JSON of 39 and draws. Then fills readouts 48, 49 and 50 and zooms to extents. |
| 48 | Largura (Width) | Dimension readout, in metres: shows the height of the sign. |
| 49 | Altura (Height) | Dimension readout, in metres: shows the width of the sign. |
| 50 | Área (Area) | Area in m². |
| 51 | Abrir no editor (Open in editor) | Writes the JSON of 39 to %TEMP%\capcad\placa_ia.capsign and opens the editor on it — the definition becomes an editable sign. |
| 52 | H | Ticked, forces the letter height chosen in 53 on the whole sign, ignoring the sizes that came in the JSON. It ticks itself when you enter field 53. |
| 53 | (letter height) | 50, 100, 125, 150, 200, 250 or 300 mm. |
| 54 | Velo. (Speed) | Speed; changing it fills 53 from the letter-height table. Where the table defines no value (urban above 80 km/h), 53 is left empty. |
| 55, 56 | Urbana, Rural | Road type for that table. Default Rural. |
| 57 | Identificar via e velocidade... | Disabled; not available in this version. |
| 58 | Exemplo (Example) | Writes into box 39 a minimal definition that works (two lines, guidance scheme) and clears the photo. A good starting point for understanding the format. |
| 59 | Redefinir (Reset) | Clears the JSON, the status message and the image. |
| 60 | Arredondar medidas (5cm) (Round sizes to 5 cm) | Ticked (default), rounds the sign to the 5 cm sheet grid. |
The Batch tab
| # | Control | What it does |
|---|---|---|
| 61 | Selecionar imagens... (Select images) | Chooses up to 10 photographs (more and it warns and does nothing) and runs the lot: for each photo it recognises, assembles the sign, draws it 3 units above the previous one and attaches the photograph beside it, to the left. Failures are counted and skipped. At the end the footer reports how many were drawn and how many failed. |
| 62 | Incluir condição (Include condition) | Ticked (default), also runs the condition prompt on each photo and writes the report as text beside the sign. |
| 63 | Gemini | Disabled; not available in this version. |
| 64 | Opus | The higher-quality model (default). |
| 65 | Sonnet | The faster model. |
| 66 | GPT | Disabled; not available in this version. |
Below the models sit the progress bar and the batch status line.
The interactive editor (CAPCAD_CAPSIGN)
The editor is a WPF window called CapSign, opened integrated with the CAD (it is not a separate executable). One window per session. With no CAD host active, the CAD buttons are hidden and the editor works as a standalone designer.
Command ribbon
| Group | Buttons |
|---|---|
| File | New (choose a model and the project letter height) · Save · Open · Import (forces reading of the simplified JSON) |
| Elements | Text · Box · Arrow · Picto · Border · Background · Module · Delete · Insert DWG and Library... (only with a CAD host) |
| History | Undo (Ctrl+Z) · Redo (Ctrl+Y) — up to 100 steps |
| CAD | Draw in CAD |
| Language | Português / English / Español, switched live |
Models offered under New (all of them produce editable elements and relations). The model names themselves appear in Portuguese:
| Model | English meaning | What it brings |
|---|---|---|
| Em branco | Blank | An empty sign. |
| Mensagem simples | Simple message | One text line. |
| Múltiplas mensagens | Several messages | Three stacked lines, spaced by the norm. |
| Limite de municípios | Boundary sign | A blue band over the two names; the top line comes out one step smaller. |
| Indicativa de sentido | Direction sign | A destination with an arrow beside it, at the size the norm gives for the chosen letter height. |
| Orientação (destinos) | Guidance (destinations) | Several destinations, each with its own arrow. |
| Saída | Exit | An exit legend with a number and an arrow. |
| Orientação (destinos + km) | Guidance (destinations + distances) | Destinations on the left, distances aligned on the right. |
| Dois módulos / Três módulos | Two / three modules | The module stack, each with its own message. |
Besides those, any .capsign, .json or .txt dropped into the models folder appears in the list as a starting point — just put the file there.
Right-hand panel
- NEW TEXT — Content, H letra (mm) (letter height), Serie (alphabet) for the next text.
- SIGN — Colour (preset), the project letter height, the corner radius, and the options for line spacing at 3/4 h, Sheet-metal values (5 cm), Module seams, Sign preview and Detail sheet (DET) (read-only view).
- DIMENSIONS (m) — type to lock — W and H, each with an auto button: typing a value locks that dimension about the centre; auto gives the automatic computation back.
- MODULE (m) — Module colour (or (scheme), following the sign), Respiro (breathing gap) and Delete empty module.
- NEW BOX SIZE (m) — width and height of the next box.
- SELECTED ELEMENT — depending on the type: Text, letter height, Serie, Colour, fill colour, corner radius, the anchor distance (with a 3/4 h button that applies the norm's gap), Margin (m) on the elements that wrap another one, Width (m) and Height (m).
- Show all relations — draws the anchors of every element, not only of the selected one.
A handful of panel labels stay in Portuguese even in English mode: the project letter height, the corner radius, the 3/4 h line-spacing checkbox, the anchor distance and the fill colour.
On the canvas — the unit is the metre. A click selects; a drag re-anchors; a double-click on a text edits it in place; the mouse wheel zooms under the cursor; a middle-button drag pans; a middle-button double-click frames the whole sign; Del deletes. The status line at the bottom reports every action.
How the options combine
Every figure below was produced by running CapSign's own engines — the editor templates, the relation solver and the CAD-free draughtsman — and drawing the result exactly as the CAD would receive it.
A sign from messages
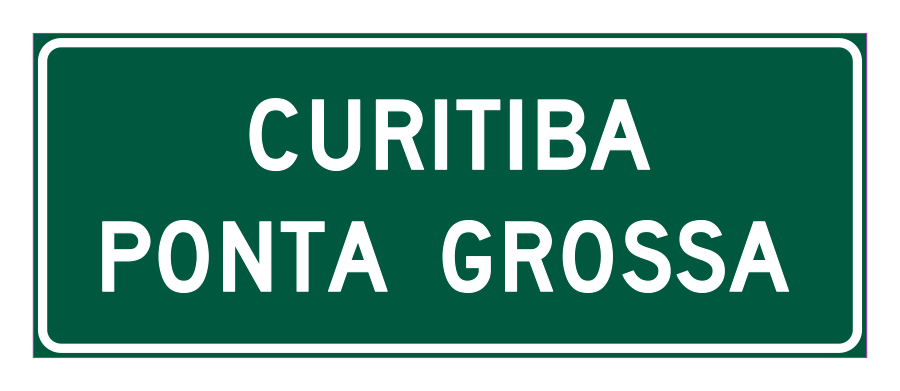
Simple messages template, two lines at 150 mm, guidance category: 1.80 × 0.70 m, 1.26 m². The border, the breathing gap and the corner radius come from the area table; the lines come out in series D because the text is all in capitals.
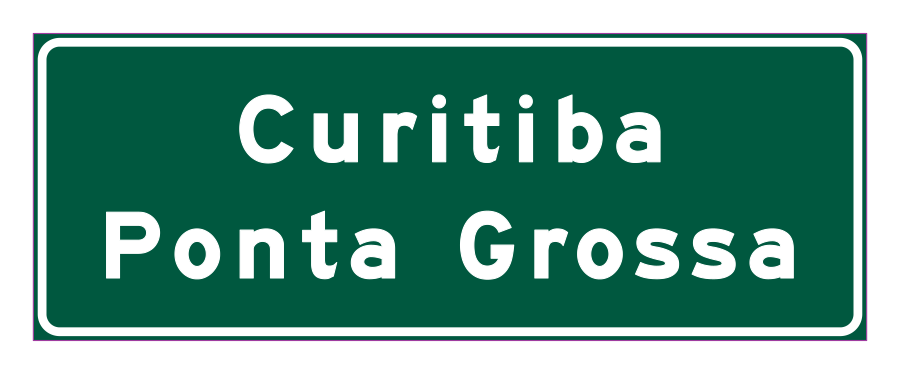
The same sign from the JSON definition that the "Exemplo" button (58) writes — mixed-case place names, which sends the lines to series Em. 1.90 × 0.70 m.
Modules and seams
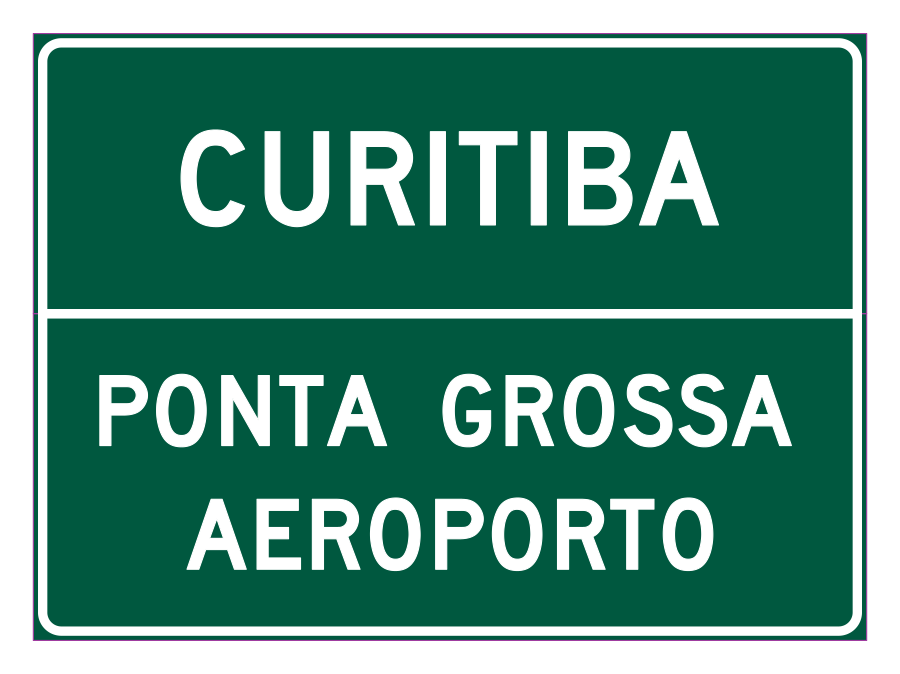
Two modules: one line at 200 mm above two lines at 150 mm. The borders open on the joining side and the seam bar marks where the plates meet. Note that the modules are equalised to the width of the wider one.
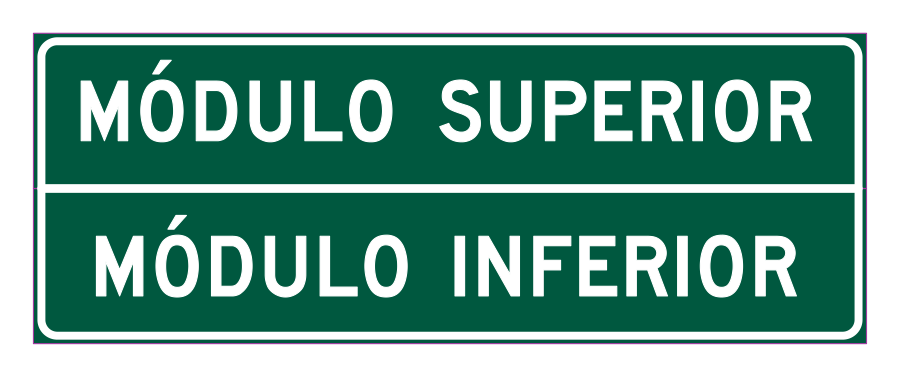
The editor's "Two modules" model, with the same seam rule.
Editor models
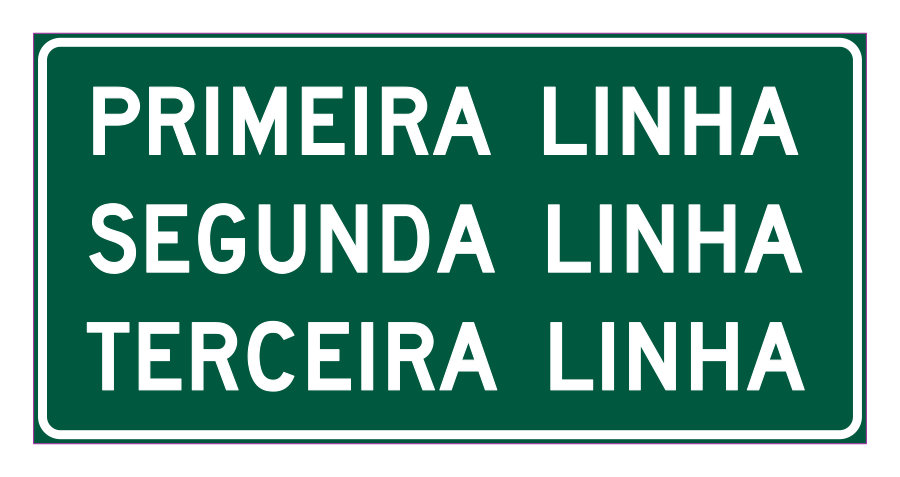
"Several messages": three lines spaced by the norm, 1.86 × 0.92 m at 150 mm.
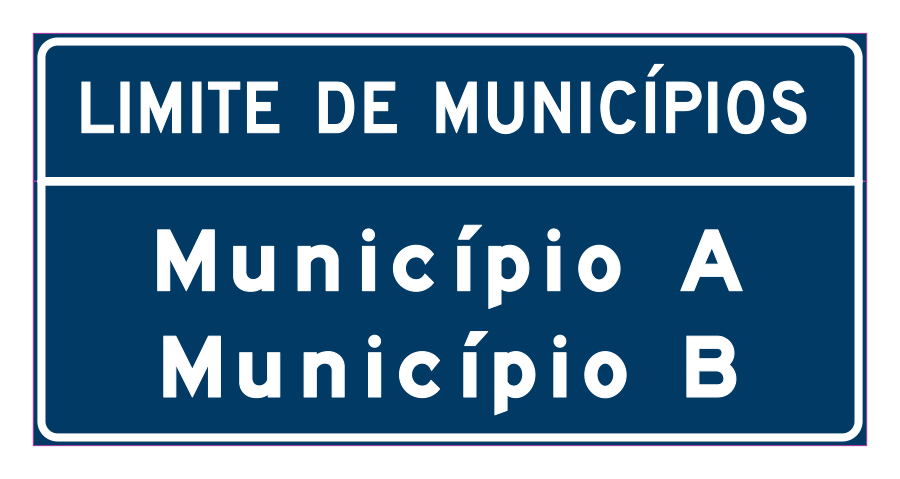
"Boundary sign": the whole sign comes out in the information category (blue) and the header is a module of its own above the module with the names — hence the seam between them. The header comes out one letter-height step below the names.
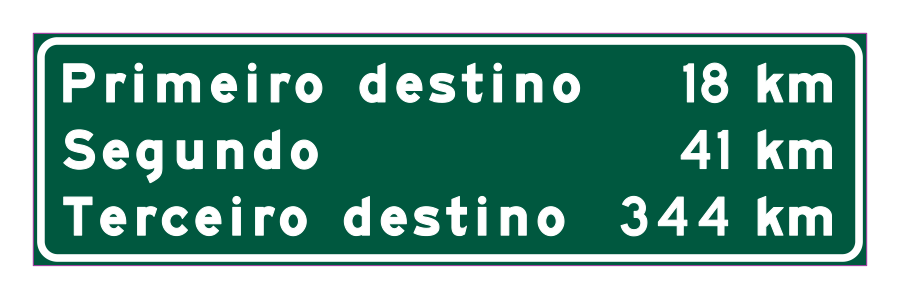
"Guidance (destinations + distances)": destinations aligned left and distances in a column on the right. The distance of the widest line (name + gap + distance) is the column's anchor; the others align to its right edge horizontally and to the centre of their own line vertically — which is why the column stays right-aligned without anyone positioning it.
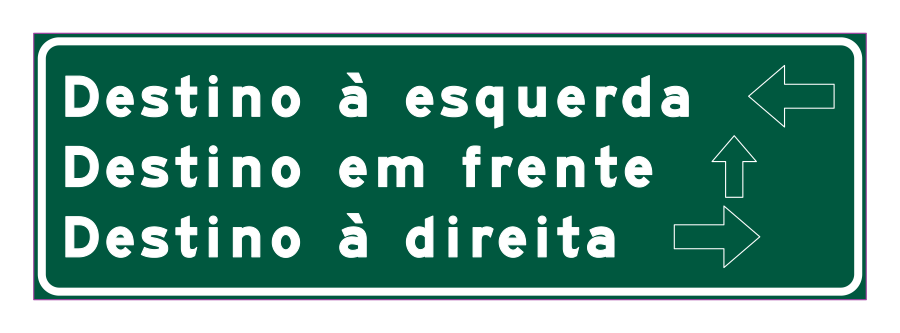
"Guidance (destinations)": each destination with its own arrow. The arrows are a schematic shape today, at the size and side gap the norm asks for at the chosen letter height.
Colour categories

The same message in the categories of the Cor list (13), in the order warning, information, regulatory, roadworks, guidance and tourist. The educational category is not shown because it uses the same scheme as regulatory (white background, black detail). Each category picks the plate background colour and the detail colour (border and text). The colours in the figure are the editor's display colours — in the drawing the sign comes out in the corresponding CAD colour indices, and the warning plate is the norm's yellow, not the orange tone of the preview.
Remembered between sessions
Only the editor language (Português / English / Español) is written to the user preferences and restored the next time it opens. The Templates CapSign and CapSign AI forms always open at their defaults: template Mensagens simples, H 150 mm, Rural road type, Orientação colour, Lista de valores rounding, Manter dwgs abertos ticked; and in CapSign AI, the Conteúdo da placa prompt, Normal mode, the Opus model, and Deletar o último, Arredondar medidas (5cm) and Incluir condição ticked.
What really persists is the files: the .capsign you saved in the editor and the sign published into the project-signs folder.
Notes
- The templates form is beta and says so. Only the Simple messages template assembles a sign in this version; the other panels are not available in this version, and their buttons answer with a notice saying so. The complete route to an arbitrary sign is the editor (
CAPCAD_CAPSIGN), and then Importar do editor… here, to save it into the project and generate the detail sheet. - The empty-drawing rule. When the first module is created (or when importing from the editor), if the current drawing is empty the sign is drawn in it; if it holds any entity, a new drawing is opened. The project and the alignment are read from the drawing the command was run in.
- Each redraw erases the previous one. While the form is open, the sign is erased and redrawn on every change — only the last drawing survives.
- Saving requires a project. With no active project carrying a project-signs folder, Salvar warns and writes nothing. That folder is the same one the sign insertion command reads for project signs, and the same one PlacaPro must point at in its EXPORTAR menu.
- Pictograms and shields are read from the
...capcad/support/capsign/folder. - The AI does not do everything. CapSign refuses, with the reason stated: definitions holding more than one sign ("process one at a time"), signs identified only by a catalogue code (insert the library block instead), the guidance type (destinations + distances, not available in this version), the pictograms type, and arrow, pictogram or shield elements inside a multi-module sign. Text lines and stacked modules work.
- Arrows and pictograms in the editor are schematic shapes: the direction, the normative size and the placement are right.
- The detail sheet always labels the series as Em and the colour as white in its messages frame, even when the sign uses another series or another colour. Check that label before publishing the sheet.
- On the other CADs. The templates form runs on all five CADs. The interactive editor, however, only opens on AutoCAD: on BricsCAD, GstarCAD and ZWCAD the
CAPCAD_CAPSIGNcommand answers on the command line that the hosted editor is not available there, and on ARES Commander it answers with the "coming soon" notice. The Editor... button (35) of the templates form shows a "no host available" notice on those CADs.CAPCAD_CAPSIGN_AIandCAPCAD_SIGN_PLACAPROexist on AutoCAD (ARES reports that they are not available).
The PlacaPro shortcut (CAPCAD_SIGN_PLACAPRO)
PlacaPro is another company's sign layout software (www.placapro.com.br), licensed and bought separately. CapCad does not embed it: the command only opens a notice with three actions.
| Action | What it does |
|---|---|
| Ok, abrir PlacaPro | Looks for the executable in %LOCALAPPDATA%\Programs\PlacaPro\PlacaPro.exe, then C:\Program Files (x86)\BrikSoft\PlacaPro\PlacaPro.exe and finally C:\Program Files\PlacaPro\PlacaPro.exe, and opens the first one that exists. If it is not installed, nothing happens. |
| Como configurar pastas para uso no Cap | Explains the integration: in PlacaPro's EXPORTAR menu, point the export folder at the same project-signs folder as your CapCad project. CapCad converts the DXF into DWG, adjusts the scale on demand and generates the sign's preview image from the DXF by itself. |
| Vídeo tutorial | Opens the video at youtu.be/PM0FsQV45Lo. |
In other words: PlacaPro and CapSign stock the same shelf. A sign from either one appears in the sign insertion command as a project sign, with the difference that a CapSign sign has a .capsign behind it that you can reopen and edit.