| Command | CAPCAD_MARKING_PARKING |
| Shortcut | ES |
| Ribbon | CapCad tab › Traffic Control panel › Markings split button › Parking |
| Category | CAD Utils: Segment |
| Form | ParkingForm (modeless: the drawing stays live while it is open) |
| Hosts | AutoCAD, BricsCAD, GstarCAD, ZWCAD, ARES Commander |
| Also opened by | none |
Draw a whole row of parking bays from one line, and keep adjusting it while you look at it. With the CAD's own commands a row of bays is an offset, an array, a trim and a lot of counting. Here the row is one pick and a form.
- Live preview. Every value you change redraws the row. Accept when it looks right, Reset if it does not.
- Every layout in one place. Perpendicular, angled or parallel bays; individual, straight or no back line; delimiter ticks or a closed front; tapered ends.
- Widths that fit. One width, two alternating widths or a free list, and the choice between trimming the base line or stretching the bays to use all of it.
- Numbering and counting built in. Bay numbers as text or attributed blocks, continuing from the last number already in the drawing, plus an invisible quantification block per bay for the reports.
- Bay extras. Pictograms, text, solid fill or zebra stripes on the bays you choose, each on its own layer.
- The same tool on five CADs. AutoCAD, BricsCAD, GstarCAD, ZWCAD and ARES Commander.
What it does
The command takes a base line (two points, a polyline segment, a whole entity or several entities) and lays a row of bays along it. The line is normally the back of the bays: bays of a given width are marked off along it, and a demarcation line of the given depth is drawn at each station, on one side of the line or on both. On top of that the form adds the back line style, the front (delimiter ticks or a closed line), tapered ends, bay numbers, quantification blocks, pictograms, text and fill.
Everything is a live preview: each change on the form erases the previous result and redraws it. Accept keeps the result as ordinary entities; Reset erases it. Closing the form keeps the last preview.
The base line is the input for everything. Its direction (from the first point to the second, or the entity's own direction) decides which side is Right and which is Left, where numbering starts, and where the free-list widths begin. Flip direction reverses it.
Workflow
- Run
CAPCAD_MARKING_PARKING(or typeES). The form opens beside the drawing. - Choose how to pick the base line in Input (5 to 8) and click the big 2 points button (4). The form hides while you pick; the command line asks for the points or the entities.
- Choose the Side (17 to 19), the Rear style (14 to 16) and the Front style (20 to 26).
- Set the bay: Width (34), Length (38, the bay depth), Angle (41) and Line width (43). The row redraws after every change.
- If the row lands on the wrong side or starts at the wrong end, click Flip direction (13). To shift it, use the Move pad (65 to 70) or type a Length for the base line (61).
- Add what the bays need in the inner tabs: Pictogram, Text, Fill, Number, Quantify, Termination.
- Click Accept (12) to keep the row. The form stays open; pick the next base line. Reset (9) erases the preview, Update (10) redraws it.
The form
Numbers are the same in every screenshot of this page. The form has six top tabs (Bays, Presets, Tools, Options, Tutorial, Area study) and, inside Bays, six inner tabs. Controls that only appear in some states (the second width box, the free-list box) keep their number wherever they show.
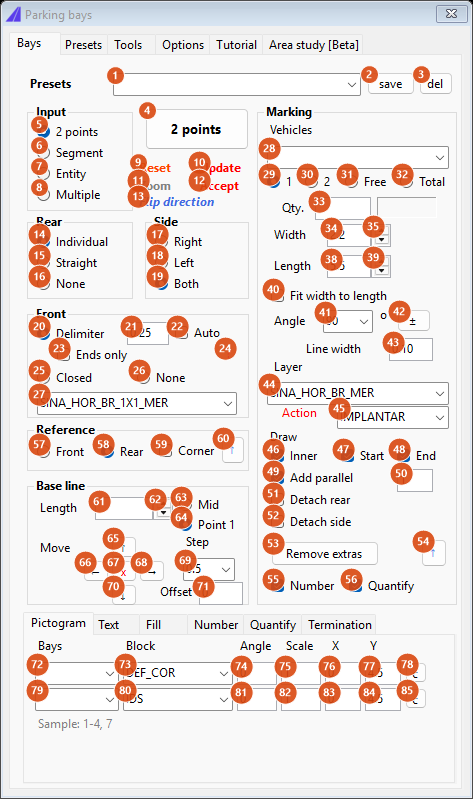
Default state: Marking "1" (one width), Rear "Individual", Side "Both", Front "Delimiter", inner tab "Pictogram".
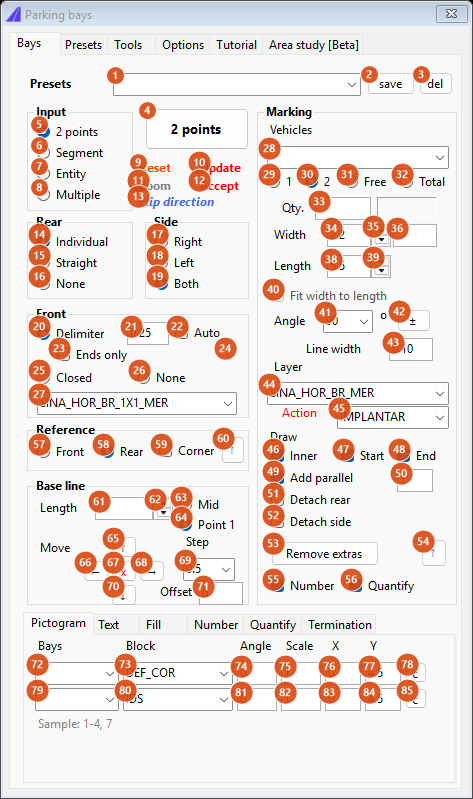
Marking "2": the second width box (36) appears next to the first.
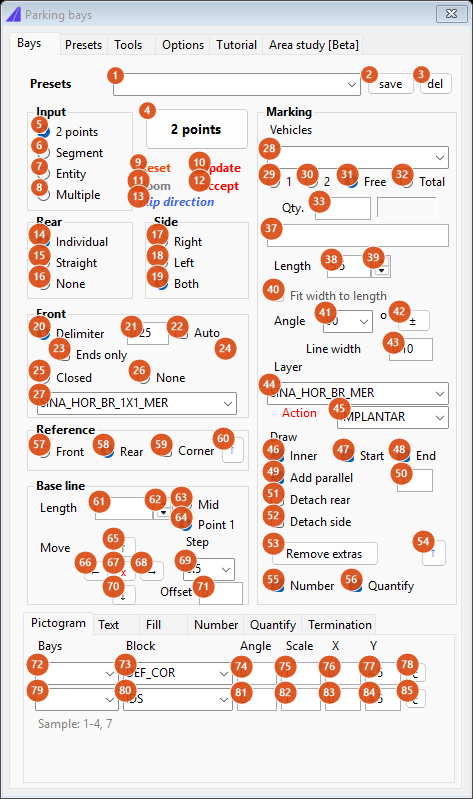
Marking "Free": the list box (37) replaces the width box.
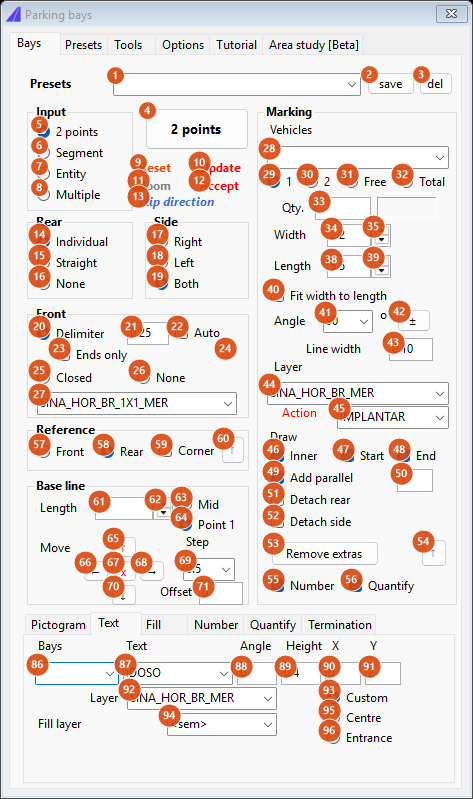
Inner tab "Text" (86 to 96).
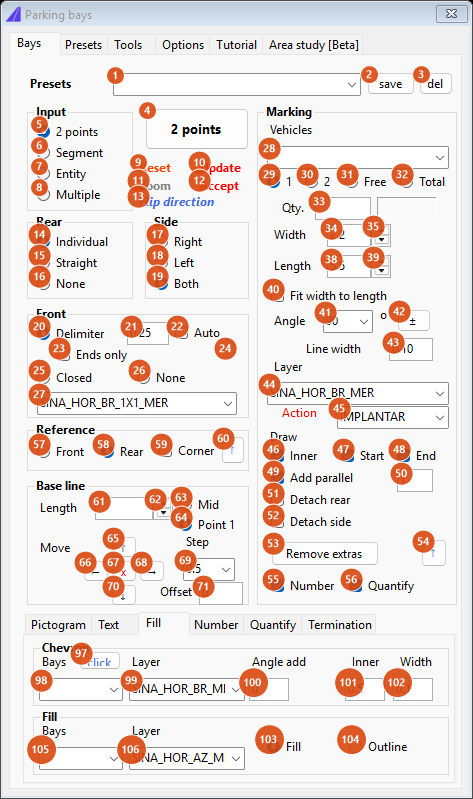
Inner tab "Fill" (97 to 106): zebra stripes and solid fill.
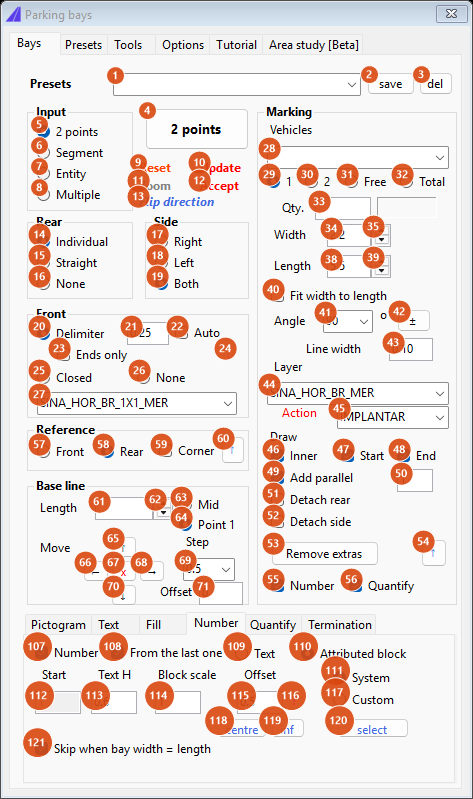
Inner tab "Number" (107 to 121).
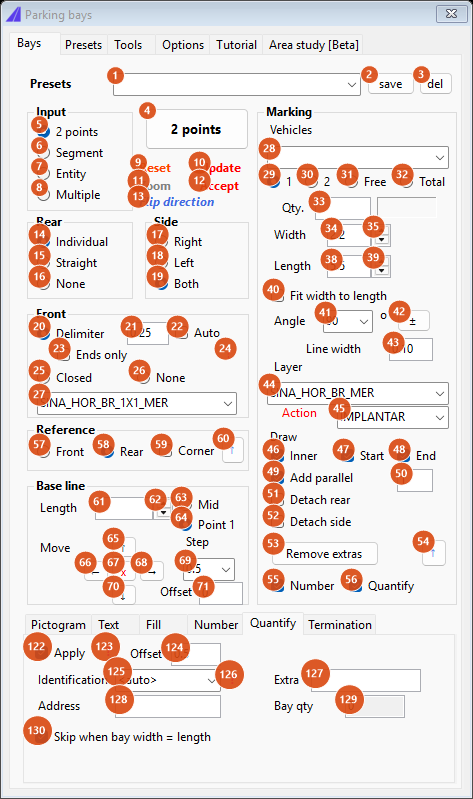
Inner tab "Quantify" (122 to 130).
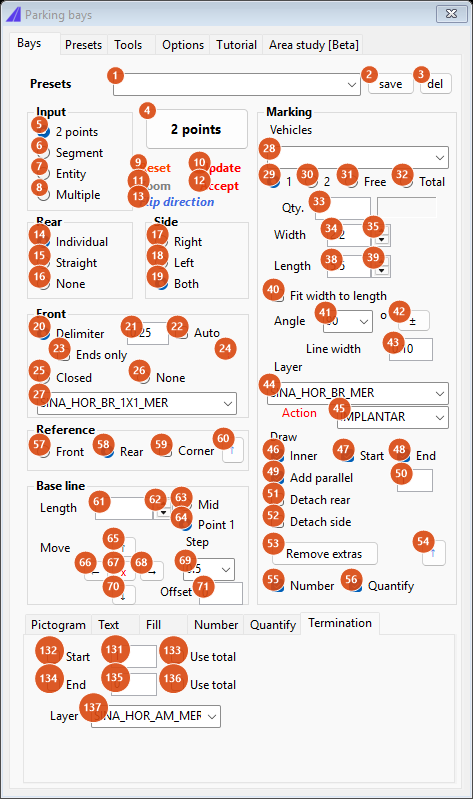
Inner tab "Termination" (131 to 137).
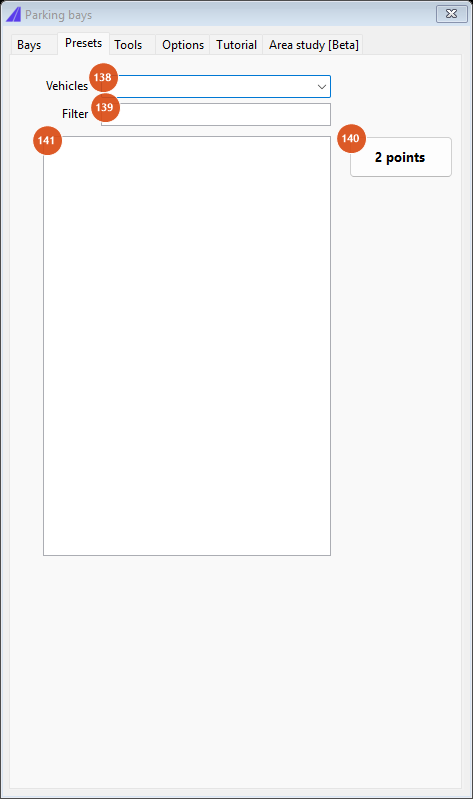
Tab "Presets" (138 to 141).
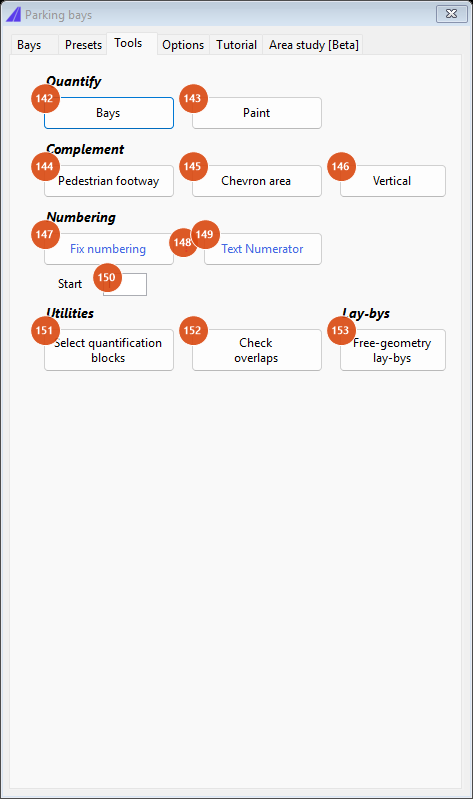
Tab "Tools" (142 to 153).
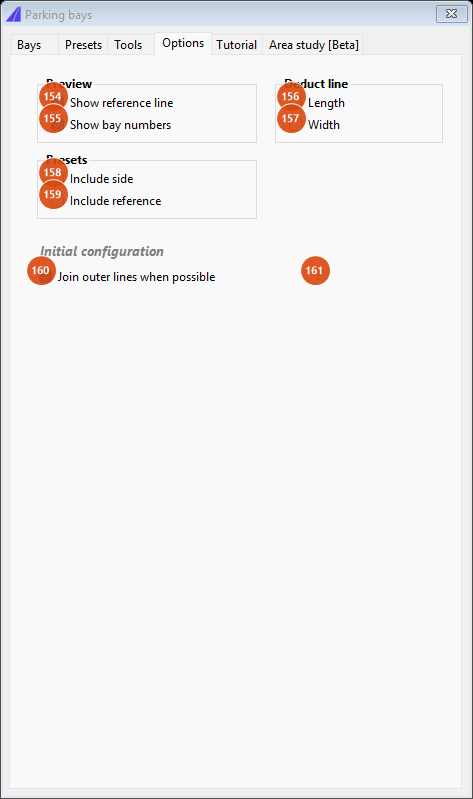
Tab "Options" (154 to 161).
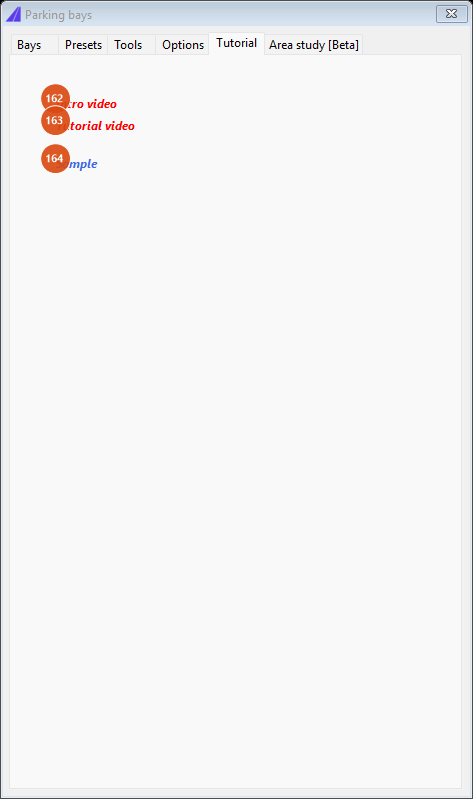
Tab "Tutorial" (162 to 164).
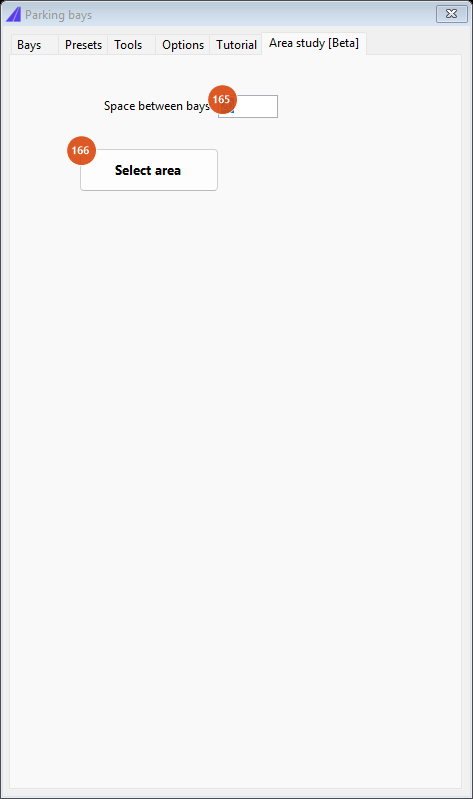
Tab "Area study [Beta]" (165, 166).
Tab 1: Bays. Presets row (top)
| # | Control | What it does |
|---|---|---|
| 1 | Presets | Whatever is typed here is written into the TYPE attribute of the quantification blocks (see 125), unless Identification (125) overrides it. Loading presets is not available in this version: the list is empty. |
| 2, 3 | save, del | Not available in this version. |
Tab 1: Bays. Input (frame at top left)
| # | Control | What it does |
|---|---|---|
| 4 | 2 points (big button) | Pick the base line in the mode chosen in 5 to 8. The form hides during the pick. A new pick discards the previous preview, resets the Move pad and redraws. The caption always reads 2 points, whatever the mode. |
| 5 | 2 points | Click two points; the straight line between them is the base line, walked from the first to the second. Prompts: Primeiro ponto da linha base, Segundo ponto. |
| 6 | Segment | Click a polyline near one of its segments; that segment alone (with its arc, if any) becomes the base line. Prompt: Selecione a entidade perto do segmento. |
| 7 | Entity | Pick one curve; the whole entity is the base line. Prompt: Selecione a linha base. |
| 8 | Multiple | Select several curves. Each one gets its own row, in selection order, and the bay numbers continue from one to the next. In this mode the base-line Length (61) and the Move ←/→ slide are not applied. Prompt: Selecione as linhas base. |
| 9 | Reset | Erase the preview. |
| 10 | Update | Redraw the preview with the current values. |
| 11 | Zoom | Only refreshes the display in this version; it does not zoom to the row. |
| 12 | Accept | Keep the preview as ordinary entities and forget the base line: the next change redraws nothing until you pick again. The Move pad is reset. |
| 13 | Flip direction | Reverse the base line(s) and redraw: the bays change side, numbering starts from the other end. |
Tab 1: Bays. Rear, Side, Front (left column)
| # | Control | What it does |
|---|---|---|
| 14 | Individual | One back-line piece per bay, drawn between the two demarcations of that bay (default). |
| 15 | Straight | One straight line from the first station to the last, for the whole row. With angled bays the depth is increased so the angled demarcations still reach it. |
| 16 | None | No back line. Same depth increase for angled bays. |
| 17 | Right | Bays on one side only: with the base line picked from left to right on the screen, Right draws the bays above the line. (Right is the counter-clockwise side of the walking direction.) |
| 18 | Left | The other side: below a line picked from left to right. |
| 19 | Both | Bays on both sides (default). The demarcations are drawn as one line crossing the base line; numbering runs along the Left side first, then the Right side. Join (160) has no effect with Both. |
| 20 | Delimiter | A short tick at the open end (mouth) of every demarcation, at right angles to it. At the intermediate lines the tick is centred, 21 to each side; at the two end lines it points inward, welded to the line as a third vertex (default). |
| 21 | value | Tick length on each side (0.25). |
| 22 | Auto | Not available in this version. |
| 23 | Ends only | Only the two end ticks; the intermediate ones are not drawn. |
| 24 | ? | No help text in this version. |
| 25 | Closed | One straight line joining the open ends of the demarcations, on the layer in 27. Each side gets its own line. |
| 26 | None | No front. |
| 27 | Layer (front) | Layer of the Closed front line (default SINA_HOR_BR_1X1_MER, typed). Disabled with None. |
Tab 1: Bays. Reference (frame at left)
| # | Control | What it does |
|---|---|---|
| 57 | Front | The picked line is the front (open end) of the bays: the whole row is pushed back by the bay depth plus the base-line Offset (71), so the demarcations end on the line. See the note on text placement below. |
| 58 | Rear | The picked line is the back of the bays (default). |
| 59 | Corner | Angled bays only: shifts the row along the first demarcation so that the first bay's back corner sits on the start of the base line. No effect with 0 or 90 degrees. |
| 60 | ↑ | Not available in this version. |
Tab 1: Bays. Base line (frame at bottom left)
| # | Control | What it does |
|---|---|---|
| 61 | Length | Force the base line to this length before dividing it: longer or shorter than picked. Empty or 0 keeps the picked length. Not applied in Multiple mode. |
| 62 | spinner | Only redraws in this version; it does not change the value. |
| 63 | Mid | The forced length grows or shrinks about the middle of the base line. |
| 64 | Point 1 | The forced length grows or shrinks from the first point, keeping it fixed (default). |
| 65, 70 | ↑, ↓ | Shift the base line sideways by one Step (69) per click, accumulated. This is added to the Offset (71). |
| 66, 68 | ←, → | Slide the base line along itself by one Step per click, keeping its length: it is extended at one end and cut at the other. Not applied in Multiple mode. |
| 67 | x | Reset both the slide and the sideways shift to zero. |
| 69 | Step | 0.5, 0.1, 0.25, 1 or 5 drawing units per click of the pad. |
| 71 | Offset | Sideways offset of the base line, applied before the bays are computed (0 by default). With Reference = Front it is added to the push-back distance instead. Change the sign if the line moves the wrong way. |
Tab 1: Bays. Marking (frame at right)
| # | Control | What it does |
|---|---|---|
| 28 | Vehicles | Not available in this version. |
| 29 | 1 | One bay width, the value in 34 (default). |
| 30 | 2 | Two widths alternating along the row: 34, 36, 34, 36... |
| 31 | Free | The widths listed in 37, used once in order. The row stops when the list is used up, even if the base line goes on. Values that are not positive are ignored; an empty list falls back to the width in 34. |
| 32 | Total | The whole base line is one bay: bay width = base-line length (with Angle 0, bay depth = base-line length). Number and Quantify can be skipped in this mode (121, 130). |
| 33 | Qty. | Number of bays. Empty: as many as fit, and after the first redraw the box shows that count with max N next to it. From then on the box is used as a fixed count, so a later change that reduces the maximum gives the message Quantidade acima do máximo; clear the box to recompute. A count smaller than the maximum drops the last bays. |
| 34 | Width | Bay width along the base line (2.2). For angled bays the width is measured across the bay, so each bay takes width / cos(angle) of base line. |
| 35 | spinner | Only redraws in this version. |
| 36 | second width | The alternating width in mode 2. |
| 37 | list | The widths in mode Free, separated by commas or semicolons. |
| 38 | Length | Bay depth: the length of each demarcation (5.5). |
| 39 | spinner | Only redraws in this version. |
| 40 | Fit width to length | Normally the base line is trimmed to a whole number of bays (20 / 2.2 gives 9 bays and 0.2 left over). With this on the bays are widened instead, so they use the whole line (9 bays of 2.222). Modes 1 and Total only. |
| 41 | Angle | Demarcation angle in degrees: 90 = perpendicular to the base line (default), 0 = parallel bays (the Length runs along the line and the Width becomes the depth), 30/45/60 = angled bays leaning towards the end of the line, negative values lean the other way, −90 = perpendicular walked from the other end. Type any value or pick from the list. |
| 42 | ± | Change the sign of the angle. |
| 43 | Line width | Constant width of every demarcation, back line, tick, front line, taper and zebra stripe (0.10). Also the amount used by Detach (51, 52) and Deduct stripe (156, 157). |
| 44 | Layer | Layer of the demarcations, back lines and ticks (SINA_HOR_BR_MER, typed). |
| 45 | Action | Not available in this version. |
| 46 | Inner | Draw the demarcations between bays. Off: only the two outer lines (and the back-line pieces) remain. |
| 47 | Start | Draw the outer demarcation at the start of the row. Off with Delimiter: only its tick remains. |
| 48 | End | The same for the end of the row. |
| 49, 50 | Add parallel, value | Not available in this version. |
| 51 | Detach rear | Offset the base line by half a Line width so the edge of the back line, not its centre, sits on the reference. Not applied with Reference = Front. |
| 52 | Detach side | Slide the base line along itself by one Line width (the recorded reference is slid back). With Total: shorten the base line by two line widths instead. |
| 53, 54 | Remove extras, ↑ | Not available in this version. |
| 55 | Number | Same as 107: number the bays. |
| 56 | Quantify | Same as 122: insert a quantification block in every bay. |
Tab 1: Bays. Inner tab Pictogram
| # | Control | What it does |
|---|---|---|
| 72, 79 | Bays | Which bays get pictogram 1 / pictogram 2: all, alterna1 (1st, 3rd, 5th...), alterna2 (2nd, 4th...) or a list such as 1-4, 7. Empty: none. |
| 73, 80 | Block | Block name to insert (DEF_COR, IDS by default; type any name that exists in the drawing). The list is not filled from the drawing in this version. |
| 74, 81 | Angle | Rotation added to the bay's own direction (degrees). |
| 75, 82 | Scale | Uniform scale of the insert. |
| 76, 83 | X | Distance from the back line into the bay. |
| 77, 84 | Y | Sideways shift along the base line. The default 4.5 puts the block 4.5 units along the line, two bays over; use X for the distance into the bay. |
| 78, 85 | c | Not available in this version. |
Pictograms are inserted on layer SINA_HOR_BR_MER. A bay with a pictogram gets its quantification TYPE from the block name (DEF_COR and DEF become PNE, IDS becomes IDOSO).
Tab 1: Bays. Inner tab Text
| # | Control | What it does |
|---|---|---|
| 86 | Bays | Which bays get the text (same syntax as 72). Empty: none. |
| 87 | Text | IDOSO, PNE, IDOSO/PNE or any typed text. Also becomes the quantification TYPE of those bays. |
| 88 | Angle | Rotation added to the bay's direction (degrees). |
| 89 | Height | Text height (0.4), text style capcad_parking. |
| 90 | X | Distance from the back line into the bay. |
| 91 | Y | Sideways shift along the base line. |
| 92 | Layer | Layer of the text (SINA_HOR_BR_MER). |
| 93, 95, 96 | Custom, Centre, Entrance | Not available in this version; the position always comes from X and Y. |
| 94 | Fill layer | <sem> = no box. Drawing a box around the text on another layer is not available in this version. |
Tab 1: Bays. Inner tab Fill
| # | Control | What it does |
|---|---|---|
| 97 | click | Not available in this version. |
| 98 | Bays (zebra) | Which bays are zebra-striped (same syntax as 72). A zebra bay gets no number and no quantification block; the next bay takes the number. Without a Closed front, each zebra bay also gets its own closing line across the mouth. |
| 99 | Layer (zebra) | Layer of the stripes (SINA_HOR_BR_MER). |
| 100 | Additional angle | Stripes are drawn perpendicular to the bay's bisector; this angle (degrees) is added. |
| 101 | Inner | Spacing between stripes (0.5). |
| 102 | Width | Stripe width (0.1). |
| 103 | Fill | Draw the closed outline of the bays listed in 105 as a filled (hatched) polygon. |
| 104 | Outline | Draw the closed outline only. |
| 105 | Bays (fill) | Which bays are filled or outlined. Empty: none. |
| 106 | Layer (fill) | Layer of the outline (SINA_HOR_AZ_MER). |
Tab 1: Bays. Inner tab Number
| # | Control | What it does |
|---|---|---|
| 107 | Number | Number the bays (default on; same as 55). Zebra bays are skipped. |
| 108 | From the last one | Default on: before each redraw the drawing is scanned for CAPCAD_PARKING_BLOCK inserts, and the first number is the highest NUMBER attribute found plus one. The result is shown in 112 (disabled). |
| 109 | Text | Numbers as text, height 113, style capcad_parking, read from the open end of the bay. |
| 110 | Attributed block | Numbers as CAPCAD_PARKING_NUMBER_BLOCK inserts (default): a rounded badge with the NUMBER attribute visible and EXTRA invisible, scaled by 114. |
| 111, 117 | System, Custom | Not available in this version. |
| 112 | Start | First number (1). Editable only when 108 is off. |
| 113 | H text | Height of the text number (0.6). |
| 114 | Block scale | Scale of the number block (1). |
| 115 | Offset | Distance of the number from the open end back into the bay (0.5). |
| 116 | ? | No help text in this version. |
| 118, 119, 120 | centre, inf, select | Not available in this version. |
| 121 | Skip when bay width = length | With Total (32) on, do not number. |
With Multiple input the numbers continue from one base line to the next; after Accept, the next row continues from the drawing if 108 is on.
Tab 1: Bays. Inner tab Quantify
| # | Control | What it does |
|---|---|---|
| 122 | Apply | Insert one CAPCAD_PARKING_BLOCK per bay (default on; same as 56) on layer CAPCAD_ESTACIONAMENTO_QUANT, with the attributes TYPE, NUMBER, ADDRESS and EXTRA. Zebra bays get none. Both block definitions are created on the first run if the drawing lacks them and are never redefined. |
| 123 | ? | No help text in this version. |
| 124 | Offset | Distance of the block from the back line into the bay (0.5). |
| 125 | Identification | The TYPE attribute. <auto>: NORMAL, or the Presets text (1) if any, replaced by the text (87) or the pictogram block name of that bay when it has one. Any other value typed here is used as is. DEF_COR/DEF are written as PNE, IDS as IDOSO. |
| 126 | ? | No help text in this version. |
| 127 | Extra | Written into the EXTRA attribute of every block. |
| 128 | Address | Written into the ADDRESS attribute. |
| 129 | Bay count (read-only) | Total bays of the last run, all base lines added up. |
| 130 | Skip when bay width = length | With Total (32) on, insert no blocks. |
Tab 1: Bays. Inner tab Termination
Tapers at the ends of the row, for perpendicular (90) and parallel (0) bays only. Each taper is a line from the open corner of the first (or last) bay down to the back-line level, leaning outward by the value: a right triangle whose legs are the bay depth and the value.
| # | Control | What it does |
|---|---|---|
| 132 | Start | Draw the taper at the start of the row. |
| 131 | value | Outward leg of the start taper (1). |
| 133 | Use total (start) | Instead of the value, the taper spans the whole base line the other way: from the open corner at the start to the back line at the end. |
| 134 | End | Draw the taper at the end of the row. |
| 135 | value | Outward leg of the end taper. 0 = same angle as the start taper. |
| 136 | Use total (end) | As 133, for the end. |
| 137 | Layer | Layer of the tapers (SINA_HOR_AM_MER). |
Tab 2: Presets
| # | Control | What it does |
|---|---|---|
| 138, 139, 141 | Vehicles, Filter, list | Not available in this version. |
| 140 | 2 points | Same as the pick button (4). |
Tab 3: Tools
| # | Control | What it does |
|---|---|---|
| 151 | Select quantification blocks | The form hides, you select on screen, and only the CAPCAD_PARKING_BLOCK inserts are kept in the selection. The count is written on the command line. |
| 142 to 147, 149, 152, 153 | other buttons | Not available in this version: the command line says Ainda não disponível nesta versão with the tool's name. |
| 148 | ? | No help text in this version. |
| 150 | Start | Not available in this version. |
Tab 4: Options
| # | Control | What it does |
|---|---|---|
| 154, 155 | Show reference line, Show bay numbers | Not available in this version. |
| 156 | Deduct stripe: Length | Add one Line width to the bay width (perpendicular and angled bays) or to the bay depth (parallel bays), so the clear space between stripes keeps the nominal size. Not with Total. |
| 157 | Deduct stripe: Width | Add half a Line width to the bay depth (perpendicular and angled bays) or to the bay width (parallel bays). |
| 158, 159 | Include side, Include reference | Not available in this version. |
| 160 | Join outer lines when possible | One side only (17 or 18): weld the two outer demarcations and the back line (and the Closed front, when both are on the same layer) into a single polyline. Default on. See the note below before relying on it. |
| 161 | ? | No help text in this version. |
Tab 5: Tutorial, Tab 6: Area study [Beta]
| # | Control | What it does |
|---|---|---|
| 162, 163, 164 | Intro video, Tutorial video, Sample | Not available in this version. |
| 165, 166 | Space between bays, Select area | Not available in this version. |
How the options combine
All figures below were produced by running the command's own engine on a straight base line of 20 units, picked from P1 (left) to P2 (right), with Side = Right, Rear = Individual, Front = Delimiter 0.25, width 2.2, depth 5.5, line width 0.10 and numbers as text. The dashed grey line is the picked base line. Numbers are drawn to be read from the open end of the bay, which is why they appear upside down on the Right side.
Side
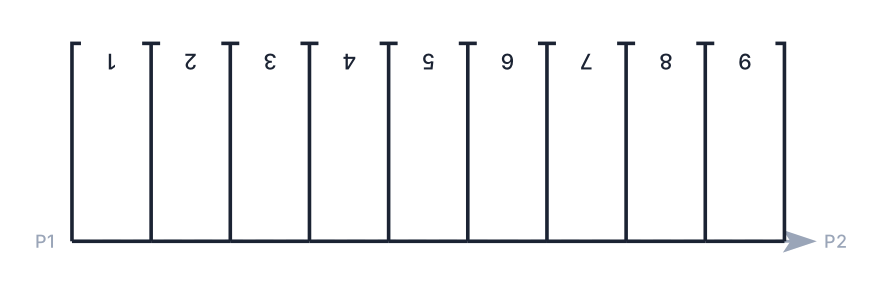
Right: nine bays of 2.2 above the line. 20 / 2.2 = 9.09, so the base line is trimmed to 19.8 and the last 0.2 (dashed) is unused.
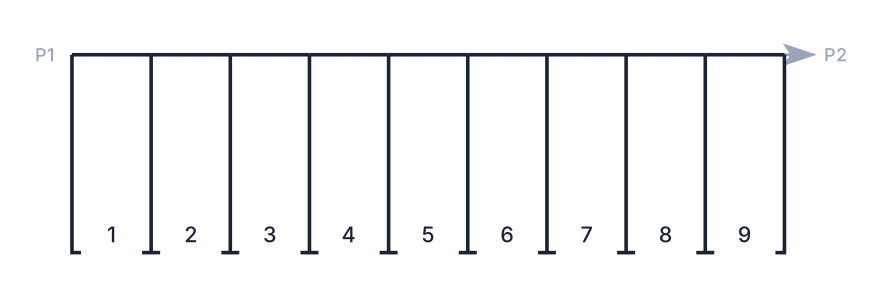
Left: the same row below the line; numbers read from below.
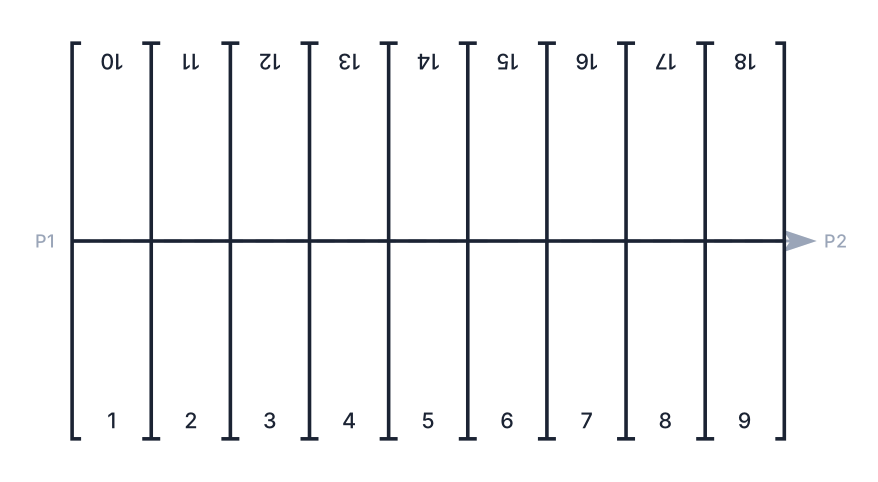
Both: bays on both sides, each demarcation is one line crossing the base line. Numbers 1 to 9 on the Left side, 10 to 18 on the Right.
Rear
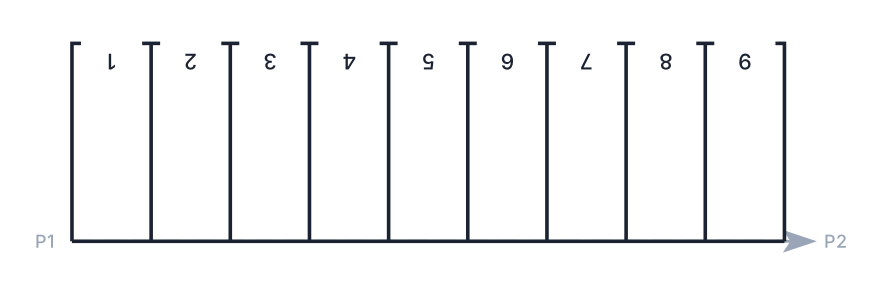
Straight: one back line for the whole row.
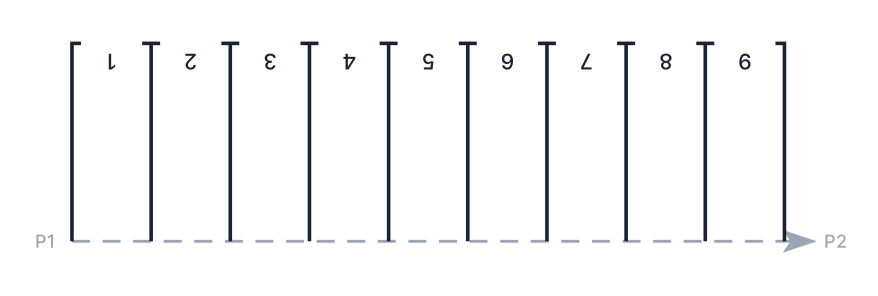
None: no back line; the demarcations start on the base line.
Front
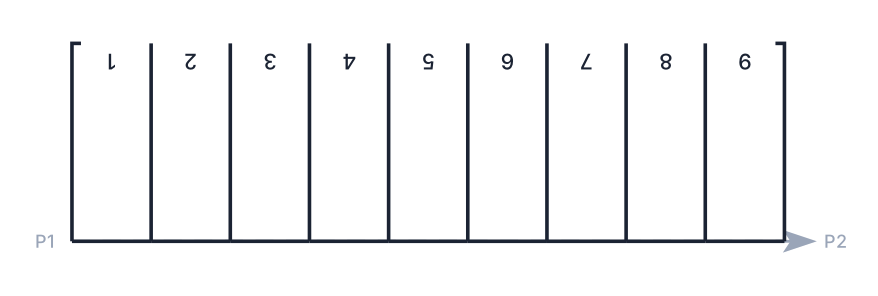
Delimiter with Ends only: only the two inward ticks at the ends.
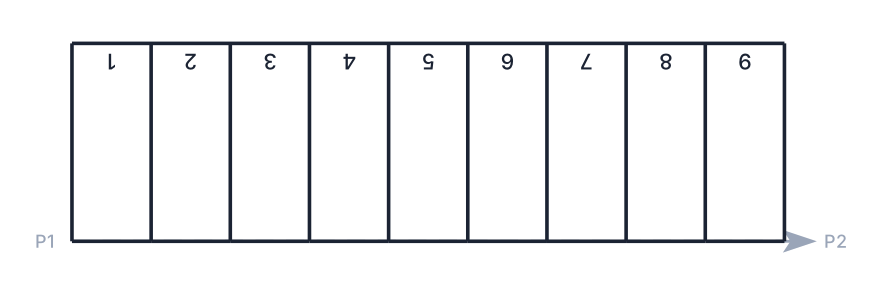
Closed: a straight line joins the open ends, on the front layer.
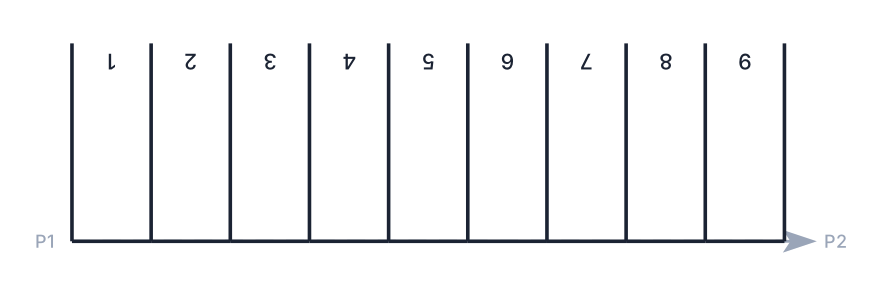
None: plain demarcations.
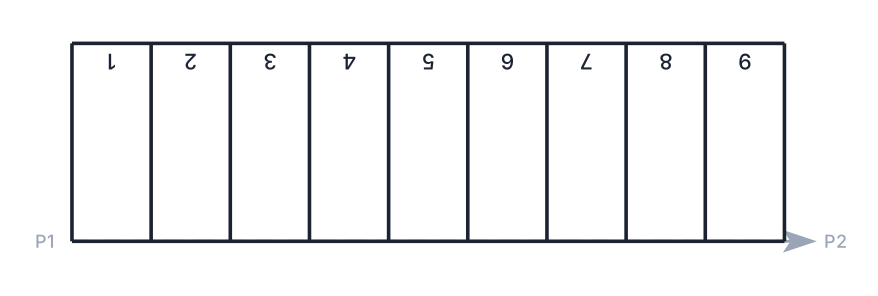
Closed front with Straight rear: every bay is a closed rectangle.
Angle
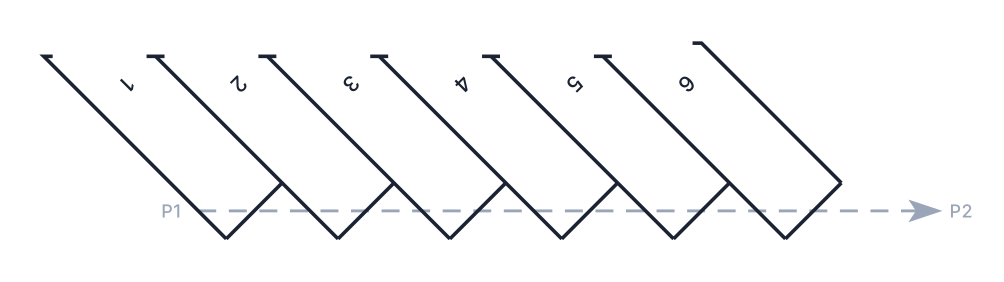
Angle 45: bays lean towards P2. Each one takes 2.2 / cos 45° = 3.11 of base line, so six bays fit (the width readout is 3.11, the adjusted width 2.2).
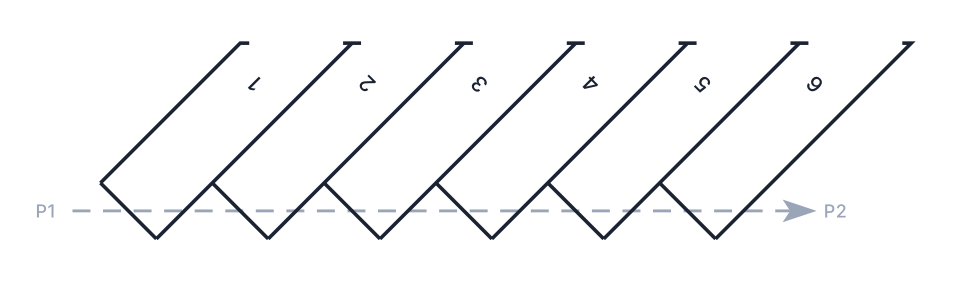
Angle −45: the same bays leaning the other way.
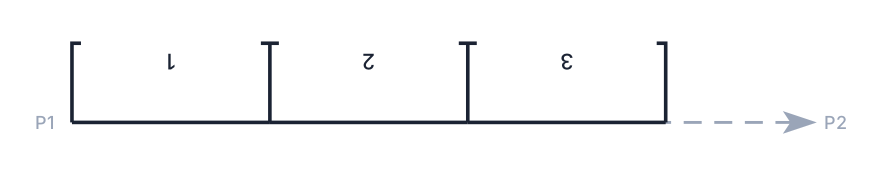
Angle 0, parallel bays: the Length (5.5) runs along the base line and the Width (2.2) becomes the depth. Three bays fit in 20 and the line is trimmed to 16.5.
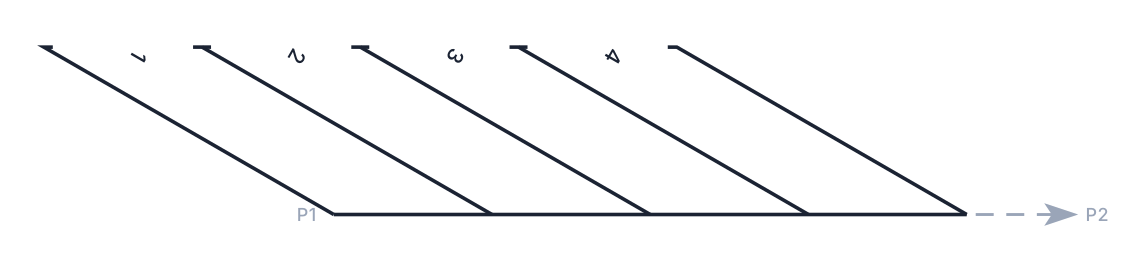
Angle 60 with Straight rear: the depth is increased so the angled demarcations still reach the back line.
Marking modes
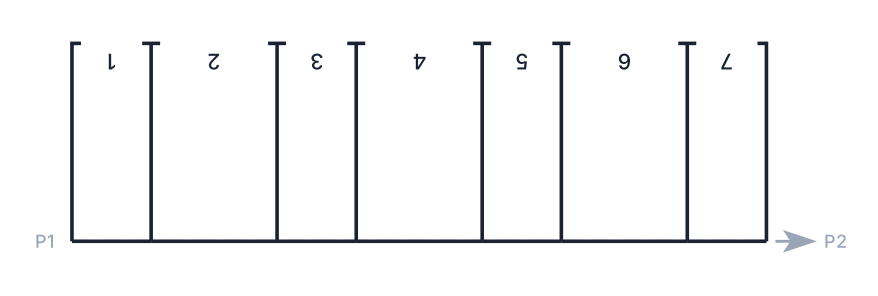
Mode 2 with widths 2.2 and 3.5: the widths alternate; seven bays fit and the line is trimmed to 19.3.
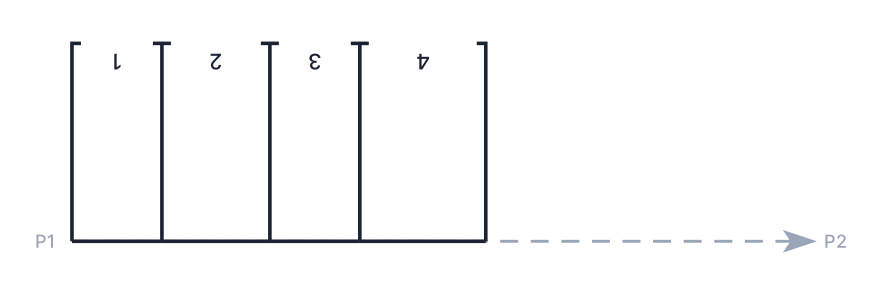
Mode Free with the list 2.5, 3, 2.5, 3.5: the list is used once and the rest of the base line is left alone.
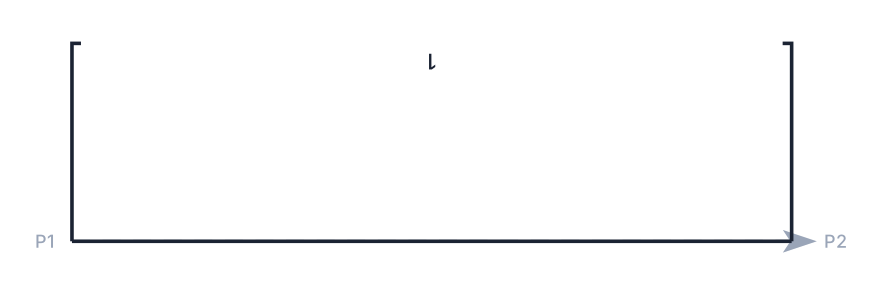
Mode Total: one bay the full length of the base line.
Quantity and fit
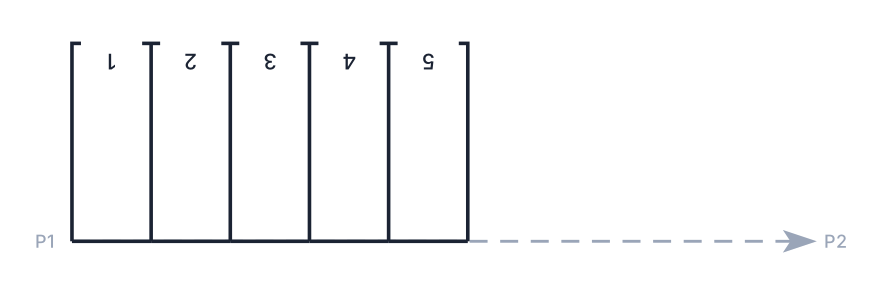
Qty. = 5: only the first five bays are drawn (the maximum was 9).
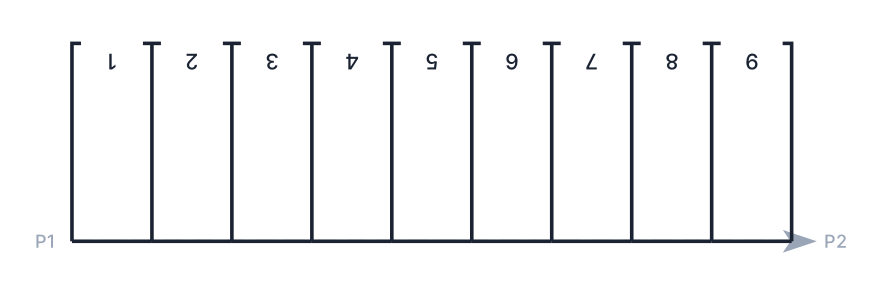
Fit width to length: nine bays of 2.222 use the whole 20 units; nothing is trimmed.
Draw
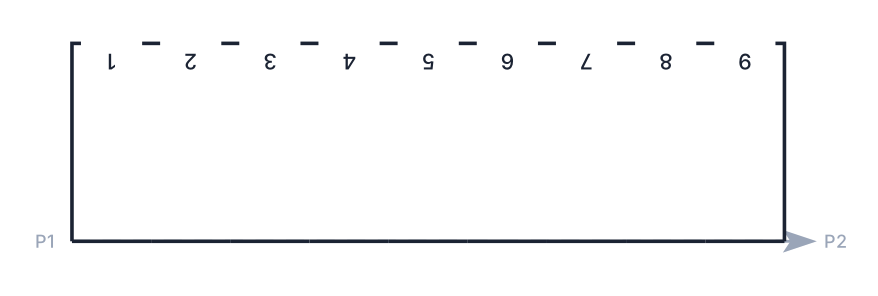
Inner off: only the two outer demarcations remain; the back-line pieces and the ticks stay.
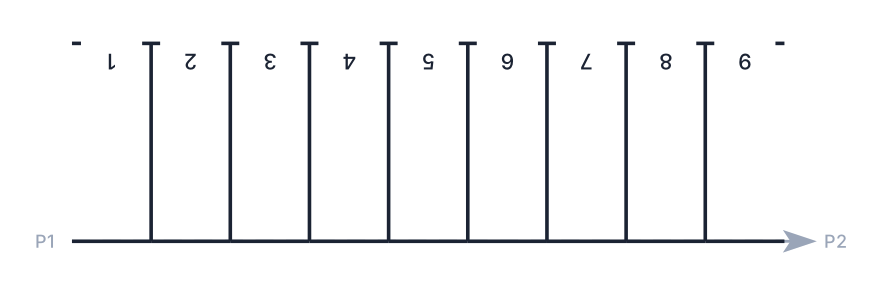
Start and End off: the outer demarcations are removed; with Delimiter on, their ticks remain.
Reference
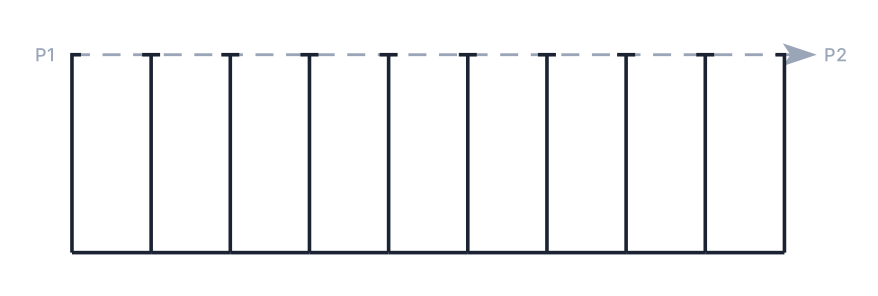
Reference = Front: the picked line is the open end; the row is pushed back by the depth (numbers off in this figure, see the notes).
Termination
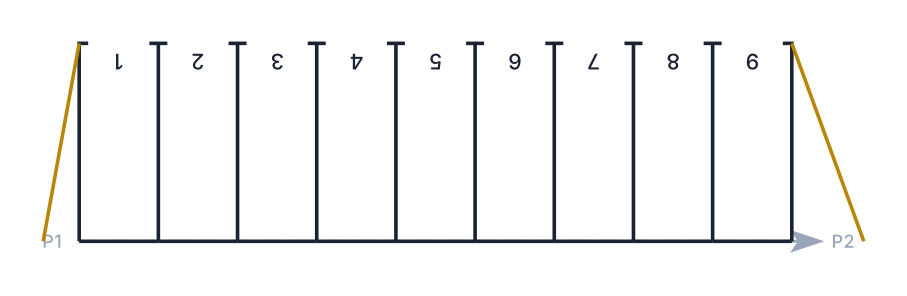
Start 1 and End 2: tapers from the open corner of the first and last bay to the back-line level, leaning outward by 1 and by 2.
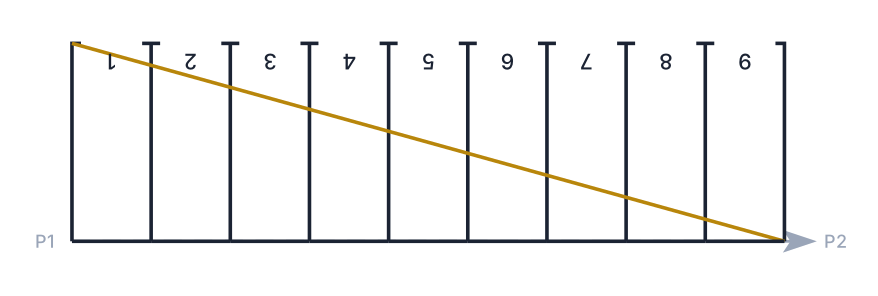
Start with Use total: the taper runs from the open corner at the start to the back line at the end of the row.
Fill
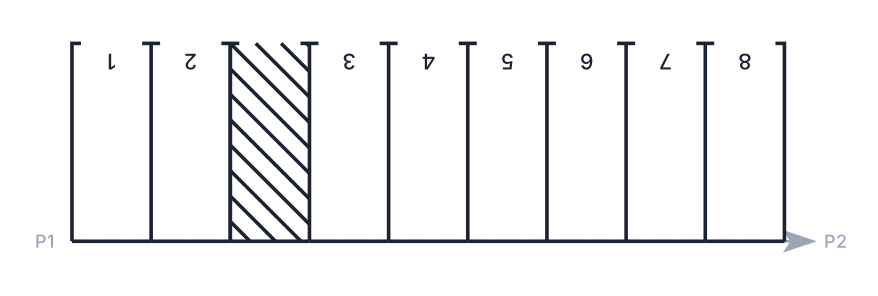
Zebra on bay 3, spacing 0.5, stripe width 0.1: the bay is striped, not numbered, and the next bay takes number 3.
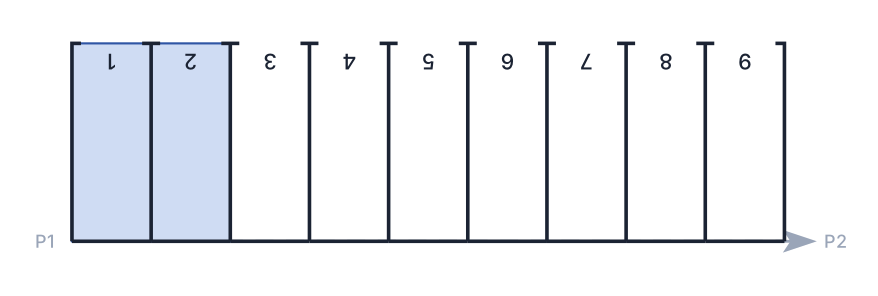
Fill on bays 1, 2: the closed outline of each is drawn on the fill layer and hatched.
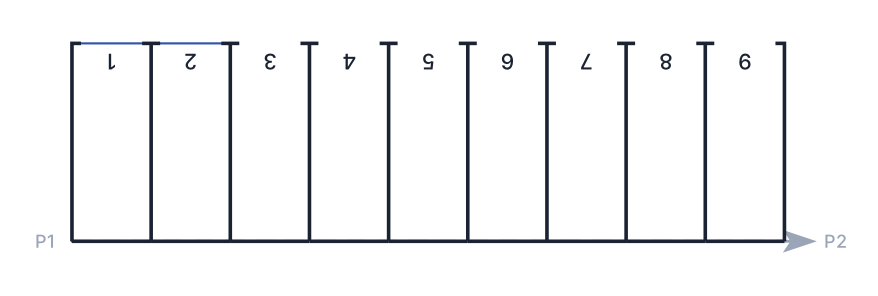
Outline on bays 1, 2: the closed outline only.
Pictograms, text, numbers, quantification
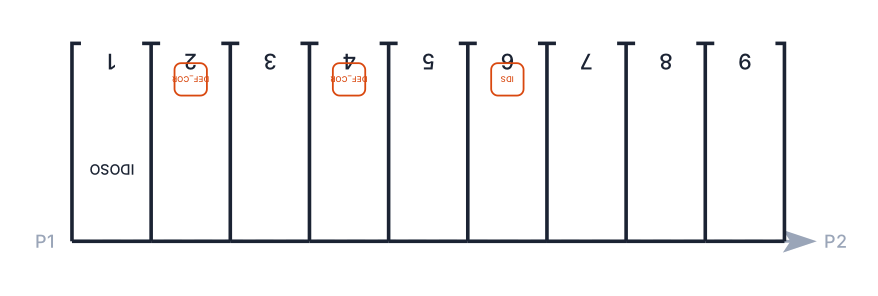
Pictogram 1 (DEF_COR, X 4.5) on bays 2 and 4, pictogram 2 (IDS, X 4.5) on bay 6, text IDOSO (X 2) on bay 1. X is measured from the back line into the bay.
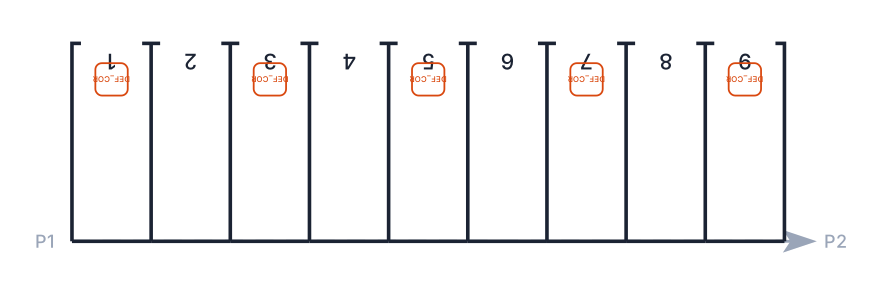
Bays = alterna1: the pictogram on the 1st, 3rd, 5th, 7th and 9th bay.
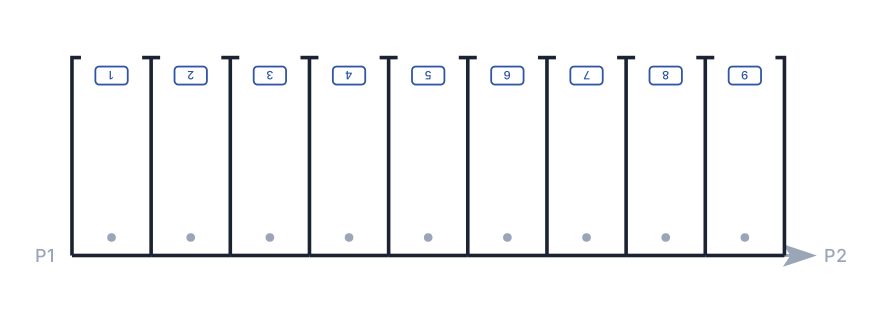
Number as Attributed block (badge near the open end) and Quantify on: an invisible quantification block (grey dot) 0.5 from the back line of every bay.
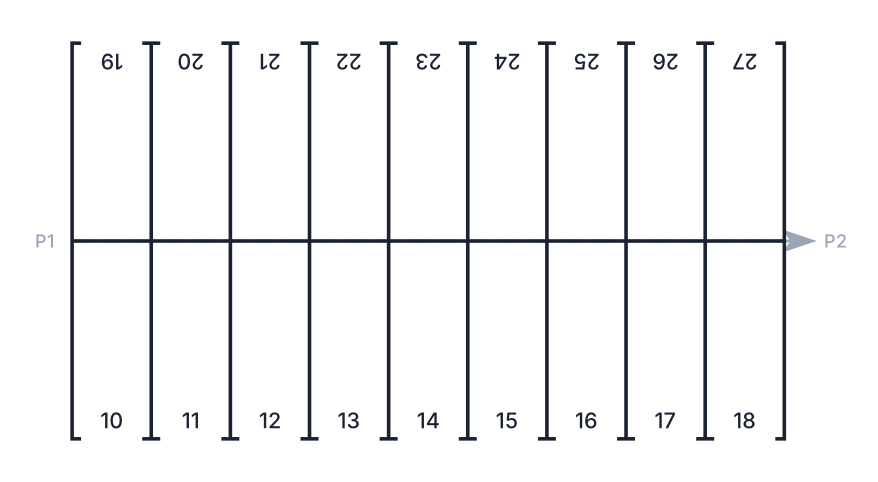
Both sides with Start = 10: the Left side takes 10 to 18, the Right side 19 to 27.
Base line
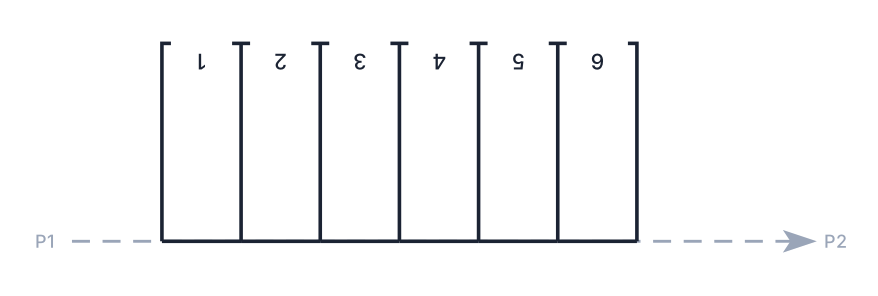
Length 15 with Mid: the 20-unit base line is shortened to 15 about its middle; six bays fit.
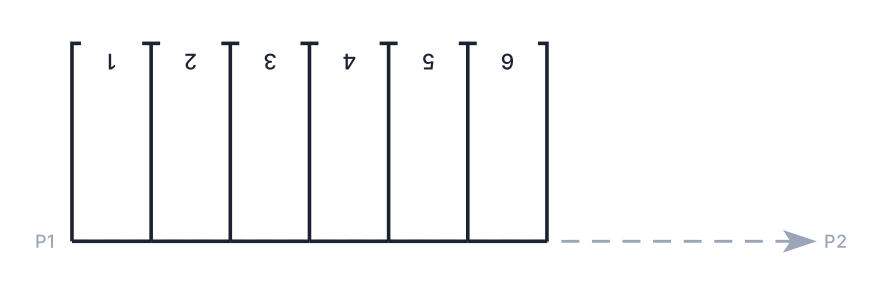
Length 15 with Point 1: shortened from the first point; the start stays put.
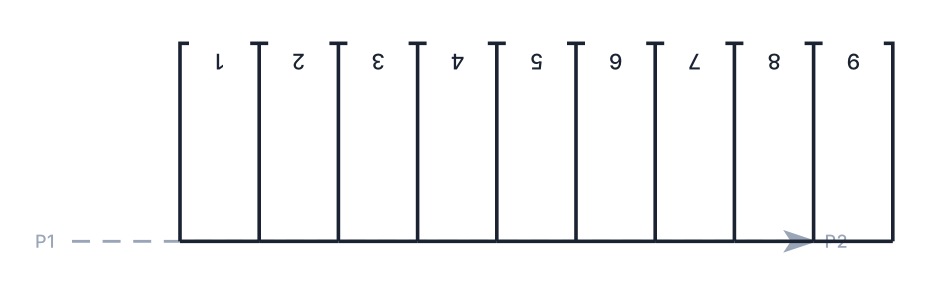
Move → six clicks of 0.5: the base line slides 3 units along itself, keeping its length.
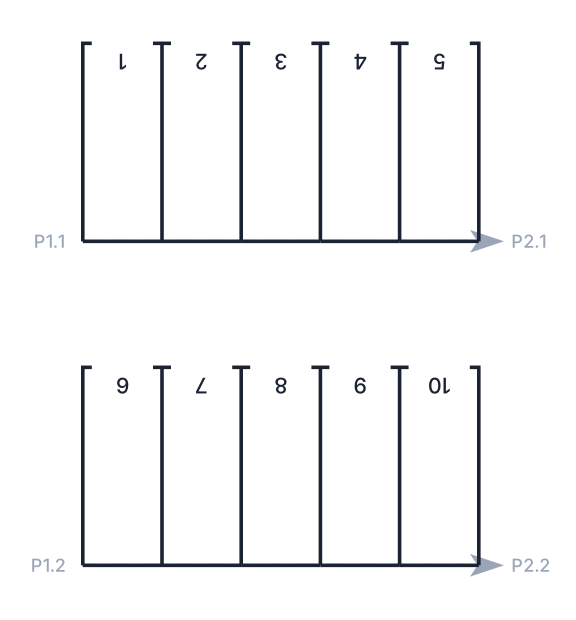
Multiple with two base lines of 11 units: each gets its own row and the numbers continue, 1 to 5 then 6 to 10.
Remembered between sessions
Nothing. Every control returns to its default value when the form is opened again. The layer and block boxes keep only their default entries; they are not filled from the drawing.
Notes
- Which side is Right. Right is the counter-clockwise side of the base line: with a line picked from left to right on the screen, the bays go above it. If they land on the wrong side, use Flip direction (13) or pick the line the other way.
- Join outer lines (160): on a one-sided row the joined polyline can contain a stray diagonal segment. Check the result, or leave the option off.
- Reference = Front moves the text items (numbers as Text, the Text tab entries) twice as far as the lines, so they land outside the bays. Use Attributed block numbers with Front, or keep Rear and offset the line yourself.
- Qty. box. After the first redraw the box holds the computed count and is treated as a fixed value; clear it whenever you change the width, angle or base line and want the count recomputed.
- Blocks and layers. The two attributed blocks are created in the drawing on the first run if missing and never redefined. The number badge is drawn on the blue marking layer; the quantification block on
CAPCAD_ESTACIONAMENTO_QUANT; pictograms and text numbers onSINA_HOR_BR_MER. Layer names are taken as typed. - Not available in this version: presets, the Tools launchers other than 151, the text position radios, the c and click buttons, the ↑ buttons, Auto, Add parallel, Remove extras, Action, Vehicles, the spinners, the Options preview and preset boxes, the Tutorial links, Area study, and the ? labels.