This page covers the two commands that draw transverse elements meant to slow traffic down: one computes where the lines fall from the deceleration, the other builds the body of the obstacle over a two-point line.
| Commands | CAPCAD_MARKING_SPEED_REDUCTION_LINES (speed-reduction lines / rumble strip) and CAPCAD_DEVICE_TRANSVERSE (hump and the other transverse devices) |
| Shortcuts | LRV and LB |
| Ribbon | CapCad tab › Traffic Control panel › Transverse split button › Yellow Transv' Bars and Speed Bump |
| Category | CAPCAD_MARKING_SPEED_REDUCTION_LINES: Horizontal: Especiais · CAPCAD_DEVICE_TRANSVERSE: NEW |
| Forms | LervForm "LRV", with four modes and a side expander · LombadaForm "Lombada" (hump), with four families. Both are modeless: the drawing stays live while they are open |
| Hosts | CAPCAD_MARKING_SPEED_REDUCTION_LINES: AutoCAD, BricsCAD, GstarCAD, ZWCAD and ARES Commander (the Use active alignment option only works on AutoCAD) · CAPCAD_DEVICE_TRANSVERSE: AutoCAD (on ARES Commander the command exists and reports that it is not available yet; not available on BricsCAD, GstarCAD and ZWCAD) |
| Also opened by | none |
Speed-reduction lines are not an array: the distances between them shorten as the driver approaches the obstacle, and that calculation is what the command does. You type an initial speed and a final speed and let CapCad decide how many lines there are and where — the opposite of copying a stripe with a decreasing spacing by hand.
- The calculation is on screen. The calc note beside the form shows how many lines, how many intervals, every distance, and the raw n before rounding — the sheet you attach to the design.
- Four modes in one form. Computed lines, rumble strip, a typed list of distances (with the tables of the active country profile's norm ready to load), and "just one", which drops one line per click until you stop.
- Rounding under control. The number of intervals can round normally, truncate or go up; the distances can be snapped to multiples of 0.5.
- The hump is geometry, not a canned block. 45° bands, a solid slab, a grid of circles or a rumble strip, all built to the width you clicked.
- The line you clicked can be any edge of the body. Top, centre, bottom, or set back by a measurement — with no need to move the drawing afterwards.
- Trimming comes with it. One button trims the existing surface marking around the obstacle, using the rectangle the command has already built.
- The warning signs come too, 10 m past each end, when you ask for them.
What it does
Speed-reduction lines
The command asks for a point (the obstacle) on an alignment or a curve and spreads transverse bars along it, with a shortening spacing towards the obstacle.
The calculation: from the initial and final speeds comes the deceleration time ta = (v0 − va)/a; divided by the interval t between consecutive lines, it gives the number of intervals n; and the distance of line i is i × (v0·t − 0.5·a·t²·i), with v0 in m/s. The form opens with t = 1.00 s and a = 1.47 m/s², the usual values; both are editable in the side column. The total number of bars is n + 1: there is one bar at the obstacle on top of the n computed.
When you leave the width field at zero, the bar width comes from the initial speed: 0.40 above 80 km/h, 0.30 between 60 and 80, 0.20 below 60.
The other three modes work the same way with a different input: Rumble strip replaces the bars with stripes of constant width and gap along a stretch; Value list uses the distances you type (and loads tabulated ones from the presets combo); Just one places a single bar and asks for the next point, until you press Esc.
Transverse devices (hump and relatives)
The command asks for two points — normally kerb to kerb — and builds the body of the device between them, with the given height, in four families:
- Lombada (hump): the body rectangle plus 45° bands clipped inside it. The rectangle goes on the
LOMBADAlayer and the bands on the manual yellow horizontal-marking layer. - Solid: a single filled rectangle.
- Elementos (elements): a staggered grid of circles (or of a chosen block) inside the body, with an optional outline.
- Sonorizador (rumble strip): stripes of constant width and gap crossing the body, repeated along the direction of travel.
The body can be drawn straight into the drawing or inside a block generated on the spot (LOMBADA_H…, CIRCLES_H…, SONORIZADOR_H…), inserted at the middle of the span.
Workflow
Speed-reduction lines
- Run
CAPCAD_MARKING_SPEED_REDUCTION_LINES(or typeLRV). - Choose the mode (6 to 9) and fill in Initial speed (11) and Final speed (12).
- Click Select point (1) and click on the alignment, at the obstacle. With Use active alignment (5) ticked CapCad works out on its own which project alignment runs there; without it, you select the curve and then the point.
- Adjust length (18), width (15), orientation (28, 30, 31) and direction (24, 25). Every Enter redraws.
- Check the Calc note (27) — it is the calculation record.
- Click Accept (16) to let go of the reference, or Reset (13) to erase the drawing.
Transverse devices
- Run
CAPCAD_DEVICE_TRANSVERSE(or typeLB). - Choose the family (53 to 56) and type the body height (62).
- Click Criar transversalmente com 2 pontos ("create transversely with 2 points", 59) and click the two points, left kerb to right kerb.
- Choose the reference line (66 to 72): where the line you clicked sits relative to the body.
- Adjust the family's parameters and press Enter, or click Update (75).
- To open space in the existing marking, click Trim sinalização horizontal ("trim surface marking", 78).
- Aceitar ("accept", 74) keeps the body and frees the command for the next one.
The form
The numbers on this page are unique and continuous: 1 to 52 on the LRV form and 53 to 89 on Lombada.
The screenshots below were captured in a Portuguese session; the control numbering is the same in every language. The LRV form has English captions and the tables quote them; the Lombada form is shown in Portuguese in every language, so its captions below are quoted in Portuguese and glossed.
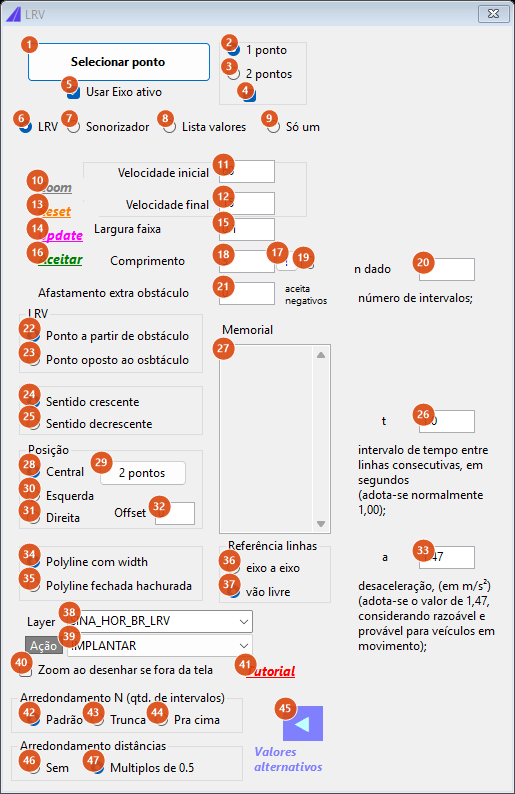
LRV mode, with the side expander (45) open to reveal the n, t and a fields and the explanation of each.
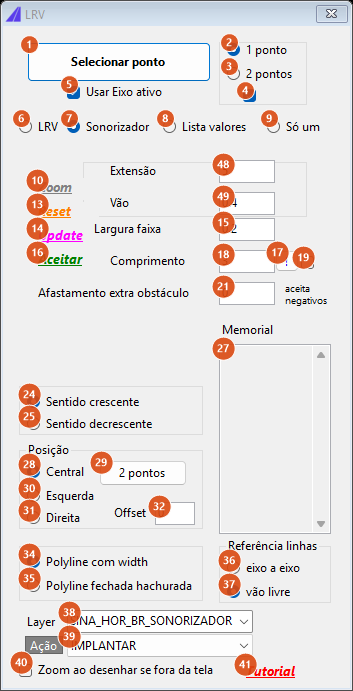
Rumble strip mode: the speeds give way to "Length" (48) and "Gap" (49), the width becomes 0.2, the layer changes to SINA_HOR_BR_SONORIZADOR and the rounding frame disappears.
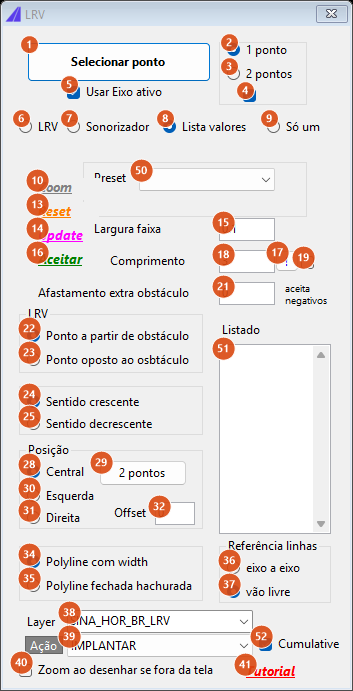
Value list mode: the presets combo (50), the values box (51) in place of the calc note, and the "Cumulative" box (52) appear.
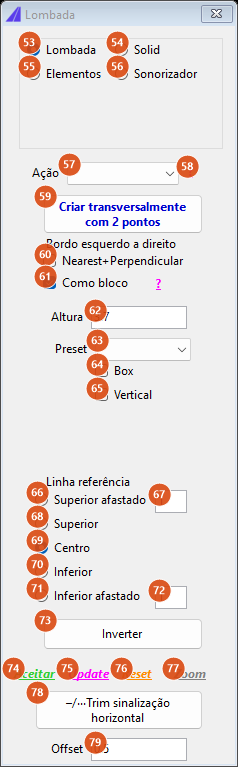
The Lombada family: "Preset" (63), "Box" (64) and "Vertical" (65).
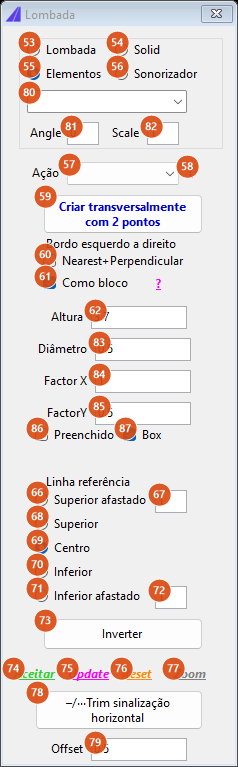
The Elementos family: the block combo (80), "Angle" (81) and "Scale" (82) appear in the upper frame, and the panel shows "Diâmetro" (83), "Factor X" (84), "FactorY" (85), "Preenchido" (86) and "Box" (87).
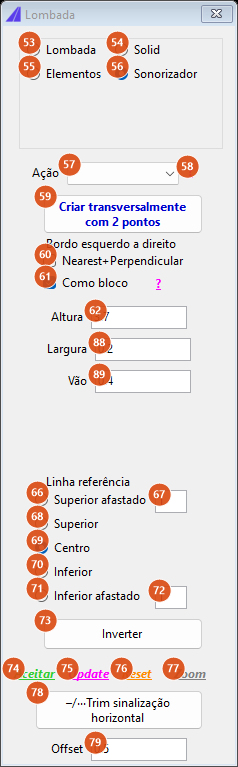
The Sonorizador family: "Largura" (88) and "Vão" (89).
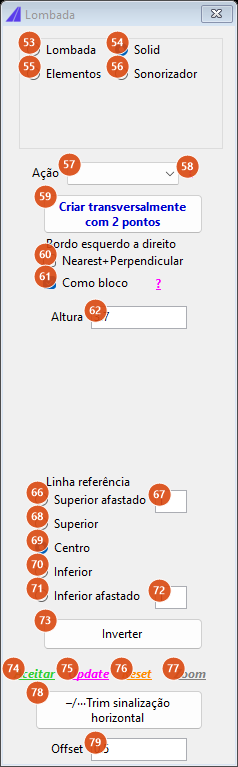
The Solid family: no parameter panel — only the height and the reference line.
LRV — selection and mode
| # | Control | What it does |
|---|---|---|
| 1 | Select point / Select alignment and point | The caption follows 5 and 3. Hides the form and asks for the reference and the working point; with Use active alignment ticked, only the point, and the project alignment whose perpendicular foot is nearest (within 50 units) is the one chosen. After accepting, it draws a red cross on the auxiliary layer over the perpendicular foot. |
| 2 | 1 point | One click defines the working point. |
| 3 | 2 points | Two clicks: they give the bar length, the side and the offset, and the bar then spans exactly the gap you clicked. |
| 4 | (box beside 3) | Forces CapCad's object snaps to nearest on the first click and perpendicular on the second, and puts the previous setting back afterwards. On by default. |
| 5 | Use active alignment | On AutoCAD it is only enabled when the project has a registered alignment — and then it comes ticked. On the other four CADs it appears ticked but is not used: the command asks for the curve before the point. |
| 6 | LRV | The deceleration calculation. |
| 7 | Rumble strip | Stripes of constant width and gap over a length. |
| 8 | Value list | The distances come from box 51. |
| 9 | Just one | One bar at a time, 1 unit from the point: after each one, the command asks for the next point with the form still open. Esc ends it. Everything drawn stays. |
LRV — parameters
| # | Control | What it does |
|---|---|---|
| 10 | Zoom | Frames the last drawing on screen. |
| 11 | Initial speed | v0, in km/h. |
| 12 | Final speed | va, in km/h. If it is higher than the initial speed, the command warns and does not draw. |
| 13 | Reset | Erases the bars and the cross. The reference and the point stay, so Update redraws. |
| 14 | Update | Redraws with the current values. |
| 15 | Line width | Bar width, along the direction of travel. Zero lets the command choose from the initial speed (0.40 / 0.30 / 0.20). It opens at 0.1 in LRV and list modes, and at 0.2 on the rumble strip. |
| 16 | Accept | Lets go of the point and the reference; the bars stay and the cross is erased. |
| 17 | ! | Measures the length in the drawing: two clicks, and the distance goes into 18. |
| 18 | Length | Bar length, transverse to the road. |
| 19 | (box beside 17) | Applies the nearest/perpendicular snap pair to the two measurement clicks as well. |
| 20 | n given | Side column only. Forces the number of intervals, ignoring the calculation. Empty or zero lets the calculation decide. |
| 21 | Extra obstacle distance | Pulls the working point back along the curve before the bars are spread. Negatives accepted. |
| 22 | Point from the obstacle | The clicked point is the obstacle, and the bars move away from it. |
| 23 | Point opposite the obstacle | The clicked point is the far end: the spread is mirrored. |
| 24 | Forward | The bars advance in the curve's own direction. |
| 25 | Against | The other way. |
| 26 | t | Side column only. Time interval between consecutive lines, in seconds; 1.00 is the usual value. Zero or negative is read as 1. |
| 27 | Calc note | Read-only. The calculation record: number of lines, number of intervals, every distance, the total, and the unrounded n. |
| 28 | Centre | The bar is centred on the curve. |
| 29 | 2 points | Measures the gap with two clicks and writes length, side and offset — the same calculation as the 2 points mode, available at any time. |
| 30 | Left | The bar sits entirely to the left of the curve (one end on it). |
| 31 | Right | The same, to the right. |
| 32 | Offset | Extra lateral shift: the working curve is offset by this much before the spread. |
| 33 | a | Side column only. Deceleration, in m/s²; 1.47 is adopted as reasonable and likely for moving vehicles. |
| 34 | Polyline with width | Each bar is a line of constant width. |
| 35 | Closed hatched polyline | Each bar is a closed, filled rectangle. |
| 36 | C to C | List mode with Cumulative only: the typed distances are centre to centre. |
| 37 | Clear gap | List mode with Cumulative only: the typed distances are the clear gap, and the bar width is added at every accumulation. |
| 38 | Layer | SINA_HOR_BR_LRV or SINA_HOR_AM_LRV (on the rumble strip, SINA_HOR_BR_SONORIZADOR or SINA_HOR_AM_SONORIZADOR). |
| 39 | Action | IMPLANTAR, MANTER, REMOVER or REVITALIZAR (implant, keep, remove, refurbish); the suffix enters the layer name. |
| 40 | Zoom when drawn off screen | If the result falls entirely outside the view, it frames it on its own. |
| 41 | Tutorial | Opens the command's video in the browser. |
| 42 | Std | Rounds the number of intervals normally. |
| 43 | Trunc | Rounds down. |
| 44 | Up | Rounds up. |
| 45 | ▶ / ◀ | Expands the form to the right, revealing n given (20), t (26) and a (33) and the explanation of each. |
| 46 | None | Does not round the computed distances. |
| 47 | Multiples of 0.5 | Rounds each distance to the nearest multiple of 0.5. Only applies in LRV mode. |
| 48 | Length | Rumble strip only: the length of the stretch to fill, from the point on. |
| 49 | Gap | Rumble strip only: the gap between stripes. |
| 50 | Preset | Value list only. It fills box 51 with a tabulated set of distances. The four presets that ship today are Brazilian and are listed on the Portuguese page. |
| 51 | Values | One distance per line. Values separated by space, comma or semicolon are also accepted. |
| 52 | Cumulative | List mode only: each value is added to the previous one instead of being measured from the point. With Clear gap (37) ticked, the bar width enters each sum as well. |
Transverse devices — family and action
Captions on this form are Portuguese in every language; the gloss follows each one.
| # | Control | What it does |
|---|---|---|
| 53 | Lombada (hump) | Body with 45° bands. |
| 54 | Solid | A single filled rectangle. In this family the body is never drawn inside a block. |
| 55 | Elementos (elements) | A grid of circles or of a block. |
| 56 | Sonorizador (rumble strip) | Stripes of constant width and gap. |
| 57 | Ação (action) | CapCad's full action list — from IMPLANTAR to TROCAR, by way of INVENTÁRIO, DANIFICADO and CONFERIR. It enters the layer name. |
| 58 | ? | Note: the typed values only take effect on the "as block" path. |
| 59 | Criar transversalmente com 2 pontos (create transversely with 2 points) | Accepts the current body, validates the height, forces the World UCS, asks for the two points (the second rubber-banded from the first), builds the span and the trim rectangle, and restores the UCS. It refuses a height above 10 (and tints box 62 light blue), a height below 0.1, and a span wider than 50. |
| 60 | Nearest+Perpendicular | Forces the nearest snap on the first click and perpendicular on the second. |
| 61 | Como bloco (as block) | On by default. Instead of drawing loose geometry, it generates a block with the body inside and inserts a reference at the middle of the span. Ignored in the Solid family. The "?" beside it explains that elements inside the block take the block's layer and colour. |
| 62 | Altura (height) | The body dimension along the direction of travel. Default 3.7. |
Transverse devices — family parameters
| # | Control | What it does |
|---|---|---|
| 63 | Preset | Lombada family only. TIPOA sets the height to 3.7 and TIPOB to 1.5. That is all the presets do. |
| 64 | Box | Lombada family only: draws the body filled as well as the outer rectangle. |
| 65 | Vertical | Lombada family only: inserts two warning signs 10 m past each end of the span, facing the road. The sign is the Brazilian catalogue's; outside a Brazil profile the block is not found. |
| 80 | (block) | Elementos family only. <circles> draws circles; any other name stamps that block at each grid centre. The list carries the drawing's blocks (anonymous ones and the bodies the command itself generated excluded) and, on opening, the TACHA and TACHAO blocks are fetched from the library so that they appear there. |
| 81 | Angle | Extra rotation of the stamped block, in degrees. |
| 82 | Scale | Scale of the stamped block. Zero is read as 1. |
| 83 | Diâmetro (diameter) | Diameter of the grid circles. |
| 84 | Factor X | Grid pitch factor along the span. |
| 85 | FactorY | Grid pitch factor across it. |
| 86 | Preenchido (filled) | Fills the circles. |
| 87 | Box | Draws the grid's outer rectangle — which is always an outline, even when everything around it is filled. On by default. |
| 88 | Largura (width) | Rumble strip only: the width of each stripe. |
| 89 | Vão (gap) | Rumble strip only: the gap between stripes. |
Transverse devices — reference line and actions
| # | Control | What it does |
|---|---|---|
| 66 | Superior afastado (top, set back) | The body sits below the clicked line, set back by the measurement in 67. |
| 67 | (measurement) | The setback for 66. |
| 68 | Superior (top) | The clicked line is the top edge of the body. |
| 69 | Centro (centre) | The clicked line runs through the middle of the body. This is the default. |
| 70 | Inferior (bottom) | The clicked line is the bottom edge. |
| 71 | Inferior afastado (bottom, set back) | The body sits above the line, set back by the measurement in 72. |
| 72 | (measurement) | The setback for 71. |
| 73 | Inverter (invert) | Reverses the span, so the body is built to the other side, and redraws. |
| 74 | Aceitar (accept) | Lets go of the span and the auxiliary line; the body stays. Switching family also accepts the current body before redrawing. |
| 75 | Update | Redraws with the current values. |
| 76 | Reset | Erases the body and the span. |
| 77 | Zoom | Frames the drawn body, or the span when there is no body yet. |
| 78 | Trim sinalização horizontal (trim surface marking) | Trims the existing surface marking against the body rectangle, with the clearance in 79. The boundary is the one the command already built when it took the two points: you do not have to select it. After Aceitar, when there is no rectangle left, the command asks for a boundary again. |
| 79 | Offset | The clearance the trim uses. Default 0.5. |
The "?" beside Como bloco (61) and the label "Bordo esquerdo a direito" ("left kerb to right kerb") above 60 have no number.
How the options combine
The figures below came out of the engines themselves, over a 120 m sample alignment (speed-reduction lines) and over a 6 m span with height 3.7 (transverse devices).
Where the lines fall
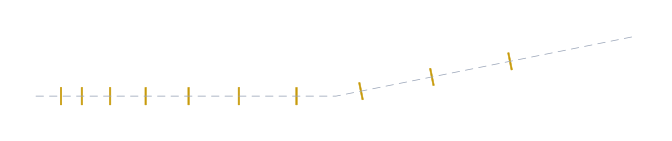
v0 = 60 km/h, va = 15 km/h, t = 1.00, a = 1.47: n = 8.503 rounded to 9, and the distances come out 0 — 15.94 — 30.40 — 43.40 — 54.92 — 64.98 — 73.56 — 80.68 — 86.32 — 90.50. Note that the gaps shorten towards the obstacle (on the left).
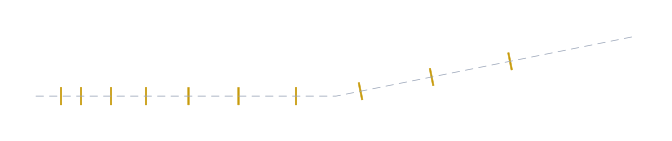
The same with Multiples of 0.5: 0 — 16 — 30.5 — 43.5 — 55 — 65 — 73.5 — 80.5 — 86.5 — 90.5.

The same calculation with orientation Left: the bars sit entirely on one side of the alignment instead of being centred on it.
The four families of transverse device
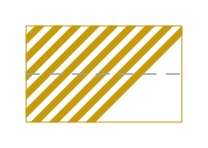
Family Lombada, span 6 m, height 3.7: the outer rectangle and the 45° bands clipped inside it. The dashed line is the clicked span, here on the "Centro" reference. The banding under-runs: a triangle at the far corner is left unbanded — see the note below.
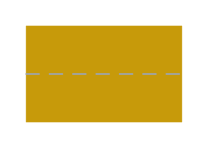
Family Solid: a single filled rectangle.
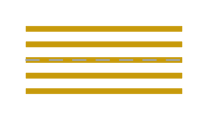
Family Sonorizador, width 0.2 and gap 0.4: the stripes cross the body and repeat along the direction of travel.
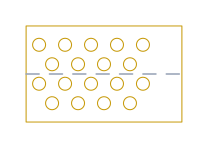
Family Elementos, diameter 0.5, Factor X 1 and FactorY 0.5, with "Box": the staggered grid inside the outer rectangle.
Remembered between sessions
Speed-reduction lines: every control on the form is saved on closing and restored on opening, except the calc note, the t, a and n fields, the values box and the presets combo. Whatever mode was saved, the form always reopens on LRV.
Transverse devices: every control is saved and restored.
Notes
- On the LRV form, closing the form does not erase the bars — only the auxiliary cross. Reset erases the bars but keeps the point and the reference, so that Update can rebuild them.
- The 45° bands do not cover the whole hump body. A triangle at the corner opposite the start of the filling is left unbanded. A 6 × 3.7 hump leaves roughly 3.3 m unbanded, and it happens at any aspect ratio. It is visible in the figure above. Add the missing bands by hand.
- If the bars come out mirrored by the offset, flip its sign.
- In Just one mode, every additional point goes through the same calculation as the first, including the extra setback.
- The body of each family is built in a local system running from 0 to the height, and only then rotated and taken to the clicked span; that is why the same reference-line table applies to all four families.
- On AutoCAD the command forces the World UCS during the two clicks and restores yours afterwards.