| Command | CAPCAD_CAPSHEETS |
| Shortcut | none |
| Ribbon | CapCad tab › Manage panel › Output group › CapSheets: Prancheamento. Also on the CAD Utilities tab › Layout split button › Sheet Sets |
| Category | Manage: Tools |
| Form | SheetSetForm — "Project Sheet Set", modeless (the drawing stays live while it is open). Four main tabs; the first two have sub-tabs |
| Hosts | AutoCAD, BricsCAD, GstarCAD, ZWCAD and ARES Commander |
| Depends on | an active style with sheet formats defined, and (to articulate) the project's alignment |
| Also opened by | none |
Turns a project alignment into a complete set of sheets, from the rectangle in model space to the layout with viewport, title block and stamp filled in. The CAD's own sheet set organises layouts that already exist; here the sheets are born from the road's geometry.
- The sheets follow the road. Each frame is rotated to follow the alignment's direction on that stretch, not the drawing's X axis, and the next one starts exactly where the previous one ends.
- Numbering that holds. The numbers are assigned, stored in the frame block itself and can be recomputed later — globally across the project or independently per sheet group.
- Model and paper in the same window. Articulate the frames, check them in the drawing and produce the layouts with a second button — or both at once, from the Express tab.
- The stamp fills itself in. Number, scale, start and end km and whatever alignment properties the style asks for go into the format's attributes, sheet by sheet.
- Overlap, split and matchlines. The join between sheets, a sheet split into two bands on the same drawing, and the matchlines drawn in model space, all under an option.
- A standalone sheet when one is missing. Insert a loose frame anywhere, already numbered in the set's sequence.
What it does
The command solves the sheeting of a linear project in two stages.
In the first, in model space, it walks the project alignment in steps the size of the sheet and inserts, at each step, a frame block (FRAME_…) rotated to follow the alignment's direction. Each frame gets a number, the name of the sheet group it belongs to, the file name of the format, and, as XData, the scale and the viewport's insertion point. Optionally it also draws the matchlines perpendicular to the alignment, at the limit of each sheet.
In the second, in paper space, it reads those frames back, creates the layouts, inserts the format block (the title block) in each one, creates the viewport with the same rotation and scale as the matching frame and fills in the title block's attributes — number, scale, start and end km, and the alignment properties the style asks for.
What a sheet is, how big it is, which title block to use and where the viewport area sits inside it all come from the active style (key Formato); the Styles page explains where that is edited. The alignment is the active project's — see The alignment.
The Update tab renumbers a set already articulated; the Tools tab gives access to the Layout navigator and to the viewport tools.
Workflow
- Save the drawing. Generating in paper space requires a saved dwg and aborts with a warning if it is not.
- Run
CAPCAD_CAPSHEETS. The form opens beside the drawing and the style's name appears at the top, in Style:. If there is no valid style, the command says so and does not open. - On the ViewFrames ModelSpace › Along alignment tab, choose the Sheet (22) and the Scale 1: (23). The width and height boxes fill themselves in from the format's usable area.
- Check which stretches of the alignment go in, in the list (9). They all come in ticked; clear the ones you do not want.
- Adjust Overlap (3), Start from length (7), Matchlines (15) and Split (18 to 21).
- Set the Numbering (37 to 39) and the Sheet Groups (40 to 43).
- Click Articulate active alignments (11). With more than one stretch selected the command asks for confirmation, showing a summary. The frames appear in model space.
- Move to Sheet Paperspace › Generate, choose the layout mode (67 or 72) and click Generate PaperSpace sheets (68). The command lists which layouts will be deleted, asks for confirmation and generates.
- If you need to renumber afterwards, use the Update tab.
The Express tab does steps 7 and 8 in sequence, with a single button.
The form
There is one form, with four main tabs. The captures below share a single numbering: a control keeps its number on any tab where it appears. The three lower frames — Sheet size, Numbering and Sheet Groups — belong to the ViewFrames ModelSpace tab and stay visible across its three sub-tabs.
The screenshots are of a Portuguese session; the numbering is the same one this page uses, and the tables quote the English captions the software shows in an English session. The few controls with no English caption are marked (Portuguese only).
ViewFrames ModelSpace tab
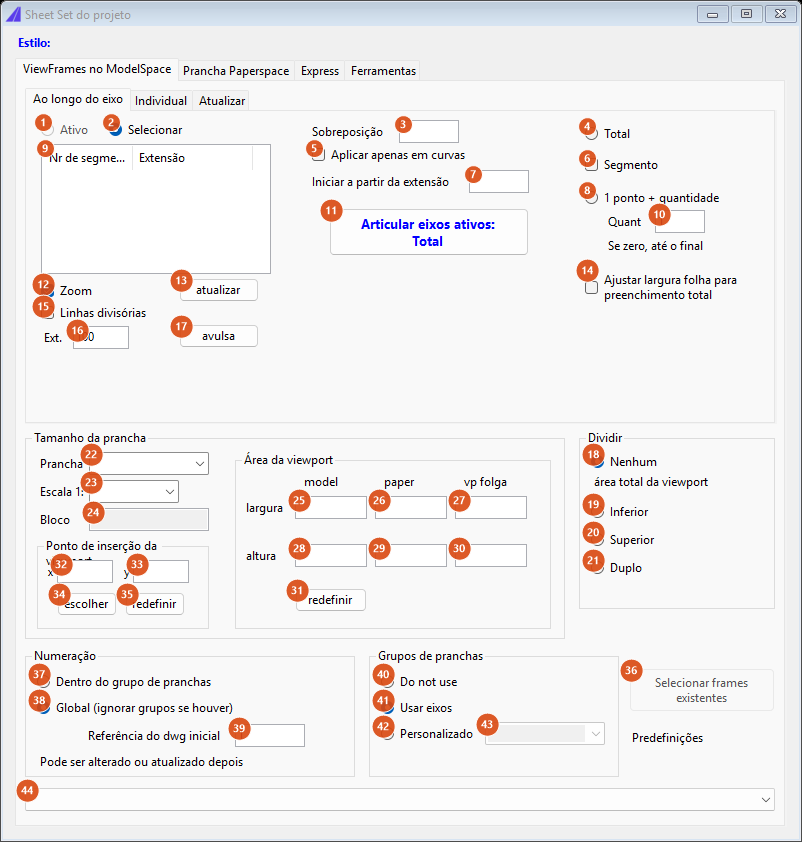
"Along alignment" sub-tab: the articulation proper. The lower frames apply to all three sub-tabs.
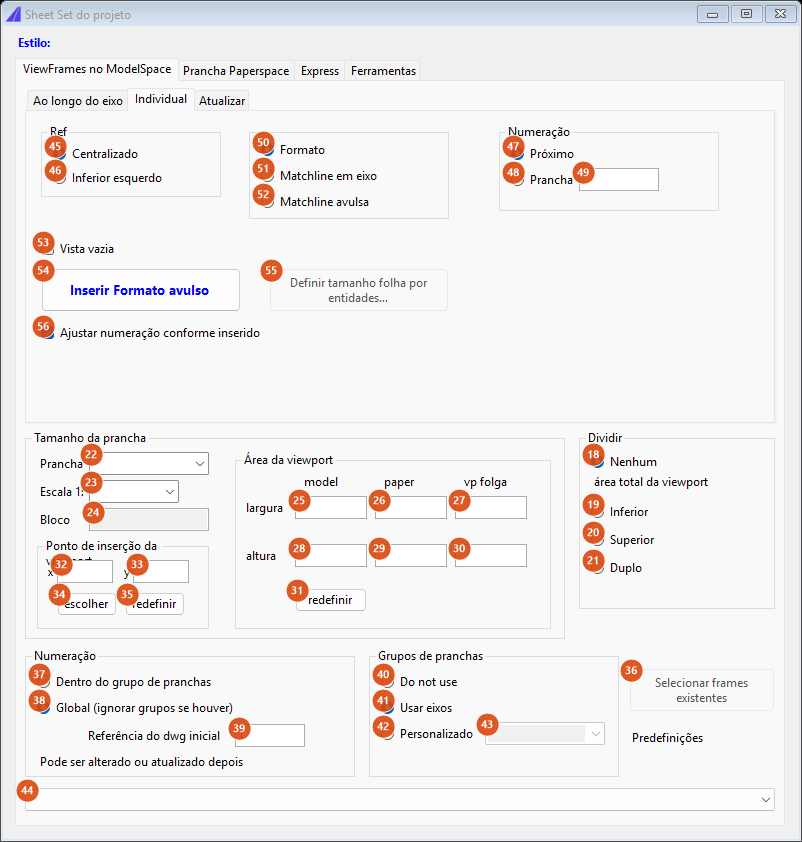
"Individual" sub-tab: inserts a loose frame, point by point.
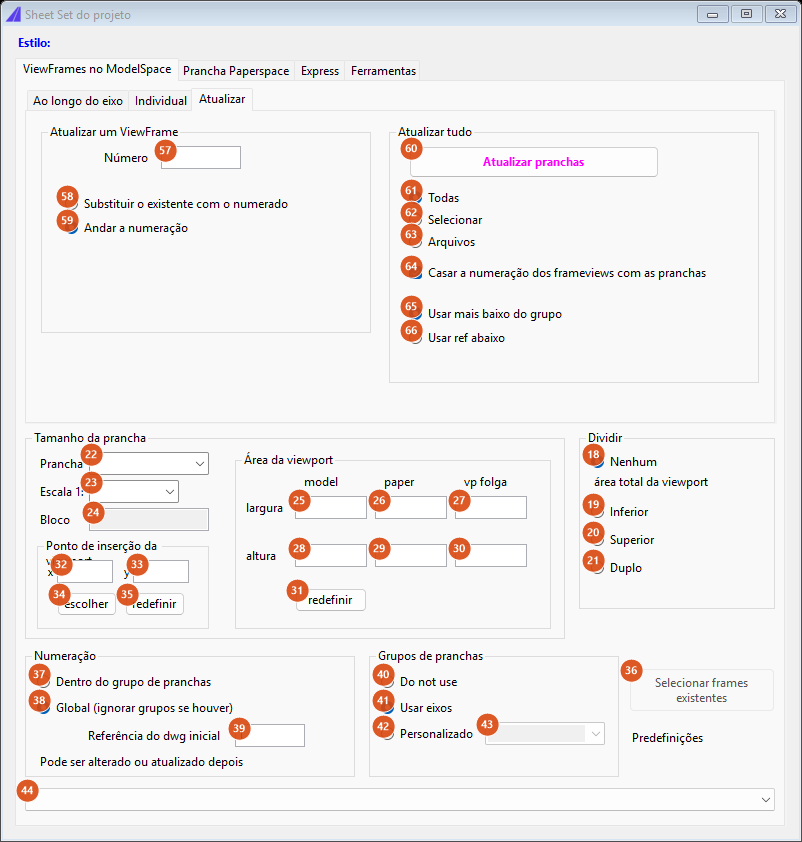
"Update" sub-tab: renumbers the existing frames and syncs the title blocks.
Sheet Paperspace tab
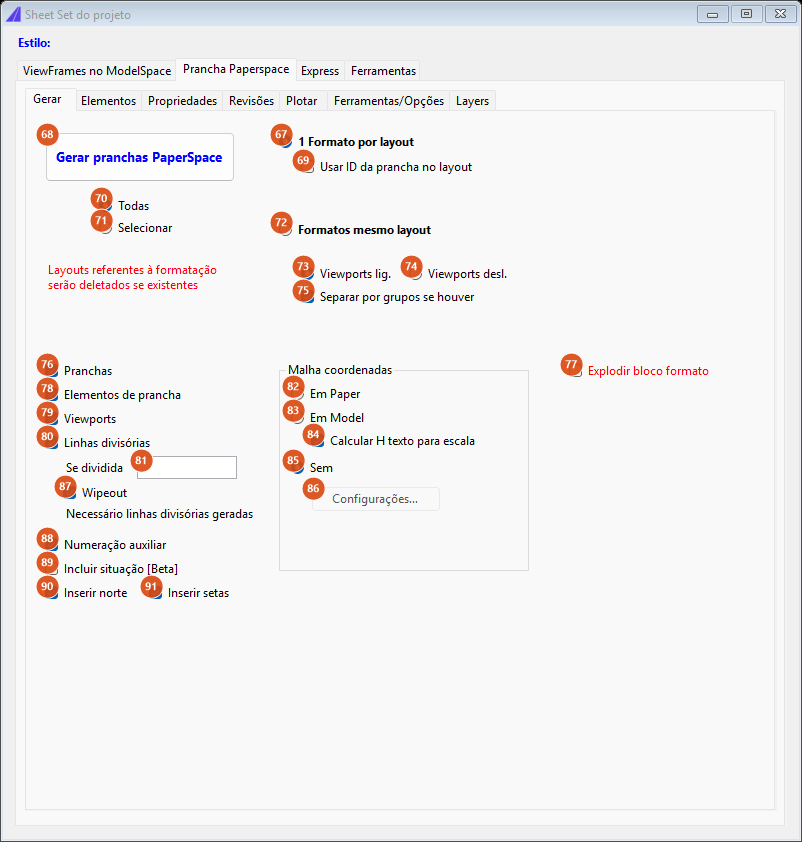
"Generate" sub-tab: creates the layouts from the model-space frames.
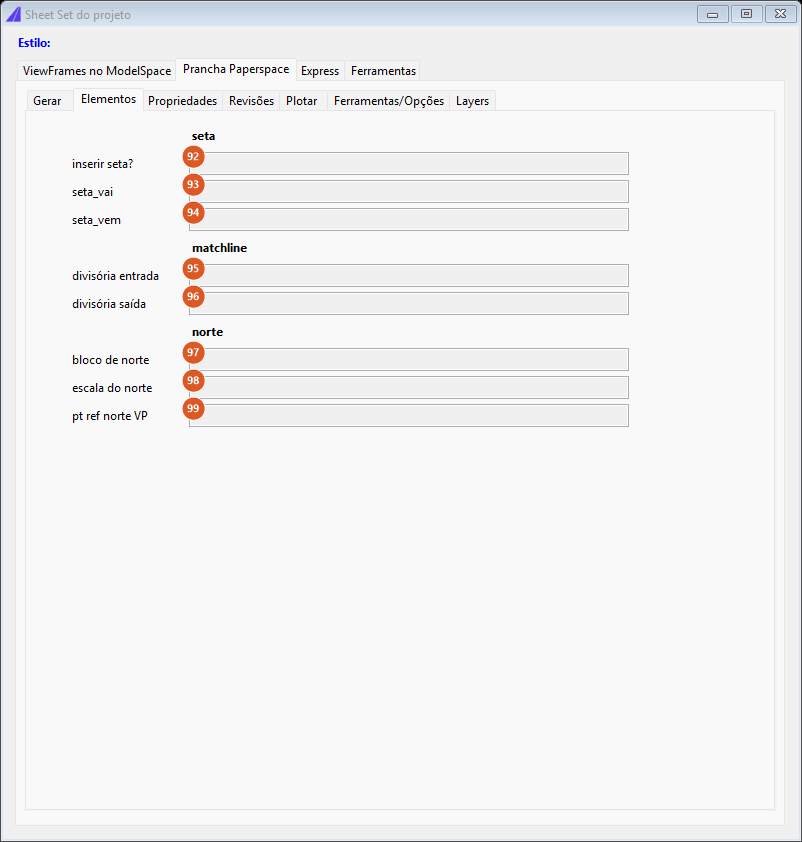
"Elements" sub-tab: a read-out of what the style defines for the chosen format. Read only.
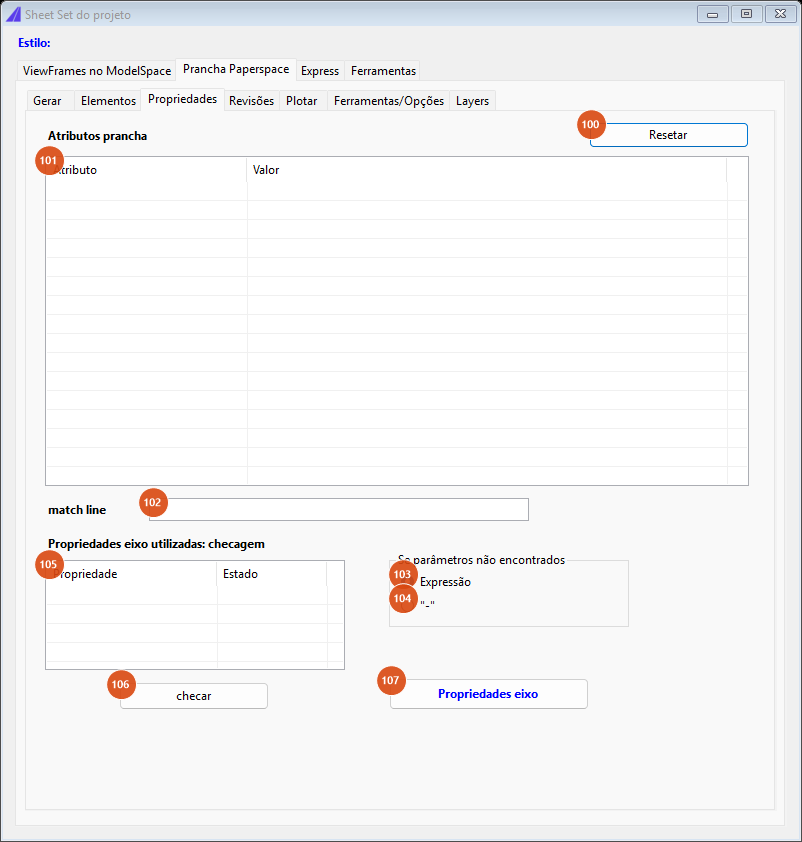
"Properties" sub-tab: the title block's attributes and the check of the alignment properties they consume.
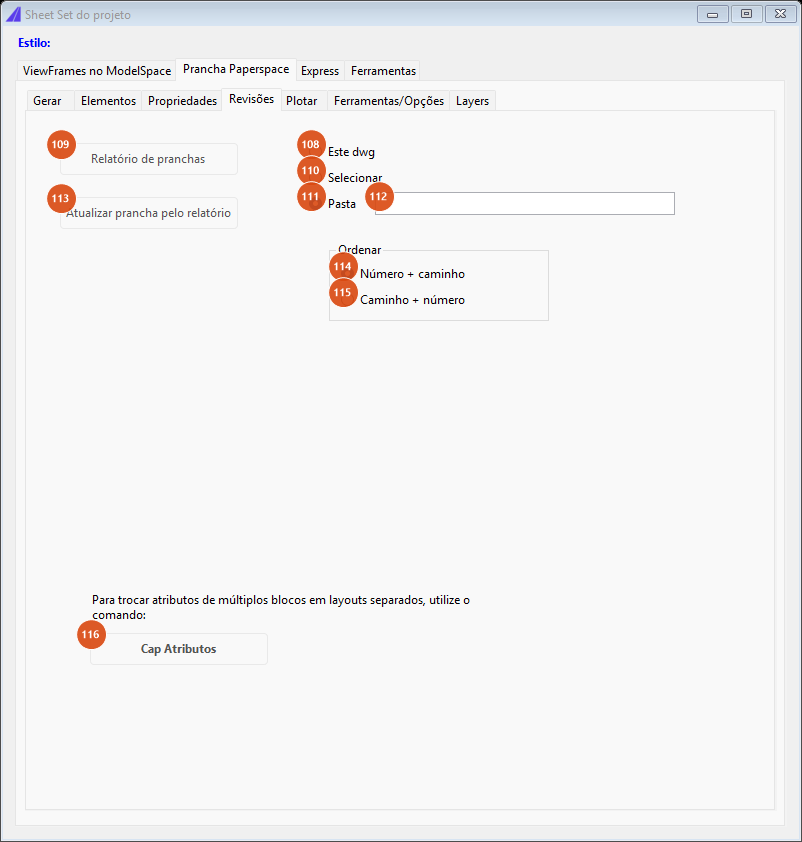
"Revisions" sub-tab: sheet report. Both buttons are disabled in this version.
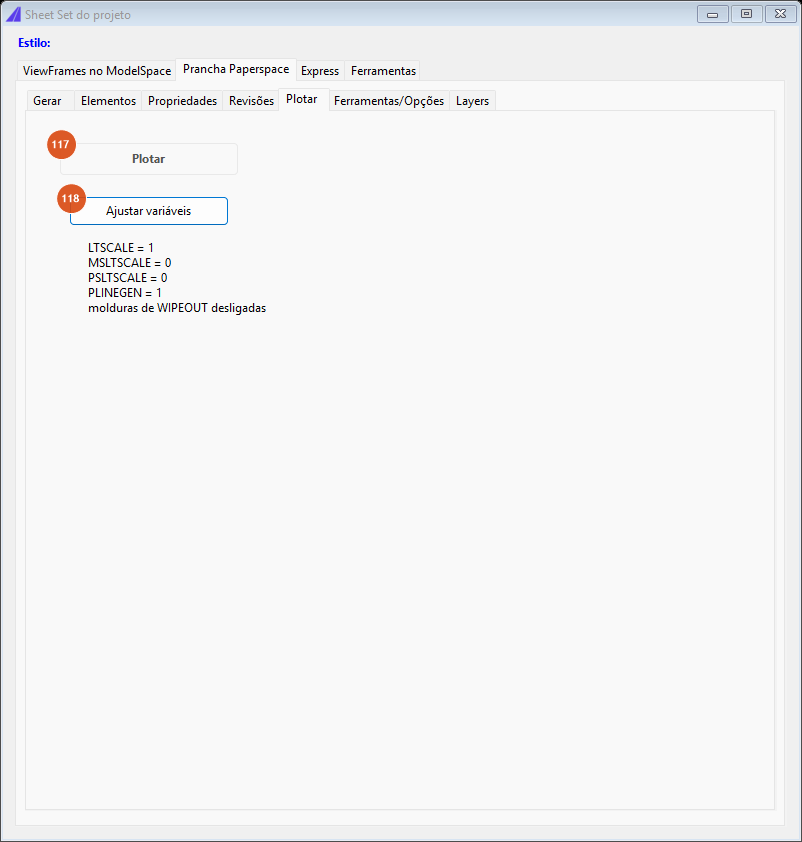
"Plot" sub-tab: a shortcut to the printing variables.
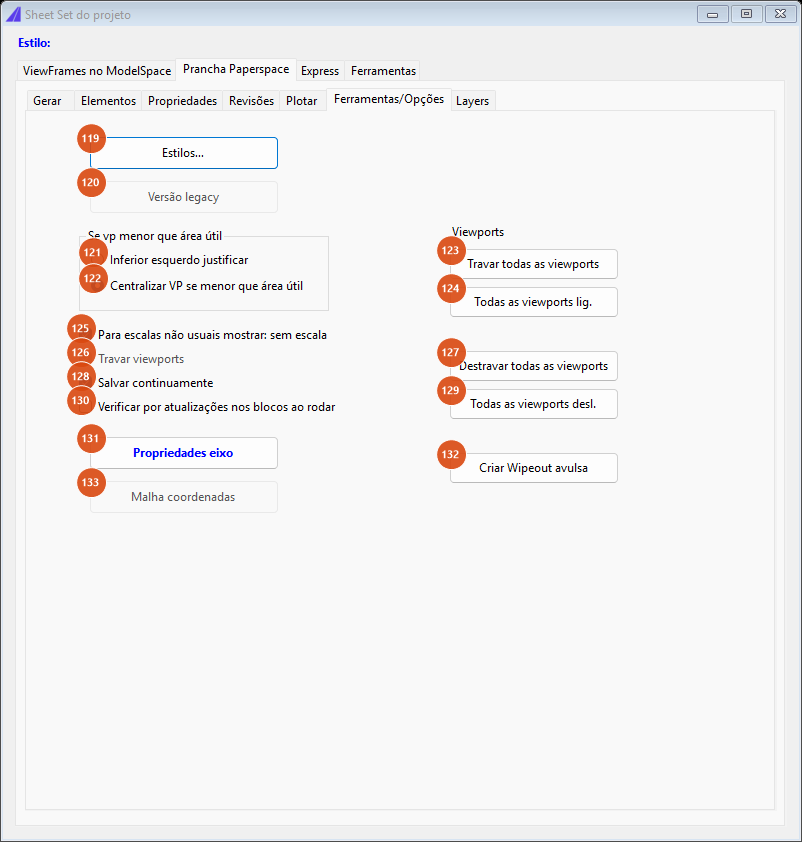
"Tools/Options" sub-tab: generation options and viewport commands.
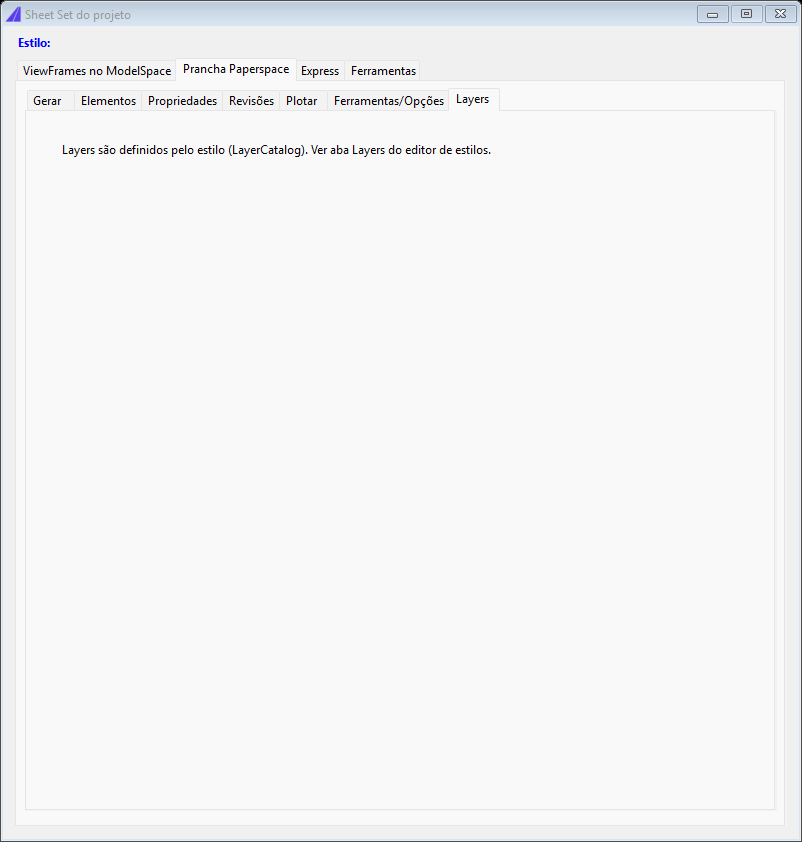
"Layers" sub-tab: a notice only — the layers come from the style's layer catalogue.
Express and Tools tabs
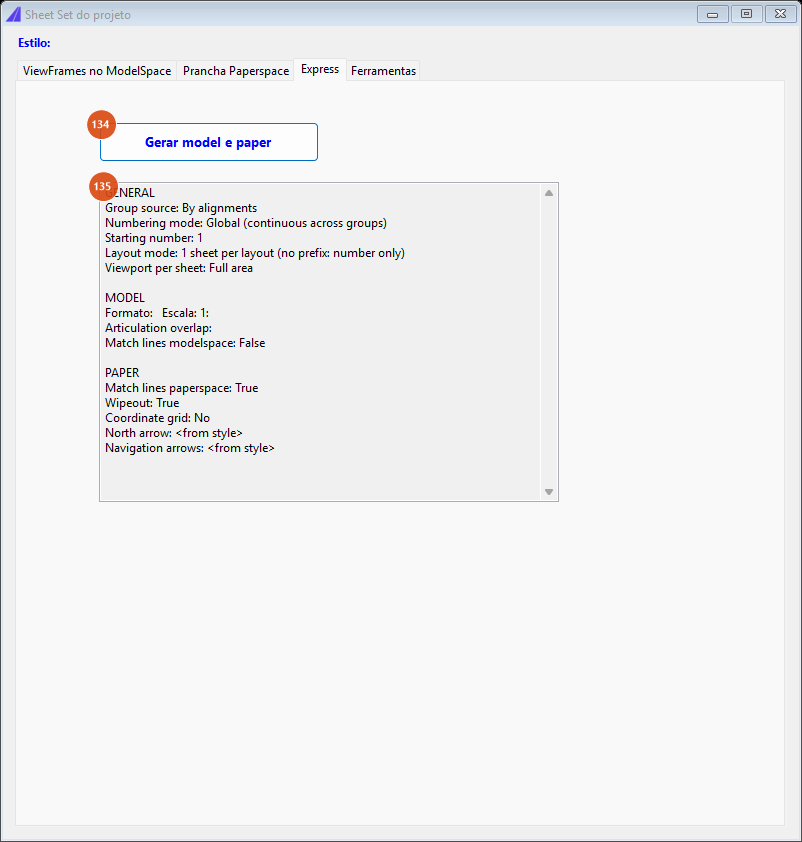
"Express" tab: model and paper in one go, with a summary of the options in force.
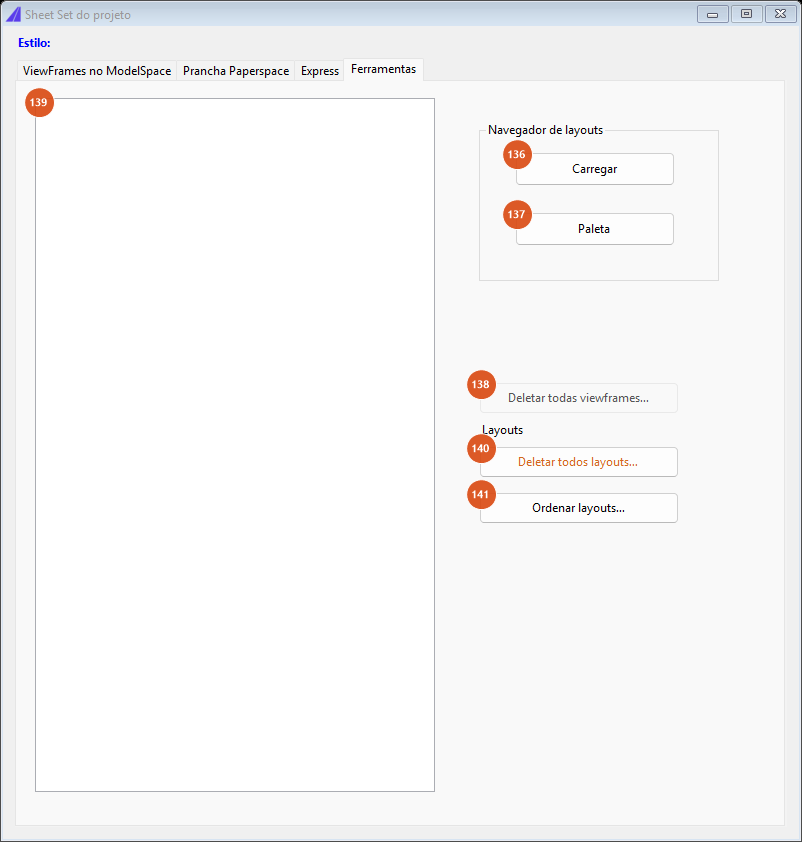
"Tools" tab: the drawing's layout list and access to the layout navigator.
Along alignment — the articulation
Where the alignment comes from
| # | Control | What it does |
|---|---|---|
| 1 | Active | Articulates the project's alignment. Only available when the project has one; when it does, this is the initial choice. |
| 2 | Select | With no project alignment (or by choice), the command asks for a curve in the drawing and articulates that curve. One curve only; the stretch list (9) then has a single item. The frames are marked as stretch 1 relative to the chosen curve, and the paper stage resolves that index against the project alignment — which is why the km attributes and the alignment properties may not match on this path. |
| 9 | Stretch list (Segments Nr / Length) | One item per stretch of the alignment, with its length. They all come in ticked. The articulation runs once per ticked stretch, in ascending order of number. With two or more ticked the command asks for confirmation before drawing. |
| 13 | refresh | Re-reads the style and the alignment and rebuilds the lists, the style defaults, the attribute table and the property check. |
Step and joins
| # | Control | What it does |
|---|---|---|
| 3 | Overlap | How far one sheet reaches back over the previous one, in drawing units. The articulation step is sheet width − overlap. A negative value leaves a gap between the sheets. An overlap greater than or equal to the width aborts the command with a warning. |
| 5 | Apply on curves only | The overlap is applied only when that sheet's limit falls on a curved stretch; on a tangent the sheet advances its full width. The command measures the change in tangent direction over a window around the limit and treats anything above ~0.57° as a curve. |
| 7 | Start from length | The distance from the start of the alignment to the first sheet. A negative value does the opposite: it extends the alignment backwards by that amount and starts articulating from the extension. |
| 14 | Fit sheet width for full coverage | Redistributes the width so the sheets close exactly at the end of the stretch: the command rounds length ÷ width to the nearest integer and divides again. With an overlap, the arithmetic becomes (length + overlap × (n−1)) ÷ n. |
| 4 | Total | Not available in this version. What decides whether a run is "total" is the selection in the list (9): with two or more stretches ticked, the command treats the run as a total articulation and asks for the summary confirmation. |
| 6 | Segment | Not available in this version. |
| 8, 10 | 1 point + count, Count | Not available in this version: the articulation always runs to the end of the stretch. |
| 12 | Zoom | Not available in this version. |
| 11 | Articulate active alignments | Runs the articulation. Before that it checks the format and the scale, warns if the group name is empty, warns if there are already frames in model space (you can carry on) and warns if any stretch has a distorted length factor. A progress bar shows the frames being created and can be cancelled — cancelling undoes that stretch's frames in full. |
Matchlines
| # | Control | What it does |
|---|---|---|
| 15 | Matchlines | Draws, at each sheet's limit, a line perpendicular to the alignment, set back by half the overlap. Its total length is sheet height + extension, half to each side of the alignment; in the split modes the height is already halved, and the line shrinks with it. |
| 16 | Ext. | The extra length of the matchlines beyond the sheet height. Empty or zero means 100. |
| 17 | standalone | Draws a loose matchline: pick a point, the command projects it onto the nearest alignment element and draws the perpendicular there. This one is more generous than the articulation's — its total length is 2 × sheet height + extension — so that it certainly crosses the viewport frame; with no format and scale defined it uses 1000. It carries no selection tag, so it survives a new articulation. |
Split (a sheet in two bands)
| # | Control | What it does |
|---|---|---|
| 18 | None | The viewport takes the format's whole usable area. |
| 19 | Bottom | The frame becomes half the height and the viewport takes the lower half of the usable area. |
| 20 | Upper | Half the height, viewport in the upper half. |
| 21 | Double | Half the height and two frames per sheet: odd passes go to the upper half, even ones to the lower, and both share the same sheet number. This is the "there and back" layout on one drawing. |
Sheet size
| # | Control | What it does |
|---|---|---|
| 22 | Sheet | The formats defined in the active style. Choosing one reloads every box in this frame. If the style has a single format, it comes already chosen. A format whose viewport area is not defined as four coordinates is refused with the warning "Format not yet implemented - please request it". |
| 23 | Scale 1: | The style's usual scales; without them, the default list 50, 100, 250, 500, 750, 1000, 1250, 1500, 2000 and 2500. It also accepts a typed value. |
| 24 | Block | The title block file defined in the format. Filled in by the style. If it is a full path and the file does not exist, the command warns and clears the box. |
| 25, 28 | width / height — model | The sheet's size in drawing units. This is what the articulation uses. |
| 26, 29 | width / height — paper | The same size in millimetres of paper. Editing one side recomputes the other through the scale (model = paper × scale ÷ 1000). The box turns pink when the paper value exceeds the format's usable area. |
| 27, 30 | width / height — vp clearance | A margin taken off the usable area. The effective sheet is model − |clearance| × scale ÷ 1000. Zero uses the whole area. It comes filled in from the style when the format carries default widths. |
| 31 | reset | Reloads this whole frame from the current format and scale. |
| 32, 33 | Viewport insertion point x / y | The lower-left corner of the viewport area inside the title block, in the format block's own coordinates. It comes from the style; it is written into every frame and it is what places the viewport in the layout. |
| 34 | pick | Takes that point by clicking in the drawing. It only works in paper space; in model space the command says "Available in PaperSpace". |
| 35 | reset | Returns to the coordinates the style's format defines. |
| 36 | Select existing frames | Disabled in this version. |
Numbering and sheet groups
| # | Control | What it does |
|---|---|---|
| 37 | Within Sheet Group | The numbering restarts in each group: when looking for the next free number, the command only looks at frames of the same group. |
| 38 | Global (ignore groups if present) | Continuous numbering across the whole drawing, whatever the group. |
| 39 | Initial dwg reference | The first number of the sequence. Empty means 1. Numbers already in use are skipped, and the numbering can be redone later from the Update tab. |
| 40 | Do not use | No group: the frames get no group name. |
| 41 | Use alignments | The group is the alignment stretch: alignment.1, alignment.2… by stretch number. |
| 42 | Custom | The group is the text in 43, the same for every sheet of the run. With an empty name the command asks whether you really want to carry on. |
| 43 | group name | The disciplines defined in the style, and it accepts typed text. Only enabled with Custom selected. |
| 44 | Presets | A list of 18 ready-made combinations of layout, group and numbering. Not available in this version: choosing one changes nothing. |
Individual — inserting a standalone sheet
Inserts frames one at a time, by clicking points. Each click creates a frame with the format, scale and size of the Sheet size frame, already numbered with the next free number, and then asks for a rotation angle about the clicked point (Enter accepts without rotating). The loop carries on until you press Enter at the point prompt.
The group follows the same choice as the articulation: with Use alignments (41), the command works out which stretch of the alignment the point fell on and uses alignment.<n>; with Custom (42), it uses the name in 43.
A standalone frame carries no selection tag, so a new articulation does not erase it.
| # | Control | What it does |
|---|---|---|
| 45 | Centred | The clicked point is the frame's centre. |
| 46 | Bottom left | The clicked point is the lower-left corner. |
| 53 | Empty View | Marks the frame as "no viewport": when paper space is generated, that sheet gets a layout and a title block, but no viewport, no north and no arrows. |
| 54 | Insert standalone format | Starts the insertion loop. It checks the format and the scale first, as the articulation does. |
| 47, 48, 49 | Next, Sheet, number box | Not available in this version: a standalone frame always gets the next free number. |
| 50, 51, 52 | Format, Matchline on alignment, Standalone matchline | Not available in this version. For a loose matchline, use the standalone button (17) of the previous sub-tab. |
| 55 | Set sheet size from entities… | Disabled in this version. |
| 56 | Adjust numeration as inserted | Not available in this version. |
Update — renumbering and syncing
| # | Control | What it does |
|---|---|---|
| 57 | Number | Type a number and press Enter to apply it to the frame selected in the drawing. With nothing pre-selected, the command asks for the frame. |
| 58 | Replace the existing one with the numbered one | Swaps the numbers between the chosen frame and the one that already had that number. |
| 59 | Shift the numbering | Applies the number to the chosen frame and renumbers the others around it, skipping the reserved number. |
| 60 | Update sheets | Renumbers the whole set in the current numeric order and, if 64 is ticked, propagates it to the title blocks and to the matchlines. At the end it shows a summary of what changed. |
| 61 | All | Considers every frame in model space. |
| 62 | Select | Asks for a selection in the drawing and works on that only. |
| 63 | Files | Renumbering across several DWGs: it opens a folder picker and walks the sheet drawings. |
| 64 | Match frameview numeration with sheets | After renumbering, writes the new number into the matching sheet's title block, renames the layout tab and updates the code on the paper-space matchlines. |
| 65 | Use the lowest in the group | The first number of the renumbering is the value in 39. |
| 66 | Use the ref below | The first number is the lowest number already present in the set. |
Generate — the sheets in paper space
The Generate PaperSpace sheets button (68) reads every frame in model space (any block carrying the number attribute), groups them, deletes the layouts that are about to be rebuilt — listing them and asking for confirmation — asks "Deseja processar N formatos em M layouts?" (in Portuguese in every language) and then, sheet by sheet: creates or activates the layout, inserts the title block, creates the viewport rotated and locked at the sheet's scale, writes the number above the title block and fills in the attributes.
| # | Control | What it does |
|---|---|---|
| 68 | Generate PaperSpace sheets | Runs the generation described above. Requires a saved dwg. A progress bar shows the sheets being created; cancelling stops between one sheet and the next (never in the middle of a split sheet) and keeps what has already come out. |
| 67 | 1 format per layout | One layout per sheet, named after the sheet number with four digits (0001). |
| 69 | Use sheet ID for layout | With 67 ticked and a group present, the layout's name becomes <group>-0001. That same identifier becomes the value written into the FOLHA / FORM_PRANCHA attributes. |
| 72 | Formats in the same layout | A single layout, with every sheet side by side, 250 paper units apart. |
| 75 | Separate by groups if present | With 72 ticked, produces one layout per sheet group, each named after the group. Cleared, everything lands in a single layout called capcad.sheets. |
| 70 | All | Processes every frame. |
| 71 | Select | Not available in this version: the generation always walks every frame. |
| 73, 74 | Viewports On / Off | The state the viewports are left in at the end. With On the command also runs CAPCAD_LAYOUT_VIEWPORT_ON at the end of the generation. |
| 80 | Matchlines | Repeats, in paper space, the matchlines that already exist in model space, with the neighbouring sheet's code. |
| 81 | If split | The code text used on the matchlines of split sheets. |
| 87 | Wipeout | Clips the viewport at the matchline, hiding what lies beyond the join. |
| 82 | In Paper | Draws the coordinate grid in the layout, over the viewport. |
| 83 | In Model | Draws the grid in model space, on its own per-sheet layers, frozen in the other viewports. |
| 85 | None | No coordinate grid. |
| 84 | Compute text H for the scale | Sizes the grid's text height by the sheet's scale. |
| 90 | Insert north | Inserts the north block defined in the style, at the position the format indicates, rotated to match the frame's rotation. |
| 91 | Insert arrows | Inserts the continuation arrows (vai / vem, out / in) defined in the format. |
| 89 | Include status [Beta] | Not available in this version. |
| 76, 77, 78, 79 | Sheets, Explode format block, Sheet elements, Viewports | Not available in this version. |
| 88 | Auxiliary numbering | Not available in this version: the auxiliary number above the title block is always written, height 50, on the current layer. |
| 86 | Settings… (grid) | Disabled in this version. |
The layouts that will be deleted. Before generating, the command lists the layouts that match the chosen mode and asks whether it may delete them. Answering No cancels the whole generation. If the generation is then cancelled from the progress bar, the sheets already created stay.
Elements
Read only: what the style defines for the format chosen in 22.
| # | Field | What it shows |
|---|---|---|
| 92 | insert arrow? | True when the format has both arrow blocks defined. |
| 93, 94 | seta_vai, seta_vem | The names of the arrow blocks. |
| 99 | pt north ref VP | The point where the north is inserted, in the format block's coordinates. |
| 95, 96, 97, 98 | entry matchline, exit matchline, north block, north scale | Blank in this version. |
Properties
| # | Control | What it does |
|---|---|---|
| 101 | Sheet attributes (Attribute / Value) | The attribute templates defined in the style: for each title-block tag, the text it receives. The text can contain <sheet.number> and <sheet.number,000> (the sheet number in three digits), <today, dd/mm/yy> (today's date), <align.name> (the alignment's name) and @property> or <align.property> for an alignment property. |
| 100 | Reset | Reloads the table from the style. |
| 102 | match line | The text that goes into the code of the paper-space matchlines. Writing @FORM_NUMERO makes the command substitute the template of the FORM_NUMERO attribute from the table above. |
| 103 | Expression | When the alignment property is not filled in at that km, the attribute receives the expression as written. |
| 104 | "-" | Not available in this version: the behaviour is always to write - when the property is not found. |
| 105 | Alignment properties used: check | The alignment properties the attributes consume, with the state of each. name is always OK; the others may show —. |
| 106 | check | Redoes the check. The text above the frame turns green on Propriedades eixo ok or red on Há propriedades não definidas para um ou mais trechos (both in Portuguese). |
| 107 | Alignment properties | Opens CAPCAD_ALIGNMENT_PROPERTIES — see Alignment properties. |
Besides the table's templates, some attributes are filled by a fixed rule, whatever the style:
| Attribute tag | Value written |
|---|---|
ESCALA, FORM_ESCALA |
1:<scale> when the scale is one of the style's usual scales; SEM ESC. when it is not |
KM_PRANCHA, FORM_KM_INICIAL |
the km of the frame's start corner, in 0+000 format |
FORM_KM_FINAL |
the km of the frame's end corner |
FORM_EXT |
the sheet's width in paper |
FOLHA, FORM_PRANCHA |
the sheet's identifier (with the group prefix, if 69 is ticked) or the bare number |
Revisions
| # | Control | What it does |
|---|---|---|
| 109 | Sheet Report | Disabled in this version. |
| 113 | Sheet update from report | Disabled in this version. |
| 116 | Cap Attributes | Disabled in this version. To edit the attributes of several blocks across different layouts, use CAPCAD_BLOCK_ATTRIBUTE_EDIT. |
| 108, 110, 111, 112, 114, 115 | This dwg, Select, Folder and the sorting | No effect while the buttons above are disabled. |
Plot
| # | Control | What it does |
|---|---|---|
| 117 | Plot | Disabled in this version. To publish the sheets, see Publish to PDF. |
| 118 | Adjust variables | Sets the four printing variables — LTSCALE 1, MSLTSCALE 0, PSLTSCALE 0, PLINEGEN 1 — and turns the WIPEOUT frames off. |
Tools/Options
| # | Control | What it does |
|---|---|---|
| 119 | Styles… | Opens the style editor (CAPCAD_STYLE_EDITOR) — see Styles explorer. |
| 128 | Save continuously | Saves the dwg after each sheet generated. On a drawing that still has no name the command warns once and ignores the option — it never saves over the template. |
| 131 | Alignment properties | Opens CAPCAD_ALIGNMENT_PROPERTIES. |
| 132 | Create standalone wipeout | In paper space: pick the viewport, then the model-space matchline through it; the command clips the smaller piece. In model space it says "Available in PaperSpace". |
| 123, 127 | Lock / Unlock all viewports | Call CAPCAD_LAYOUT_VIEWPORT_LOCK and CAPCAD_LAYOUT_VIEWPORT_UNLOCK. |
| 124, 129 | All viewports On / Off | Call CAPCAD_LAYOUT_VIEWPORT_ON and CAPCAD_LAYOUT_VIEWPORT_OFF. |
| 120 | Legacy version | Disabled in this version. |
| 133 | Coordinate grid | Disabled in this version. |
| 121, 122 | Justify bottom left / Centre VP if smaller than usable area | Not available in this version: the viewport is always created at the insertion point the frame carries. |
| 126 | Lock Viewports | Disabled: the generated viewport is always locked. |
| 125 | For unusual scales show: not to scale | Not available in this version as an option — the rule always applies (see the attribute table above). |
| 130 | Check for block updates when running | Not available in this version. |
Express
| # | Control | What it does |
|---|---|---|
| 134 | Generate model and paper | Runs the articulation and then the sheet generation. The saved-dwg check runs before anything else, so an unsaved drawing stops the command before a single frame is drawn. Each half keeps its own confirmations; if the articulation is cancelled, the paper part does not run. |
| 135 | Resumo (Portuguese only: "summary") | Read-only text with the options in force, in three blocks — GENERAL, MODEL and PAPER. It refreshes when you enter the tab. |
Tools
| # | Control | What it does |
|---|---|---|
| 136 | Load | Fills list 139 with the drawing's layouts. |
| 137 | Pallete | Opens the Layout navigator (CAPCAD_LAYOUT_NAVIGATOR). |
| 139 | Layout list | The names loaded by 136. |
| 140 | Delete all layouts… | Calls CAPCAD_LAYOUT_DELETE, which does its own confirmation. |
| 141 | Sort layouts… | Calls CAPCAD_LAYOUT_REORDER. |
| 138 | Delete all viewframes… | Disabled in this version. |
How the options combine
The figures below were produced by running the command's own articulation engine on a sample alignment 3,303.6 m long — two tangents and two curves — with an 800 × 350 unit sheet at 1:1000. The numbers inside the frames are the sheet numbers the engine assigned; the dashed orange lines are the matchlines.
Simple articulation
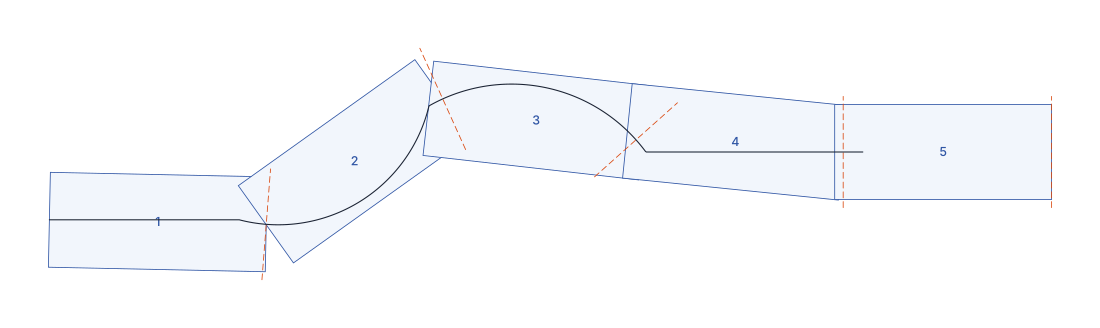
No overlap: 5 sheets numbered 1 to 5, each rotated to follow the alignment's direction on its stretch and butted against the end of the previous one. The last one runs past the end of the alignment — that is the remainder of the stretch.
Overlap
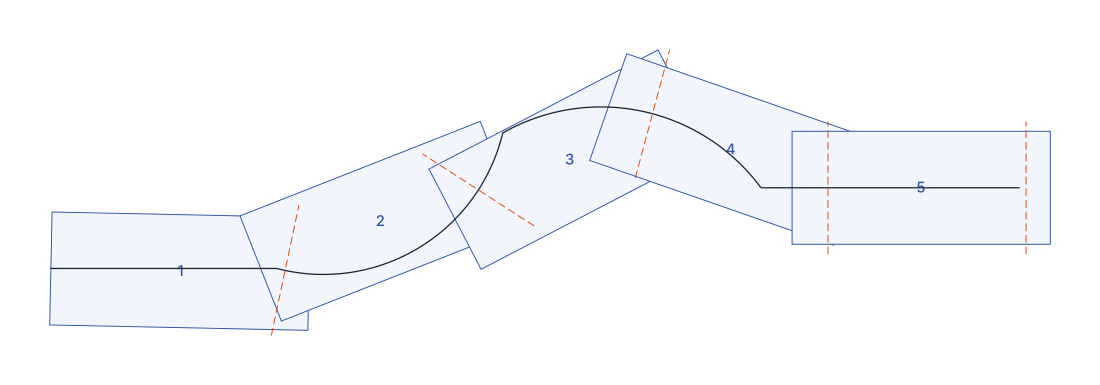
Overlap 150: each sheet reaches 150 back over the previous one, so the join now has a shared band. The matchline falls at the sheet's limit, set back by half the overlap.
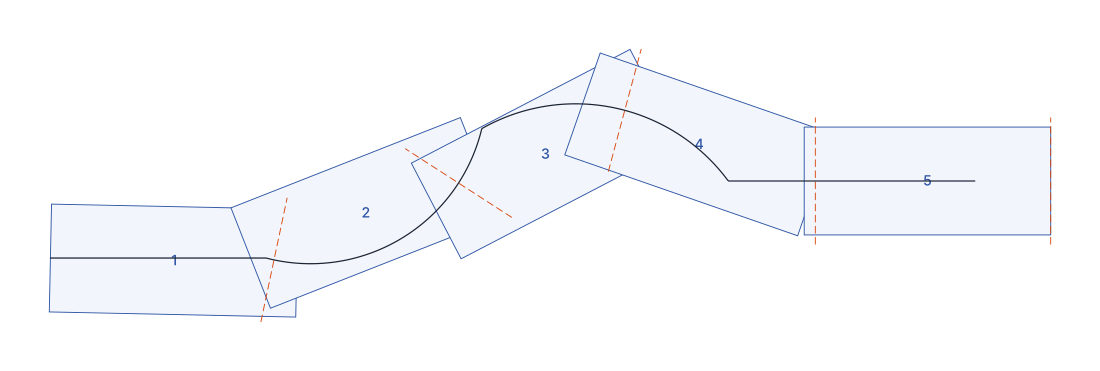
The same overlap of 150 with "Apply on curves only": where the sheet's limit falls on a tangent, the sheet advances its full width; the join only shrinks on the curves.
Fit sheet width for full coverage
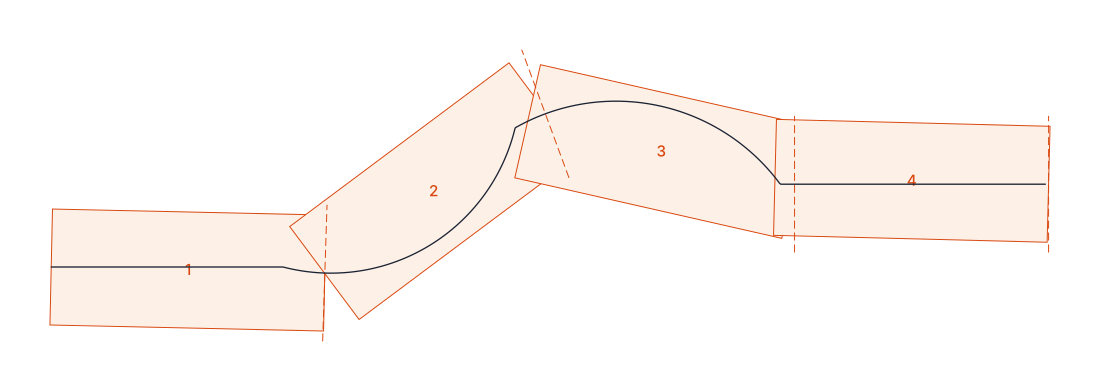
With the fit on, the same 3,303.6 units become 4 sheets of 825.9 instead of 5 of 800 — the alignment ends exactly at the end of the last sheet.
Split: Double
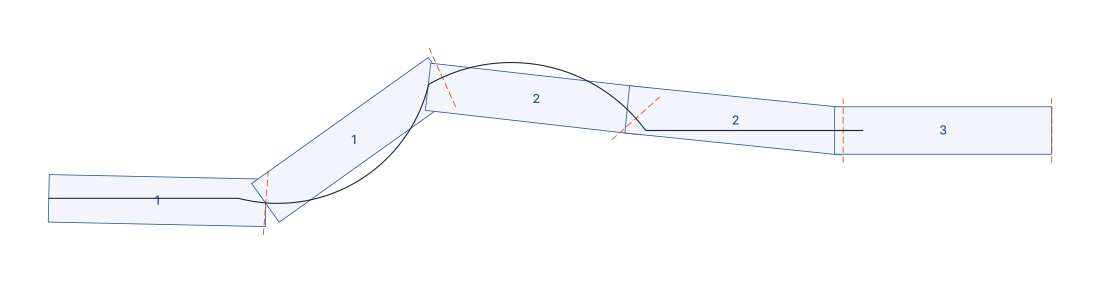
"Double" mode: the frames become half the height (175) and the numbers repeat in pairs — sheets 1 and 1, 2 and 2 are the two bands of one drawing, one above the other in the viewport.
Start from length
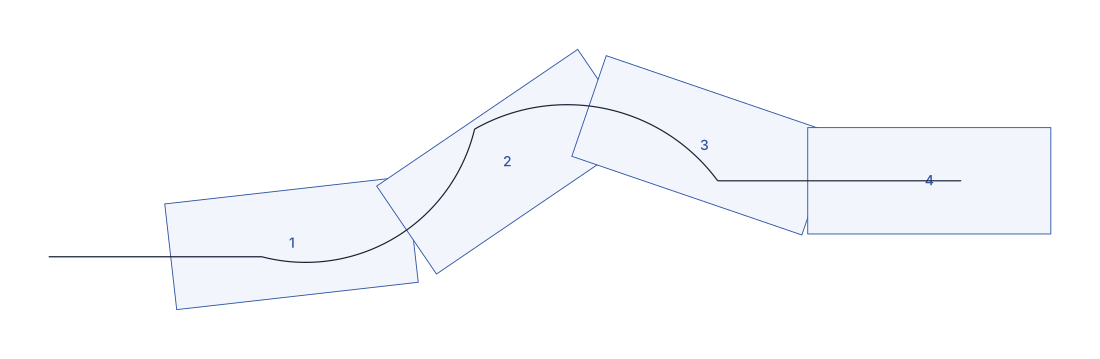
Value 400: the sheets start 400 past the beginning of the alignment, and the initial stretch has no sheet.
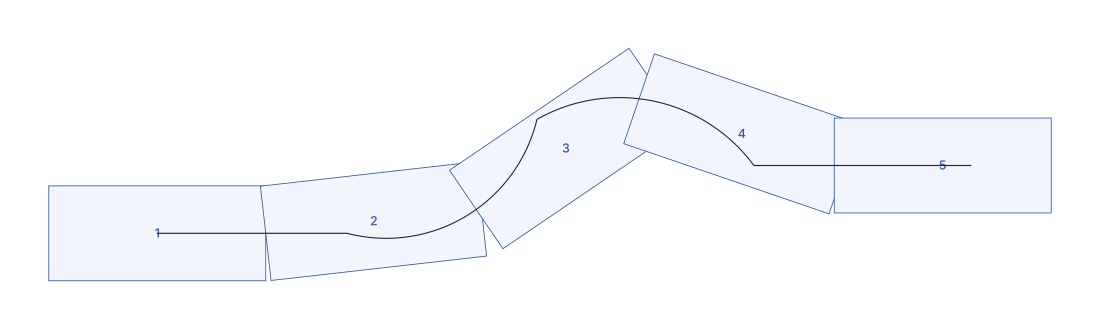
Value −400: the alignment is extended 400 backwards and the first sheet starts in the extension — useful for leaving some slack before the start km.
What is written into the drawing
Each frame is a block FRAME_<format>_<scale>_<width>_<height> inserted on the frames layer of the active layer catalogue, with:
| Where | Name | Content |
|---|---|---|
| Attribute | number |
the sheet number |
| Attribute | sheetgroup |
the sheet group |
| Attribute | sheettitleblock |
the title block's file name, without the folder |
| XData | formatoStyle |
the format's key in the style |
| XData | sheetscale |
the scale divided by 1000 |
| XData | sheetVpInsLowerPoint.x / .y |
the viewport's insertion point inside the title block |
| XData | alignmentIndex |
the alignment stretch's number |
| XData | sheet.split |
present on the frames of Double mode |
| XData | sheet.emptyvp |
present on standalone frames marked Empty View |
The frames and matchlines of one articulation run also get a selection-group tag, so they can be re-selected later with CAPCAD_SELECT_GROUP.
Remembered between sessions
Practically the whole form: format, scale, width and height, clearances, overlap, start length, start number, viewport insertion point, numbering mode, sheet group, split, matchlines and the paper tab's options. They are saved when the form closes and when you click Articulate or Generate PaperSpace sheets, and restored when it opens. The style's defaults are applied after the saved values, and a control the style set gets a light grey background so you know where it came from. A saved format that no longer exists in the active style is discarded.
Notes
- Generating in paper space requires a saved dwg. The command checks it itself; it warns and aborts, and it never saves an unnamed drawing on its own.
- The
CANNOSCALEvariable is set on every sheet to1:<scale>. It is a drawing-wide variable, so the last sheet generated is the one that stays in force; annotative entities size themselves by it. Select(2) and the alignment properties. Articulating a curve picked on screen, the frames are marked as stretch 1 relative to that curve, and the paper stage resolves that index against the project alignment — the km attributes and the alignment properties can come out wrong. For the definitive set, articulate the project's alignment.- To set the scale and format of a layout that already exists, without going through the articulation, use
CAPCAD_DEFINE_SHEET— see Layouts and viewports. - To publish the finished set as PDF, see Publish to PDF.
- Some of the command's prompts and confirmations are shown in Portuguese in every language.