| Command | CAPCAD_DIVIDER_RECTANGLE |
| Shortcut | none |
| Ribbon | CapCad tab › CAD Utilities panel › Geometry split button › the icon-only button whose tooltip reads Divider Rectangle Assistant |
| Category | CAD Utils: Segment |
| Form | DividerRectangleForm (modeless: the drawing stays live while it is open) |
| Hosts | AutoCAD, BricsCAD, GstarCAD, ZWCAD, ARES Commander |
| Also opened by | The Airport form (CAPCAD_AERO), button Roadway Edge Stripes (Zipper line): same form with the ZIPPER preset applied |
| Also | Divider Assistant (CAPCAD_DIVIDER): the sibling tool that places points, blocks or a geometry along a path |
Fill a path with rectangles that bend with it, and see the result before you commit. Drawing a chequered or zipper strip along a curve by hand means offsetting, dividing, trimming and hatching dozens of cells one by one. This assistant does the whole strip in one go and keeps the drawing live while you adjust it.
- Cells follow the curve. Each rectangle's long sides are pieces of the offset path, so arcs stay arcs; nothing is approximated with straight segments.
- Two layers, alternating. Consecutive cells switch between two marking layers, giving a checkerboard across the rows; the layers are created with their colours if they are missing.
- Zipper mode. One tick keeps every other cell and shifts the rows against each other, the pattern used for runway edge stripes.
- Whole-number fit. The width is adjusted so the cells close exactly on the end of the path, instead of leaving a short piece.
- Live preview. Every change redraws the strip; Accept keeps it, Reset erases it.
- The same tool on five CADs. AutoCAD, BricsCAD, GstarCAD, ZWCAD and ARES Commander.
What it does
The Divider Rectangle Assistant takes a path you pick (line, polyline or arc) and covers it with rows of rectangular cells. The rows are stacked about the path: with an even Quantity the path runs between the two middle rows, with an odd Quantity the middle row is centred on the path. Along the path each row is cut into cells of the given Width; each cell is a closed polyline whose long sides follow the path and its short sides are perpendicular to it, drawn with a solid hatch on its layer.
Consecutive cells alternate between Layer 1 and Layer 2, and neighbouring rows are out of phase, so the strip reads as a checkerboard. With Alternate on, only every other cell is kept and the rows are staggered, which gives the zipper look; all kept cells then go to Layer 1.
Typical uses: airport runway and taxiway edge stripes (the ZIPPER preset), chequered kerb or island edges, and any striped band that must follow a curve exactly.
The result is a live preview. Every change on the form erases the previous preview and redraws it. When you are happy, click Accept; the preview becomes ordinary drawing entities.
Workflow
- Run
CAPCAD_DIVIDER_RECTANGLE. The form opens beside the drawing. - Set the number of rows in Quantity (1), the cell Width (5) and Height (8), and the two layers (3, 4). Or pick the ZIPPER preset (24), which fills all of these.
- Click Select Path (21) and pick the curve. The strip is drawn at once, following the curve's own direction (from its start vertex). If you want only part of the curve, select Path segment (20) before clicking: after the pick you click two points and the stretch between them becomes the path.
- Refine: Alternate (2) for the zipper look, Offset (15) to move the whole strip sideways, Adjust width to fit total length (23) so the cells close on the end of the path. Press Enter in any box to redraw.
- Click Accept to keep the strip, Reset to erase it, or Update to redraw it with the current values.
- Close the form. Your numeric values are remembered for next time.
Picking a new path, or any redraw, erases the preview that is still on screen; only an accepted strip stays.
The form
Numbers are the same in every screenshot of this page. The form has a single state; the four action links on the right (Zoom, Reset, Update, Accept) are described below without a number.
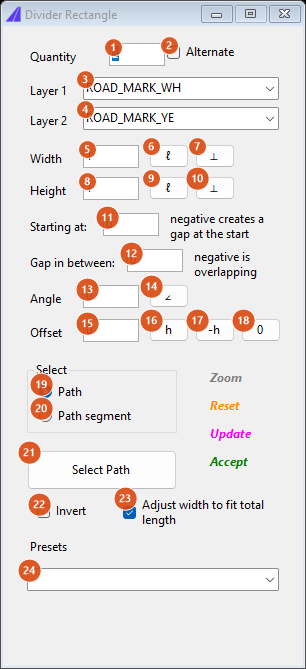
Default state: Quantity 2, Width 1, Height 1, Adjust width to fit total length on. The layer boxes show the white and yellow marking layers of the active layer catalogue.
Rows and layers (top)
| # | Control | What it does |
|---|---|---|
| 1 | Quantity | Number of rows stacked about the path (default 2). Even: rows at ±Height/2, ±3·Height/2 and so on. Odd: one row centred on the path, then ±Height, ±2·Height. 1 is special: it draws a single row of sheared cells and needs a non-zero Angle (13); see below. The value is rounded to a whole number. |
| 2 | Alternate | Keep only every other cell in each row and stagger the rows (zipper). Every kept cell goes to Layer 1; Layer 2 is not used in this mode. Redraws at once. |
| 3 | Layer 1 | Layer of the odd cells of the first row (and of every kept cell when Alternate is on). The list offers the white and yellow marking layers of the active layer catalogue; you can type another name. Redraws when you pick from the list. |
| 4 | Layer 2 | Layer of the other cells. Same list. Both layers are created before drawing if they do not exist. |
Size (middle)
| # | Control | What it does |
|---|---|---|
| 5 | Width | Length of each cell along the path (default 1). With 23 on, this is a target and the value actually used is the nearest one that divides the path into a whole number of cells. |
| 6 | ℓ | Pick two points in the drawing; their distance goes into Width and the strip redraws. |
| 7 | ⟂ | Same as 6: a plain two-point distance (the button does not measure perpendicular to anything). |
| 8 | Height | Height of each row, across the path (default 1). With Quantity 1 the single row is 2 × Height tall, Height on each side of the path. |
| 9 | ℓ | Pick a distance into Height. |
| 10 | ⟂ | Same as 9. |
| 11 | Starting at: | Saved with the form; not used by this version. Any value other than 0 adds a warning in the status line. |
| 12 | Gap in between: | Saved with the form; not used by this version. Same warning. |
| 13 | Angle | Shear angle in degrees, used only when Quantity is 1: each cell becomes a parallelogram whose side away from the path is slid along the path by Height × tan(angle). With any other Quantity the value is ignored. |
| 14 | ∠ | Pick the angle in the drawing (base point, then direction); the value goes into Angle in degrees. |
| 15 | Offset | Lateral shift of the whole strip, applied to the path before the rows are built. Positive moves the strip to the right of the walking direction, negative to the left (see the figure). |
| 16 | h | Set Offset to the current Height and redraw: the strip sits entirely on the right of the path. |
| 17 | -h | Set Offset to minus the current Height: the strip sits on the left. |
| 18 | 0 | Set Offset to 0: the strip is centred on the path. |
Select (bottom left)
| # | Control | What it does |
|---|---|---|
| 19 | Path | Select Path uses the whole curve (default). |
| 20 | Path segment | Select Path asks for two more points after the curve; the stretch of the curve between them becomes the path. If the stretch cannot be built the status reads Segment pick failed. |
| 21 | Select Path | Hide the form and pick the curve (line, polyline or arc). The strip is drawn as soon as the pick is done, in the direction of the curve itself. Picking a new path erases the current preview. |
| 22 | Invert | Not available in this version: when ticked, the next redraw adds a warning in the status line. It does not trigger a redraw by itself. |
| 23 | Adjust width to fit total length | On by default. Replace Width by the nearest value that divides the path length into a whole number of cells, so the last cell ends exactly on the end of the path. Off: cells of exactly Width are laid from the start and any remainder shorter than a cell is left empty. |
| 24 | Presets | Contains ZIPPER only. Selecting it sets Quantity 2, Width 0.5, Height 0.2, Alternate on and Layer 1 to the white marking layer, then redraws. Typing another name does nothing. |
Actions (right, no numbers)
| Link | What it does |
|---|---|
| Zoom (grey) | Not available in this version: the status line reads Zoom comes with the CAD test pass. |
| Reset (orange) | Erase the preview. |
| Update (magenta) | Redraw the preview with the current values. Enter in any text box does the same. |
| Accept (green) | Keep the preview as ordinary entities; the status line reads Kept. The form stays open for the next path. |
| status line | Red text under the presets: warnings and failures |
How the options combine
All figures below were produced by running the command's own engine on a sample path of length 21.12 (two arcs and a straight). White cells are on Layer 1, yellow cells on Layer 2; the arrow marks the direction of the path.
Quantity
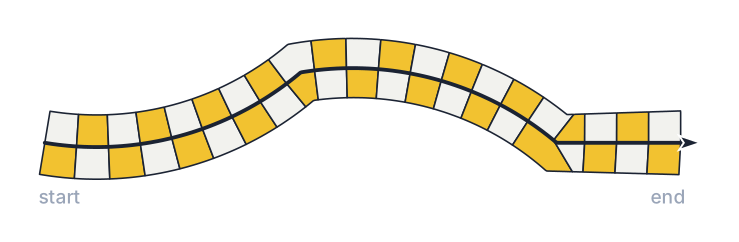
Quantity 2, Width 1, Height 1 (the defaults): two rows, one on each side of the path, cells alternating between the two layers and the rows out of phase.
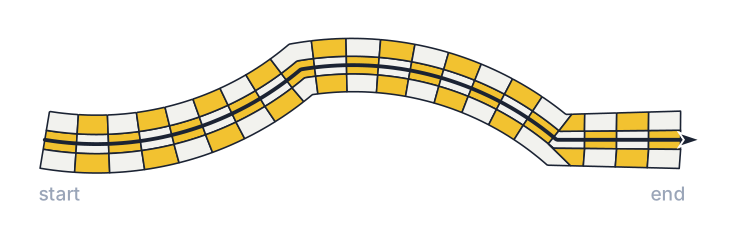
Quantity 3, Height 0.6: the middle row is centred on the path, with one row on each side.
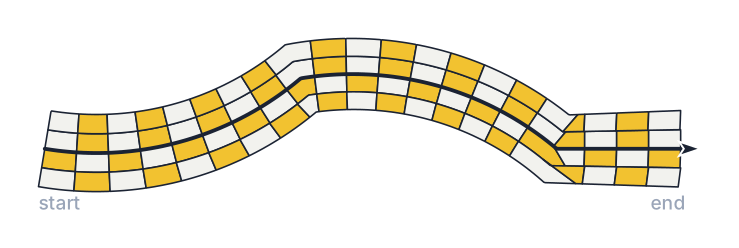
Quantity 4, Height 0.6: two rows on each side.
Alternate
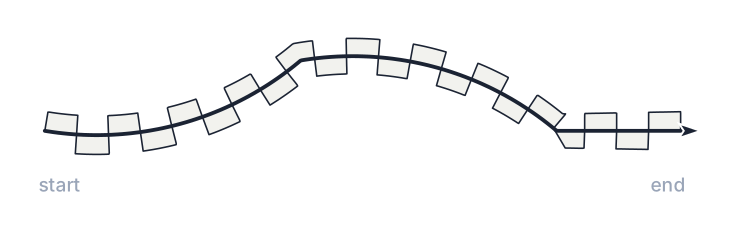
Quantity 2 with Alternate: every other cell is kept and the rows are staggered. All cells are on Layer 1.
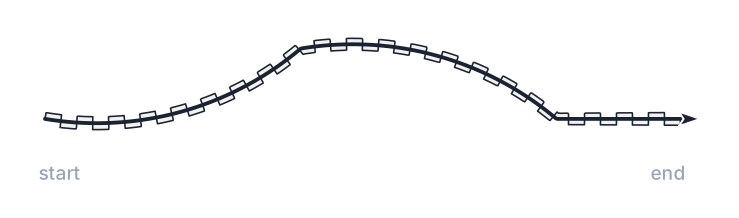
The ZIPPER preset (Quantity 2, Width 0.5, Height 0.2, Alternate) on the same path.
Adjust width to fit total length
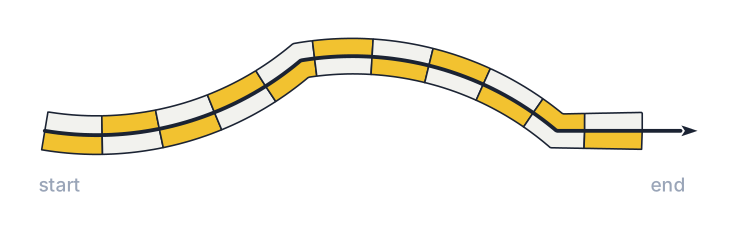
Width 1.8 with the option off: 11 cells of 1.8 per row, and the last 1.32 of the path stays empty.
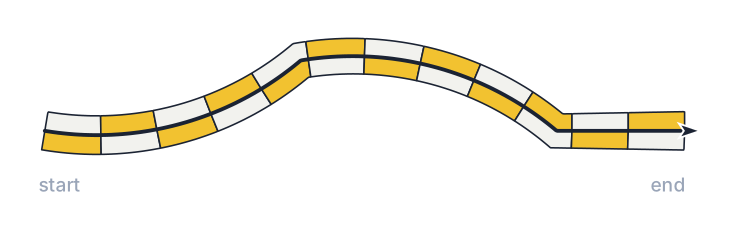
The same with the option on: the width becomes 1.76 (21.12 ÷ 12) and 12 cells close exactly on the end.
Offset
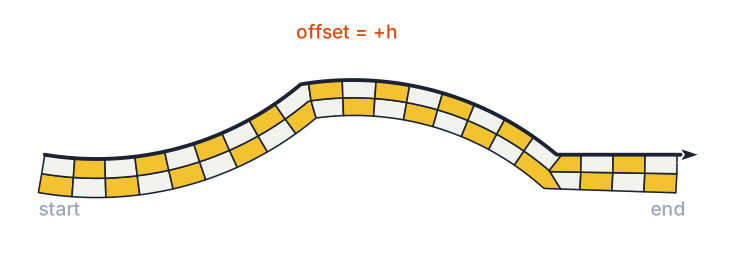
Offset = Height (button h): the whole strip moves to the right of the walking direction, so it sits on one side of the path.
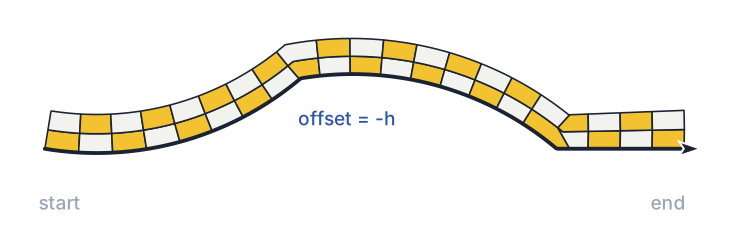
Offset = −Height (button -h): the strip sits on the left.
Quantity 1 with an angle
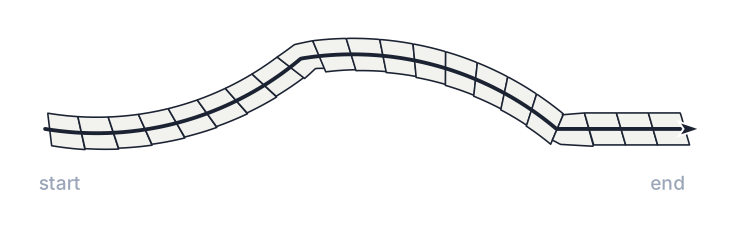
Quantity 1, Height 0.5, Angle 30: a single row of sheared cells, Height on each side of the path, all on Layer 1. With Angle 0 nothing is drawn.
Remembered between sessions
Quantity, Width, Height, Starting at, Gap in between, Angle and Offset. They are saved when the form closes and restored when it opens. The layers, Alternate, Adjust width to fit total length, Invert, the Select mode and the preset are not remembered.
Notes
- The first cell of the first row is on Layer 2, the second on Layer 1, and so on; the adjacent row starts with Layer 1. If the colours come out the other way round from what you want, swap the two layers.
- The strip follows the curve's own direction, from its start vertex. The point you pick does not choose the start, and Invert (22) is not available in this version, so reverse the polyline in the CAD if you need the phase to start from the other end.
- The sign of Offset here is the opposite of the Divider Assistant: positive is the right of the walking direction.
- The ⟂ buttons (7, 10) behave exactly like the ℓ buttons (6, 9): a plain two-point distance.
- With Alternate on, Layer 2 (4) has no effect; every kept cell is on Layer 1.
- Starting at, Gap in between and Invert are not available in this version.