| Command | CAPCAD_ALIGNMENT_STATION_GOTO |
| Shortcut | KM |
| Ribbon | CapCad tab › Project panel › Design split button › GoTo Station |
| Category | Gerenciar: Eixo |
| Form | KmInputForm (modeless: the drawing stays live while it is open) |
| Hosts | AutoCAD (on ARES Commander the command is not available in this version and says so) |
| Also opened by | The Localizar em eixo… button of CAPCAD_GEO_POINT_IDENTIFY (see Notes) |
Type a station, press Enter, and you are there. The CAD's ZOOM and PAN know nothing about your alignment; this navigator does, and it also answers the reverse question: "which station is this?"
- Three ways to write a station. Metres, kilometres or 20 m stations, whichever your project uses; the same box also accepts an
x,ycoordinate. - Walk the road. A step box and two arrows move the view station by station; turn on Auto and the view follows every keystroke.
- Click to identify. Pick any point and get its station, the alignment properties at that station (widths, speeds, whatever the alignment carries), the elevation and slope on the vertical profile, and the geographic coordinates.
- Measure along the alignment. Two picks give the distance between stations, plus the real distance along the profile.
- Straight to Street View. The identified point can be opened in Street View or Google Maps in one click.
- Leaves a mark if you want. Insert point drops a POINT entity at every station you jump to.
What it does
The Station Navigator works on the active alignment of the drawing (the eixo set in the Alignment Manager, including its sub-alignments). You type a station value in the box, and the view is centred on that station at a fixed zoom (a window 50 drawing units high). The value can be a length in metres, a kilometre value or a 20 m station number; the form converts it before looking the station up. If you type two numbers separated by a comma, they are taken as an x,y coordinate and the view is panned to it instead.
The two Identify buttons go the other way: Identify point reads the station under a clicked point, together with the alignment's properties at that station, the vertical profile elevation and slope, and the point as latitude/longitude; Identify distance measures the station difference between two clicks.
The form is modeless: it stays open while you keep working in the drawing, and hides itself while you pick points.
Workflow
- Run
CAPCAD_ALIGNMENT_STATION_GOTO(or typeKM). The drawing must have an alignment set; if it has none, a Yes/No message offers to open the Alignment Manager and the form does not open. - The form opens with the alignment's station range (initial / final) printed above the limit box.
- Choose the unit (1, 2 or 3), type the station in box 6 and press Enter or click zoom (8). The view is centred on the station. Tick Insert point (5) first if you want a POINT entity left there.
- To move along the alignment, set the step (11) and click the arrows (9, 10). Tick Auto (4) and every change of box 6 navigates at once.
- Click Identify point (12) and pick a point in the drawing: box 6 receives its station, box 14 the report, box 18 the latitude/longitude.
- Click Identify distance (13) and pick two points: box 14 shows the station distance between them.
- With a latitude/longitude in box 18, click StreeView (19) or GoogleMaps (20) to open the point in the browser.
- Close the form. The unit, Auto, Insert point, the step and the limit are remembered for next time.
The form
The form has a single state; the numbers below are the same in both languages. Turning Auto on only hides the "Enter to navigate to point" hint.
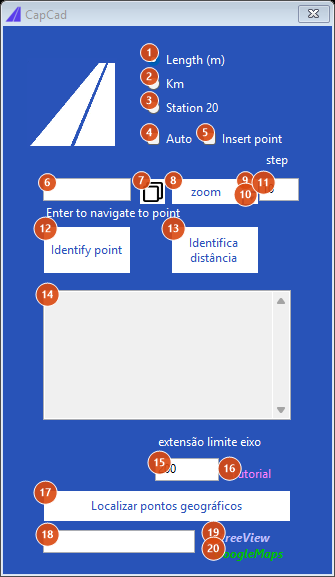
Default state: unit "Length (m)", step 10, limit 200.
Besides the numbered controls, the form shows the CapCad mark (top left), the hint Enter to navigate to point under box 6 (hidden while Auto is on), the step and extensão limite eixo captions, and, once the command has run, a two-line label at the bottom left with the alignment's station range: initial: the whole part of the smallest initial station and final: the whole part of the largest final station over all its elements.
Unit and options (top right)
| # | Control | What it does |
|---|---|---|
| 1 | Length (m) | The value in box 6 is a station in the alignment's own length units (metres), used as typed. Default. |
| 2 | Km | The value in box 6 is in kilometres: it is multiplied by 1000 before the station is looked up. Identify point writes the station back divided by 1000. |
| 3 | Station 20 | The value in box 6 is a 20 m station number: it is multiplied by 20. Identify point writes the station back divided by 20. |
| 4 | Auto | Navigate on every change of box 6 (each keystroke, each arrow click), without pressing Enter. Also hides the Enter hint. |
| 5 | Insert point | When a station is found, a POINT entity is added at that spot on the current layer, in addition to the zoom. Not used for x,y coordinates or by Identify point. |
Station box (middle)
| # | Control | What it does |
|---|---|---|
| 6 | Station | Type the station (per the unit chosen) and press Enter. The value is tried on each element of the alignment in turn; the first that contains that station gets the view: centred on the point, 50 drawing units high, then a regen. Box 14 reads Km encontrado; if no element contains the station, it reads Position not found in any of the alignments. Two numbers with one comma (350000,7450000) are an x,y coordinate: the view is panned to it at the current zoom and box 14 reads Coordenada. Use a dot as decimal separator; a comma means a coordinate. Empty box: nothing happens. Entering the box selects its text. |
| 7 | (copy icon) | Copies the text of box 6 to the clipboard (tooltip Copiar). |
| 8 | zoom | Same as pressing Enter in box 6. |
| 9 | ▲ | Adds the step (11) to the value in box 6. With Auto on, the view moves at once. |
| 10 | ▼ | Subtracts the step (11) from the value in box 6. |
| 11 | step | Increment used by the arrows, in the current unit. Default 10. |
Identify (middle)
| # | Control | What it does |
|---|---|---|
| 12 | Identify point | Hides the form and asks for a point (Point:). If the pick lies outside the current view, a Yes/No warning offers to navigate there; Yes centres the view on it and marks it with a POINT on layer AUX (magenta, non-plottable). Then the station of the pick is looked up within the limit (15): box 6 receives it, divided per the unit and with one decimal; if nothing is within the limit, box 14 reads Km para ponto não encontrado and the rest is skipped. Box 14 gets the report described below and box 18 the pick as latitude,longitude (only if the project has a coordinate system defined; no prompt is raised). Boxes 6 and 14 are cleared before the pick, so Escape at the prompt shows the form again with both empty. |
| 13 | Identify distance | Hides the form and asks for two points. Each is projected on the alignment with no distance limit; the two stations are sorted and box 14 shows the distance between them, then pt1: and pt2: with the two stations (3 decimals). If the drawing has a vertical profile, a third block shows Distance in profile: the real length along the profile between the two stations (vertical exaggeration removed) and, in brackets, the ratio profile length ÷ plan distance, printed with a % sign although it is a plain ratio; not found when the profile does not cover the two stations. Box 6 is cleared before the first pick; Escape at either pick shows the form again with box 14 unchanged. |
| 14 | Result | Read-only, scrollable. Receives the one-word outcome of a navigation, or the Identify reports. |
The Identify point report, when the pick is within the limit:
***PERFIL***
PERFIL H: <elevation, 3 decimals>
Inclinação em perfil: <slope in degrees>
Inclinação em perfil: <slope in %>

***PROPRIEDADES***
EIXO: <index of the element, 1-based>

Km: <station, 1 decimal> (real: <distance along the element>)
<property> = <value at that station>
...

From main eixo:
<curve-level property> = <value at that station>
The ***PERFIL*** block appears only when the drawing has a vertical profile and the station falls inside it; the elevation is the profile's y divided by the fixed vertical exaggeration of 10, and the slope is the drawn tangent with the same exaggeration removed. Element properties stored as station tables (the CSV-shaped ones, such as widths or speeds) are evaluated at the station; plain values are listed as they are (Acad.*, Id and RgbColor are skipped). The ***PROPRIEDADES*** block is omitted, and the dialog No alignment identified shown instead, when no element has its foot within the limit.
Limit and tutorial
| # | Control | What it does |
|---|---|---|
| 15 | extensão limite eixo | Search radius, in drawing units, for Identify point: a pick farther than this from every element of the alignment is reported as not found. Default 200. Zero or negative is taken as 1. Not used by Identify distance. |
| 16 | Tutorial | Opens the video tutorial (youtu.be/K2YHWB0zNGk) in the browser. |
Geographic point (bottom)
| # | Control | What it does |
|---|---|---|
| 17 | Localizar pontos geográficos | Closes this form and runs CAPCAD_GEO_POINT_IDENTIFY, the geographic point identifier. |
| 18 | Latitude,longitude | Filled by Identify point (6 decimals, dot as decimal separator). You can also type or paste a lat,lon pair here. |
| 19 | StreeView | Checks that box 18 holds exactly two comma-separated numbers (otherwise Not valid coordinates in box), shows a one-time explanation that Street View opens only where Google has imagery (tick don't show again to skip it in future), then opens Google Maps in Street View mode at that point (maps.google.com/maps?q=&layer=c&cbll=lat,lon&cbp=11,0,0,0,0). |
| 20 | GoogleMaps | Same check, then opens Google Maps centred on the point at zoom level 14 (google.com/maps/@lat,lon,14z). |
How the options combine
The conversions are fixed multipliers, so a table is enough. The same station 4 700 m of the alignment, in each unit:
| Unit | You type in box 6 | Station looked up | Identify point writes back |
|---|---|---|---|
| Length (m) | 4700 |
4700 | 4700.0 |
| Km | 4.7 |
4.7 × 1000 = 4700 | 4.7 |
| Station 20 | 235 |
235 × 20 = 4700 | 235.0 |
The step (11) is added in the unit you are using: with Km and step 0.1 the arrows move 100 m; with Station 20 and step 1 they move 20 m.
What the station box does with different inputs:
| Box 6 | Read as | Result |
|---|---|---|
4700 |
station 4700 | View centred on station 4700, 50 units high; Km encontrado |
350120.5,7451080 |
coordinate x = 350120.5, y = 7451080 | View panned to the coordinate, zoom unchanged; Coordenada |
99999 (beyond the end) |
station 99999 | Position not found in any of the alignments |
| empty | nothing | Nothing happens |
The shape of an Identify distance result when the drawing has a vertical profile:
<station 2 − station 1>

pt1:<lower station, 3 decimals>
pt2:<higher station, 3 decimals>

Distance in profile:<length along the profile, 3 decimals> (<profile ÷ plan ratio>%)
Remembered between sessions
The unit (1 to 3), Auto (4), Insert point (5), the step (11) and the limit (15) are saved when the form closes and restored when it opens. The station box, the result box and the latitude/longitude box are cleared on close and start empty.
Notes
- The navigation zoom is fixed: the view is set 50 drawing units high (25 each side of the station), keeping the current aspect ratio. Coordinates (
x,y) only pan; the zoom stays. - The
***PERFIL***block of Identify point is available with Length (m) selected; use that unit when you need the profile data. - Values the form writes into box 6 itself (arrows, Identify point) use the Windows decimal separator. If Windows uses a decimal comma, a fractional value written back reads as an
x,ypair on the next navigation; keep the step a whole number in that case. - The captions Identifica distância, extensão limite eixo, Localizar pontos geográficos and StreeView, the range label (
initial:/final:), the outcome words in box 14 and the report headings (***PERFIL***,Inclinação em perfil,Distance in profile) are the same in every language. - Opened from
CAPCAD_GEO_POINT_IDENTIFY(Localizar em eixo…), the form appears as a dialog without the station range, and Enter, zoom, Identify point, Identify distance and Localizar pontos geográficos are not available there; only the copy button, the arrows and the three links work. RunCAPCAD_ALIGNMENT_STATION_GOTOdirectly for the full behaviour.