| Commands | CAPCAD_LABEL (Labels — opens the form on the Insert tab) · CAPCAD_LABEL_CORRECT (Corrige Marca — opens on the Correct tab, with the button already focused) · CAPCAD_LABEL_INSERT (Insere Marca — no form, straight on the command line) |
| Shortcuts | IM → CAPCAD_LABEL_INSERT · CM → CAPCAD_LABEL_CORRECT (acad.pgp). CAPCAD_LABEL has no shortcut |
| Ribbon | CAPCAD_LABEL: CapCad tab › Roadway panel › Library split button › Annotations. CAPCAD_LABEL_INSERT: Roadway panel › Library › Insert Label. CAPCAD_LABEL_CORRECT: no button on the English CapCad tab — type the command name |
| Category | Manage: Alignment (all three) |
| Form | LabelsForm — the title bar reads Labels; modeless, one instance, 5 tabs (Insert, Correct, Styles, Utils, Streets) |
| Hosts | AutoCAD only. In ARES Commander the three commands exist only as a "coming soon" notice; in BricsCAD, GstarCAD and ZWCAD they do not exist |
| Also opens | The Nomes ruas… button of the OpenStreetMap importer opens this form straight on the Streets tab |
A CapCad label is not a block with typed text: it is a block that fills itself in from where you clicked. Station, latitude, longitude, northing/easting and side of the alignment come out of the project geometry at the moment of insertion — and can be recomputed in bulk when the alignment changes.
- The leader is part of the label. The block is born offset at 45° from the clicked point, at the width the scale asks for, with the line joining the two. There is no leader to draw.
- The station comes from the alignment, not from your memory. The point is projected on the active alignment and the station attribute is written in the project's format.
- A point, or a station you type. At the prompts you click a point or type a number: the number is read as a length along the alignment, and the offset is asked for next.
- The marking's legend writes itself. Text on geometry reads the marking's layer and builds the legend, with cadence, width and material when the layer carries them.
- Bulk correction after the alignment moved. Select the labels on screen and the command reprojects each one, rewrites station, coordinates and side, and reports how many actually changed.
- The label styles are yours. The store is layered — default, user and project — so you build your own attribute set once, save it into the project, and it travels with the folder.
What a "label" is
A label is an attribute block inserted beside something you want to identify in plan — the start of a marking, a sign, a device, a point of interest — joined to the point of interest by a leader.
The block has no drawing: it is made only of stacked attribute definitions. Which attributes exist is what the label style decides (Styles tab), and CapCad fills in the ones it recognises:
| Attribute | What it receives |
|---|---|
INFO_ITEM |
The text of the Info field — the label's description. XXX when nothing is given |
INFO_EST |
The station of the point on the reference alignment |
INFO_KM |
The same value, for the styles that use the km wording |
INFO_LAT / INFO_LON |
Latitude and longitude to 6 decimals, converted through the project's coordinate system |
INFO_ESTE / INFO_NORTE / INFO_E / INFO_N |
The projected coordinates, in the form E=1234,5 / N=…, to one decimal |
INFO_X / INFO_Y |
The same coordinates in the form X= / Y= |
INFO_LADO |
E, C or D — which side of the project alignment the label ended up on |
INFO_INICIO / INFO_FIM |
Only in the INFO_DERSP style: the two stretches chosen (see The two-stretch style) |
When the point does not fall on any station of the alignment (or there is no alignment), INFO_EST and INFO_KM are written empty and the label is inserted anyway, with no rotation.
The block and the leader go to the catalogue's INFO layer role — the name, the colour and the linetype are the ones the active style resolved for that role, never a name typed in.
How the block is positioned
| Quantity | Rule |
|---|---|
| Block scale | Escala 1: N ÷ 1000 × 10 — at 1:1000 the block comes in at scale 10 |
| Leader distance | Ext. linha chamada × 2 × the scale above |
| Direction | 45° from the normal to the alignment, towards the side you clicked |
| Rotation | The alignment's (or the reference geometry's) tangent at the perpendicular foot. With no reference at all, zero |
| Leader | A two-vertex polyline, from the clicked point to the block's insertion point |
Which command to use
| Command | When |
|---|---|
CAPCAD_LABEL_INSERT (IM) |
Label quickly, without opening a window: one notice, then the loop point → text → point → text. It uses the active label style, scale 1:1000 and leader 1 |
CAPCAD_LABEL |
Everything else: choose the reference, the offset, the scale, read the information off the entity itself, write text over the geometry, change the active style |
CAPCAD_LABEL_CORRECT (CM) |
Recompute labels that already exist |
CAPCAD_LABEL_INSERT, step by step
- If an alignment is defined, the command warns that you may enter a point or a length along the alignment — and that, if you choose the length, it will ask for the offset next.
- Point — with no alignment, the prompt is just
Ponto:. - Point or station — with an alignment, click a point or type a number. Typed, the number is the length along the alignment; the command then asks
Valor para offset:(positive = left,Enter= 0) and re-frames the screen on the resulting point, keeping the zoom. - The label is inserted.
- If the active style's block has the
INFO_ITEMattribute, the command asksMarca texto:. Left blank, the valueXXXstays. - The loop starts again.
Escends it.
The Insert label button (40) on the Styles tab runs exactly this same loop.
The form
The five tabs are independent: Insert draws, Correct recomputes, Styles edits the label-style store, Utils works on the attributes of any block and Streets writes street names.
The strip at the bottom always shows Active: <style> — the label style active in this drawing.
The screenshots are the Portuguese renders of the form; the control positions are identical in every language.
Insert tab — Marca mode
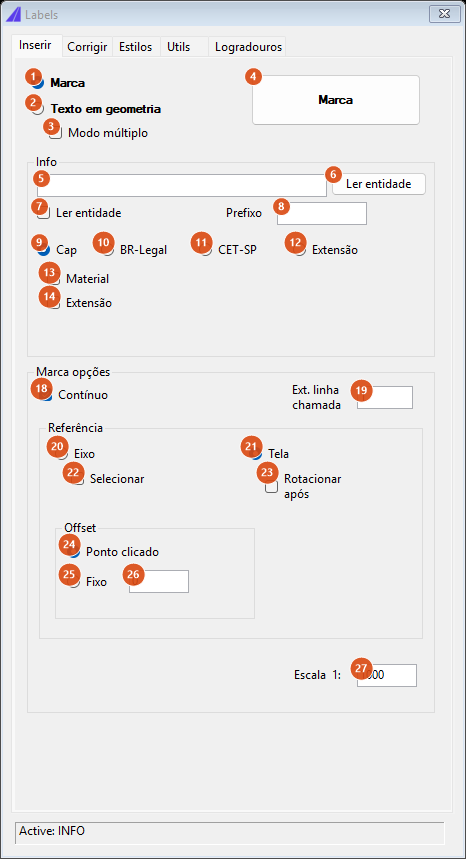
The initial state: Marca mode, Screen reference, offset by the clicked point, scale 1:1000.
| # | Control | What it does |
|---|---|---|
| 1 | Marca | Annotation-block mode. It swaps the lower option group and the caption of button (4) |
| 2 | Text on geometry | Mode that writes text over the road marking itself (below) |
| 3 | Multiple mode | Only counts in Text on geometry mode. In Marca mode the box is not read |
| 4 | Marca / Text on geometry | The button that runs. The caption follows the chosen mode |
| 5 | Info | The text that goes into INFO_ITEM. It greys out (and is ignored) while (7) is ticked |
| 6 | Read entity (button) | Asks for a curve in the drawing and drops its legend — built by the style of (9)–(12) — into field (5), for you to check or edit before inserting |
| 7 | Read entity (check box) | Turns on automatic reading: each label's information comes from the entity you pick at the time, not from field (5) |
| 8 | Prefixo | Text pasted in front of the legend in the legend styles (11) and (12). For the urban legend styles it starts out as PINTAR |
| 9 | Cap | The CapCad legend format: LFO-2 AM 4X6. It is the only one that shows boxes (13) and (14) |
| 10 | BR-Legal | A Brazilian legend format: LFO-2 (0.1-PF-4X6-M)X10 branca. It is meaningful only with a Brazilian marking-layer set; see the Portuguese edition of this page |
| 11 | CET-SP | A second Brazilian legend format, with its own wording, cadence, width (e=) and length; see the Portuguese edition of this page |
| 12 | Length | The length alone: L=123,4 |
| 13 | Material | Appends the material read from the layer to the end of the Cap legend |
| 14 | Extensão | Appends the length in brackets to the Cap legend |
| 15 | Nome do bloco | When reading a block: uses the definition name |
| 16 | Layer | When reading a block: appends its layer |
| 17 | Ação | When reading a block: appends the action deduced from the layer (IMP / MAN / REM) |
| 18 | Continuous | Keeps the loop going: the form stays hidden and you go on labelling until you press Esc |
| 19 | Ext. linha chamada | The leader length, before it is multiplied by the scale |
| 20 | Alignment | Reference = the alignment. The label is projected on it, gets a station and rotates with the tangent |
| 21 | Screen | Reference = the screen. You click wherever you like; no projection, no rotation |
| 22 | Select | With (20) on: instead of the project alignment, the reference is the curve you choose in the drawing |
| 23 | Rotate after | Screen mode only. After inserting, it fires the CAD's ROTATE on the block and the leader, with the base point already set — the angle is up to you |
| 24 | Clicked point | The label's offset is the distance from the entity read to the alignment |
| 25 | Fixed | The offset is the value of (26) |
| 26 | (fixed offset value) | Metres from the alignment. Positive = left |
| 27 | Escala 1: | The drawing scale. It governs the block size and the leader length |
Reading the information off the entity itself
With Read entity (7) on, the (15)–(17) panel appears and button (4) starts asking for an entity at every turn of the loop:
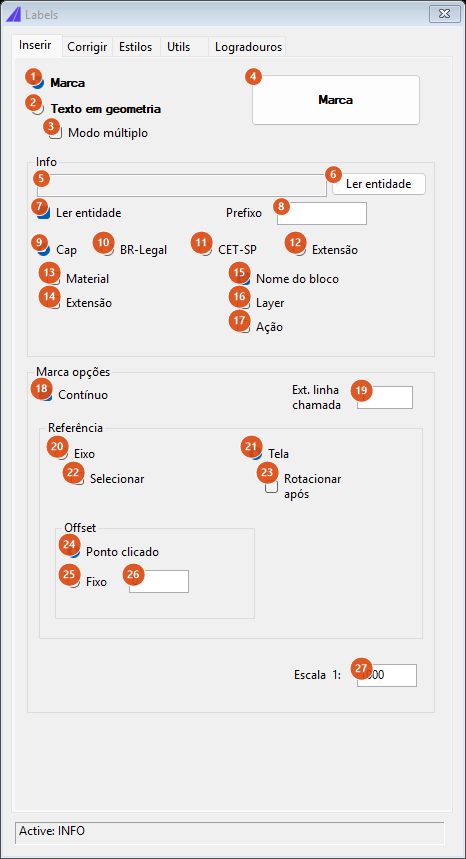
- A curve → the legend is built by the style chosen in (9)–(12) from the layer, the length and the polyline's constant width.
- A block → the legend is the definition name, the layer and the action, per (15)–(17), separated by
-.
In Alignment + Read entity mode, the label's point is the perpendicular foot of your click on the alignment, and the side comes from the click itself — nothing else to indicate. With Alignment + Select (without Read entity), the command asks for a second click, Lado..., only to know which side the label goes on.
Insert tab — Text on geometry mode
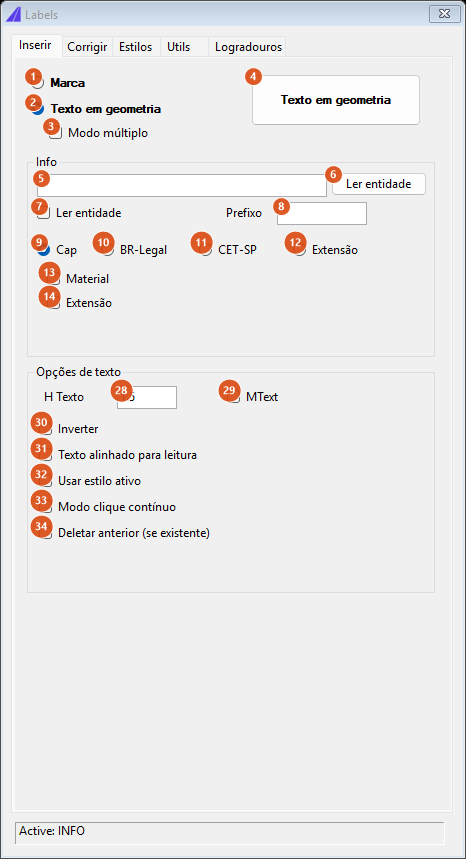
Here there is no block and no leader: CapCad writes a text over the road marking itself, rotated with its tangent, offset H × 1.25 towards the side you clicked. The text is born on the catalogue's FAIXAS_TEXT layer role, under the name the active style gives that role.
| # | Control | What it does |
|---|---|---|
| 28 | H Texto | Text height. Zero is refused |
| 29 | MText | Writes an MText instead of a simple text (DBText) |
| 30 | Invert | Rotates the text 180° |
| 31 | Text aligned for reading | Corrects the angle so the text is never upside down. It applies in Continuous click mode; on the other two paths the text comes out with the raw tangent |
| 32 | Use active style | Uses the drawing's current text style. Unticked, CapCad creates and uses CAPCAD_R60 (font romans.shx, fixed height) |
| 33 | Continuous click mode | After writing, it asks for another point and rewrites — so you can hunt for the best position while looking at the result. The form stays visible, so height and MText can change between turns |
| 34 | Delete previous (if any) | Erases the text a previous run had already attached to that same geometry |
Three paths, according to (3) and (33):
| Path | What happens |
|---|---|
| Multiple mode (3) | One selection window; each curve gets a text at its midpoint. Always with the active text style, no inversion and no reading alignment |
| Continuous click mode (33) | One curve, then as many points as you like, rewriting at every click |
| Neither | One curve, one point, one text |
Each text is tied to the geometry by an XData (capcad.geometryMark.entity) that stores the text's id on the road marking itself. That link is what lets (34) erase the old text before writing the new one.
The LFO3/LBO exception. A layer that only describes studs, with no marking code, is completed before it is read: yellow becomes
LFO3, white becomesLBO. Without that, a studs-only line would come out with no code at all.
Correct tab
The tab has a single button, Correct (35) — CAPCAD_LABEL_CORRECT opens straight on it.
The command requires an alignment. With one, it hides the form, asks for a selection on screen and recomputes every label it recognises:
- Only blocks whose name is in the label-style store (default + user + project) are taken in — the rest of the selection is ignored.
- For each label, CapCad looks for the leader: a polyline, on a layer whose name ends in
INFO, with one of its ends next to the block's insertion point. - With a leader — the anchor is the leader's first vertex. Latitude/longitude, northing/easting, X/Y and the side are rewritten from it, and
INFO_ESTgets the station of that point.INFO_KMis not touched on this path. - Without a leader — the block's own insertion point acts as the anchor, and only latitude/longitude,
INFO_ESTandINFO_KMare rewritten: neither the projected coordinates nor the side. - Labels whose point finds no station on the alignment are skipped and do not enter the count.
At the end, a summary says how many labels were found, how many had no leader, how many were corrected and how many were already right.
Styles tab
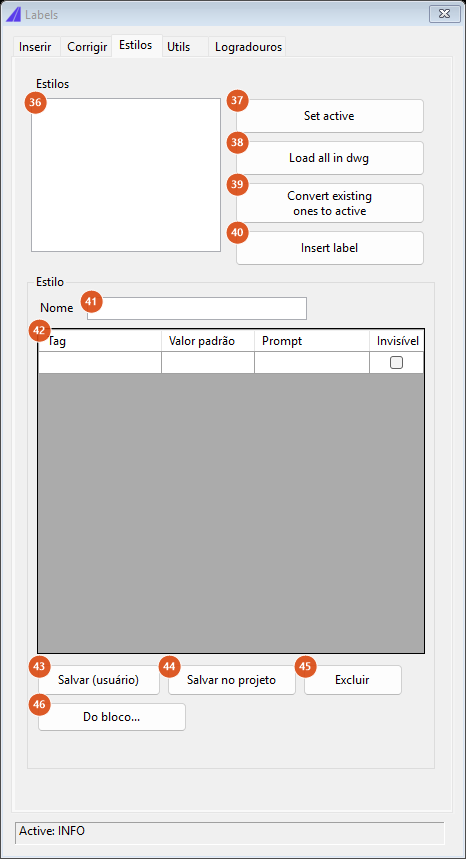
The list is empty outside the CAD: it is built when the command opens the form over a drawing.
| # | Control | What it does |
|---|---|---|
| 36 | Estilos (list) | Every style in the store, each row with the name and the tag of the layer it came from: default, user or project |
| 37 | Set active | Makes the selected style the active style of this drawing — what the Active: strip shows and what every insertion uses from then on |
| 38 | Load all in dwg | Builds in the drawing the block definition of every style in the store. An existing definition is erased and rebuilt |
| 39 | Convert existing ones to active | Swaps the references of all the other styles in the store for the active style's definition — the way to make a drawing uniform after it has received labels from several sources. It reports how many were swapped |
| 40 | Insert label | Runs the same loop as CAPCAD_LABEL_INSERT |
| 41 | Nome | The name the style will be saved under. It is this, not the list selection, that decides where (43) and (44) write |
| 42 | attribute grid | Tag, Default value, Prompt and Invisible, in the order the attributes will be stacked. Always editable, including for a default style |
| 43 | Save (user) | Writes what is in the grid to your personal layer |
| 44 | Save in project | Writes to the project layer. With no project defined, it warns and does not write |
| 45 | Delete | Removes the style from the layer it was defined in. Disabled for the default styles |
| 46 | From block... | Asks for a block in the drawing and loads its attribute definitions into the grid (tag, value, prompt, invisible). It only loads — it is saved only if you say so |
The layered store
The label-style store is assembled from three layers, in this order:
| Layer | Where it lives | Scope |
|---|---|---|
| default | Built into CapCad — 13 styles | Always present |
| user | Your CapCad user presets | You, in any project |
| project | The project's presets file, at the project root (or in the project's presets folder, when it names one) | Everyone who opens that project |
A repeated name in a higher layer shadows the one below without changing its place in the list: saving a user style called INFO makes the list show INFO — user, with the attributes you defined, and the default INFO comes back on its own if you delete yours. That is why the grid stays editable even on a default style: saving is always either "save a copy" (with another name) or "shadow" (with the same name).
There are thirteen default styles, and choosing between them is choosing which attributes the label will carry:
| Style | Attributes |
|---|---|
INFO |
item, lat, lon, station |
INFO_IENLLSC |
item, easting, northing, lat, lon, side, condition |
INFO_KLL |
km, lat, lon |
INFO_INESC |
item, northing, easting, side, condition |
INFO_ILLSC |
item, lat, lon, side, condition |
INFO_ISC |
item, side, condition |
INFO_SC |
item, side |
INFO_DERSP |
start, end, km |
codigo_geo_km |
item, lat, lon, km |
codigo_norte_este_km |
item, northing, easting, km |
codigo_x_y_km |
item, X, Y, km |
acao term geo km |
action, item, lat, lon, km |
DEFENSA - acao term i corpo term f kmi xy ext |
action, initial terminal, item, final terminal, km, easting, northing, length |
The block definition is built on the spot: the visible attributes stacked top to bottom, height 0.15 and spacing two thirds of the height, the invisible ones parked at the origin, all with their position locked inside the block.
The two-stretch style
With INFO_DERSP as the active style, the Marca button (4) changes behaviour: instead of one point, it asks for two curves. The legend of the first goes into INFO_INICIO prefixed with INÍCIO:, the legend of the second into INFO_FIM prefixed with FIM:.
Utils tab
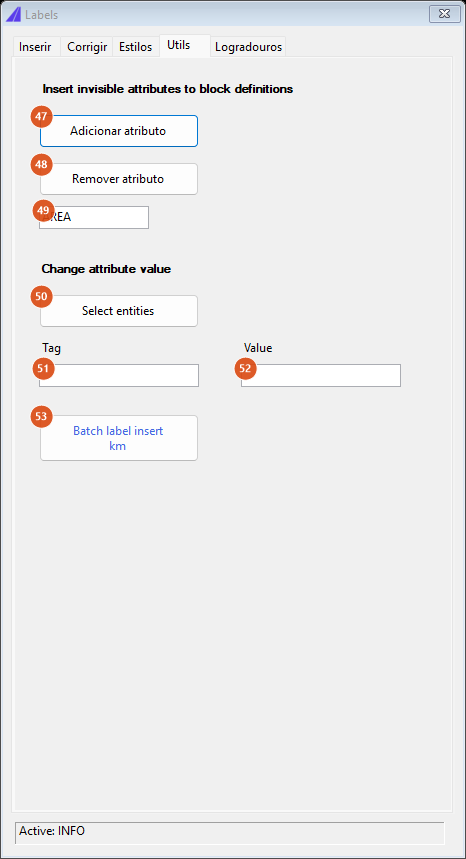
Three attribute tools that work on any block in the drawing, not only on labels.
| # | Control | What it does |
|---|---|---|
| 47 | Add attribute | Asks for a block and adds to its definition an invisible attribute with the name of (49). It then walks every reference of that definition and gives the new attribute to those that did not have it |
| 48 | Remove attribute | The opposite: erases the attribute (49) from the definition and from every reference |
| 49 | (attribute name) | The tag used by (47) and (48). It comes filled in with AREA |
| 50 | Select entities | Asks for a selection and writes Tag = Value on every block reference that has that tag |
| 51 | Tag | The tag (50) looks for. Empty, the command refuses |
| 52 | Value | The value (50) writes. It may be left empty — that is how an attribute is cleared in bulk |
| 53 | Batch label insert km | Not available in this version; clicking it says so |
Streets tab
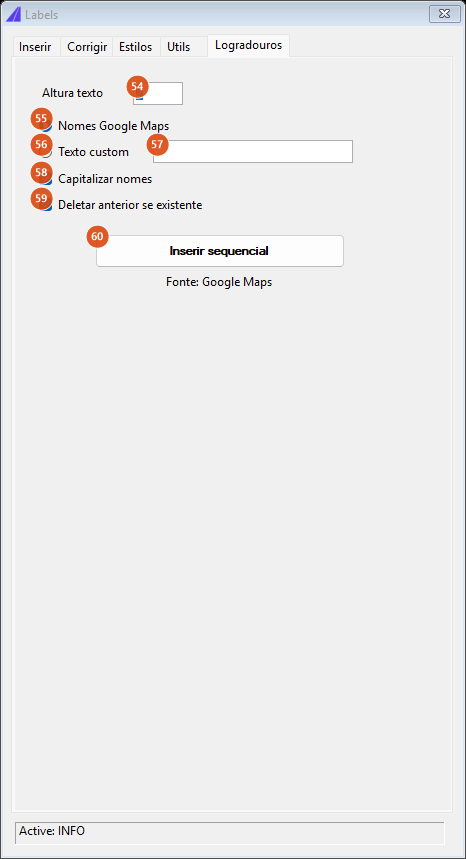
Writes street names over the roads — the natural companion to an OpenStreetMap import, which brings the geometry of the streets without the labels.
| # | Control | What it does |
|---|---|---|
| 54 | Altura texto | Text height. An invalid value or zero falls back to 2 |
| 55 | Google Maps names | The name comes from a Google Maps query at the latitude/longitude of the text point. It needs a coordinate system defined in the project |
| 56 | Custom text | Always uses the text of (57). With the field empty, the command falls back to the Google mode |
| 57 | (custom text) | The name to write |
| 58 | Capitalize names | Writes everything in capitals |
| 59 | Delete previous if any | Erases the name a previous run had already attached to that same street |
| 60 | Insert sequential | Starts the loop |
The loop is: choose the street geometry, choose the text point, CapCad writes. Esc at either prompt ends it. The text comes out rotated with the street's tangent and flipped where needed to stay readable, and is tied to the street by an XData (capcad.geometryMark.address) — the link (59) needs.
The house number Google sometimes returns at the end of the name (, 123) is stripped.
Remembered between sessions
The whole Insert tab is remembered in your user preferences: mode, Multiple mode, Read entity and its three boxes, the Info text, the Prefixo, the legend style, the Material and Extensão boxes, Continuous, the leader length, the scale, the reference, Select, Rotate after, the offset mode and value and all seven text options — 32 controls in all, saved when the form closes.
Not remembered: the tab the form opens on (always Insert, before the command chooses its own), the Utils and Streets fields, and the style list's selection. The active style is not a user preference: it is stored inside the drawing, so each dwg has its own.
Notes
- With no alignment, the form locks itself into Screen mode. If, at the moment the form is created, no alignment is loaded, Screen is forced and Select is ticked and disabled. Defining an alignment afterwards does not release the box: you have to close and reopen the form.
- The side (
INFO_LADO) always comes from the project alignment and from the block's insertion point, not from the clicked point nor from the curve chosen in Select. On a label inserted in Screen mode, far from any alignment, the attribute is left blank. Açãoon a curve comes out with no separator. Reading a block, the parts chosen in (15)–(17) are separated by-; reading a curve, the action is concatenated without a separator at the end of the legend (LFO-2 AM 4X6IMP).- The colour abbreviation in the Cap legend is the first two letters of the spelled-out colour name —
vermelhaproducesVE, not theVMabbreviation used elsewhere in CapCad. - Multiple mode + Continuous click mode really does hide the form. With both boxes ticked, the form hides at the start of the run and does not come back at the end — and running the command again does not bring it back, because the window is still open, only invisible. Keep those two apart.
- In "click once" mode,
Escat the point prompt does not cancel. The text is written anyway, at the point where you clicked the entity. - With MText (29) ticked, Use active style (32) changes nothing. The
CAPCAD_R60style is only applied to simple text; MText always comes out with the drawing's current style. - Text aligned for reading (31) overrides Invert (30). When reading alignment is on, it decides the angle and the inversion is ignored.
Alignment+Select+Read entityon a block inserts nothing. A block is not a curve; the command ends silently. Combine Select with linear entities.Rotate afterruns after the loop. The ROTATE is queued in the CAD, so with Continuous on every rotation only starts once you end the loop withEsc.- The leader is looked for as any polyline on a layer ending in
INFO. If the drawing has other polylines on a layer with that ending running beside the label, the correction may anchor on the wrong line. And the anchor is always the leader's first vertex, even when it is that end which touches the block. - The "corrected" count counts attributes, not labels. On labels with no leader, station and km are two attributes, so a single label can add two to the count — and the summary can end up announcing more labels corrected than labels found.
- The correction summary always comes out in Portuguese, even with the interface in English.
Load all in dwgrebuilds existing definitions. A label block you have customised by hand in the drawing is erased and rebuilt from the store.- The form's title bar reads Labels in all three languages; only the contents are translated.
- Several captions stay Portuguese in the English interface: the Marca mode and button, Prefixo, Material, Extensão, Nome do bloco, Layer, Ação, Ext. linha chamada, Escala 1:, the Referência and Info group titles, Estilos, Nome, Altura texto and the Fonte: Google Maps note. They are quoted above as the software shows them.
See also
- Alignment Manager — the alignment the station, the tangent and the side come from.
- Draw and edit the alignment — drawing the alignment and its auxiliary alignments.
- Alignment properties — the per-station values the alignment carries.
- Station Navigator — reading a station and its coordinates at a picked point.