| Command | CAPCAD_ROAD_EMBANKMENT |
| Shortcut | none |
| Ribbon | CapCad tab › Safety panel › Restraint split button › Talude; also GIS panel › Tools split button › Talude |
| Category | GeoData: Topographic Tools |
| Form | none — the command asks everything on the command line |
| Hosts | AutoCAD |
| Also | the same hatch is drawn together with the restraint when Add slope is ticked in CAPCAD_RESTRAINT |
The classic embankment symbol, from any curve: a base line plus perpendicular ticks alternating short and long. Done by hand it is an array of lines along a curved polyline, which the CAD will not do for you.
- It follows the curve. Every tick starts at its own station and leaves perpendicular to the tangent there, so arcs and vertices come out right with no touch-up.
- Short and long alternating. The short/long pair is the conventional drawing, and it comes out of one pass, from one spacing and two lengths.
- The side is one click. You point at the side the ground falls towards, and the whole hatch follows.
- On the right layer. Everything goes to the slope layer of the active country profile's layer catalogue, created if it does not exist.
- Three numbers it remembers. Short, long and spacing are stored together for next time.
What it does
The command takes a curve — line, polyline or arc — and turns it into the conventional embankment hatch:
- a copy of the curve becomes the base line;
- stops are marked along it every inner distance;
- the stops are consumed two at a time: the first of each pair gets a short tick (Smaller) and the second a long one (Larger);
- each tick leaves perpendicular to the curve's tangent at its own stop.
Because the stops are consumed in pairs, the number of ticks is always even, and a single leftover stop at the end is simply not used.
The curve you pick is erased. It is not lost: the first piece of the result is a copy of it, already on the slope layer. Every piece goes to the slope layer of the active layer catalogue (base name TALUDE, colour 45), created if it is not there yet and never redefined if it is.
Workflow
- Run
CAPCAD_ROAD_EMBANKMENT. - The command asks
Menor,Maior,Distância <2,4,3>— the three numbers on one line, comma-separated, no spaces. Press Enter to accept the value in<>, which is what you used last time. - Pick the curve. This is the one that will be erased and become the base line.
- Click a point on the side the ground falls towards.
- The command draws, and reports how many pairs of ticks came out.
The three numbers
| Value | What it is | Default |
|---|---|---|
| Smaller | length of the short tick | 2 |
| Larger | length of the long tick | 4 |
| Distance | spacing between stops along the base line | 3 |
They are remembered before the geometry runs: even if you cancel the curve pick, what you typed is already kept for next time.
The three values must arrive with exactly two commas. With any other count the command answers "Favor entrar com 3 valores, separados por vírgula. Obrigado." and stops. If the distance is zero or negative it says the distance must be greater than zero and stops.
How the options combine
The figures below came out of the command's own engine, on the same 62.92-unit sample curve (a straight followed by an arc).
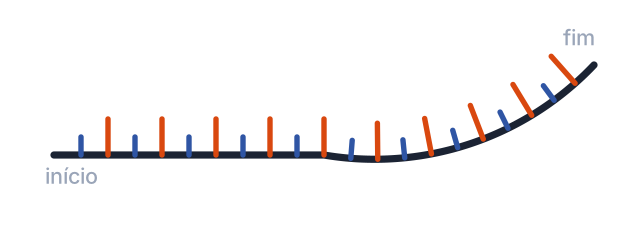
The default values — Smaller 2, Larger 4, Distance 3 — on a curve walked left to right: 10 pairs of ticks, short (blue) and long (orange) alternating, all on the left of the walk.
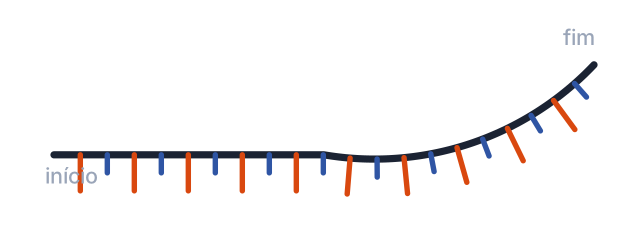
With the side point clicked on the other side, the curve is walked from the other end: the ticks fall on the opposite side and the short/long alternation starts from the other extremity. That is the only thing the side changes.
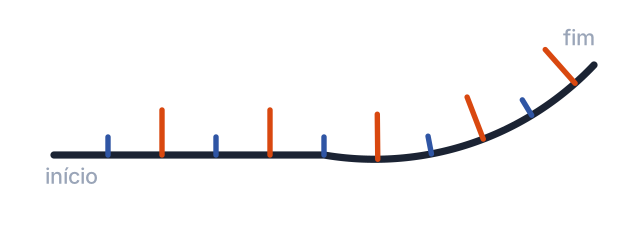
Smaller 2, Larger 5, Distance 6: fewer stops, so 5 pairs instead of 10, and the difference between short and long reads more clearly.
Remembered between sessions
The three numbers. Nothing else: the command has no form and no other options.
Notes
- The source curve is erased. This is deliberate — the result already contains a copy of it as the base line, on the slope layer. Copy the original first if you need to keep it.
- The side does not only change the side. It reverses the walking direction of the curve, which is why the short/long sequence also swaps ends. If you want the same pattern on the other side, that is the expected result.
- The hatch drawn together with the restraint is drawn the same way, with the four values from the Slope tab of
CAPCAD_RESTRAINT— where there is also an Offset that moves the base line away from the restraint body before hatching. On that path, however, the pieces land on the current layer, not on the slope layer. - The Draw standalone button on the restraint form's Slope tab is not available in this version. This command is the way to draw an embankment hatch without a restraint.
- This command's prompts are a mix of languages. The curve request ("Select the curve: ") and the distance warning come out in English, while the side request ("Lado…") and the three-values message come out in Portuguese, in every profile.
- The command exists today only in AutoCAD; on the other CADs it reports itself as not available.