| Commands | CAPCAD_MARKING_STRIP_CONTRAN (the form) · CAPCAD_LINEARSET (the line-definition editor, in the last section) |
| Shortcut | DF for CAPCAD_MARKING_STRIP_CONTRAN, only in the Portuguese acad.pgp — the alias does not exist in the English or Spanish alias files, so in an English session you type the full command name or use the ribbon button. CAPCAD_LINEARSET has no shortcut |
| Ribbon | CapCad tab › Road Marking panel › Faixas split button › Desenha Faixa CONTRAN [DF]. CAPCAD_LINEARSET has no ribbon button in any menu |
| Category | Horizontal (CAPCAD_MARKING_STRIP_CONTRAN) · none (CAPCAD_LINEARSET) |
| Forms | RoadStripForm — Faixas CONTRAN, modeless, one instance per session · LinearSetForm — Linear Set — Line Definition, modal |
| Hosts | CAPCAD_MARKING_STRIP_CONTRAN: AutoCAD, BricsCAD, GstarCAD, ZWCAD and ARES Commander — with the caveat that the input modes exist on AutoCAD only (see Notes). CAPCAD_LINEARSET: all five |
| Neighbouring commands | Marking Strip draws the same marking by picking a definition out of a library instead of describing it field by field; the type-section composer applies a whole cross-section at once; -CAPCAD_MARKING_STRIP_CONTRAN is the scriptable version |
You do not pick a layer: you describe the marking. Code, colour, cadence, width, device and material — the layer name comes out ready, with the right colour and linetype.
- The norm catalogue is built in. Every code the active country profile's norm defines, each with the colours, cadences and widths that norm allows.
- The layer writes itself.
SINA_HOR_AM_4x8_LFO2appears in the box as you choose, and it is created with the colour of the colour token and a linetype generated to the cadence. - A preview of what you will get. The picture beside the list follows the marking, the cadence and the colour you pick.
- Three ways to give the base. A stretch of the alignment, the entities you have already selected, or two points with the reference at the edge or on the centre.
- Copy properties from a marking already drawn. One click on an existing marking reads its layer back into the form.
- The action comes with it. Implant, keep, remove or refurbish enter the layer name, and the quantity takeoff sees them.
What it does
CAPCAD_MARKING_STRIP_CONTRAN opens a form on which a longitudinal or transverse marking is described by its norm attributes:
| Attribute | Values |
|---|---|
| Code | The marking codes of the active country profile's norm |
| Colour | yellow, white, black, red, green, blue, orange |
| Cadence | continuous, 0.5x1, 1x1, 1x2, 1x3, 2x2, 2x4, 2x6, 3x6, 3x9, 4x4, 4x8, 4x12 |
| Width | 0.10, 0.15, 0.20 m (or blank) |
| Device | none, stud, big stud, delineator, cone, supercone |
| Material | the paint and device materials of the active paradigm |
Out of those choices comes the layer name, assembled in the SINA_HOR grammar described in Layers and the layer catalogue — SINA_HOR_<colour token>_<cadence><device>_<material>_<code>. The Layer box shows the result and is read-only: it is a consequence of the choices, not a field.
Then you give the geometric base — a stretch of alignment, the selected entities, or two points — and the command draws the marking as a polyline of constant width on the resolved layer, creating it with the colour of the colour token and a linetype generated from the cadence.
This command is bound to one norm. The code list, the descriptions under the preview and the material lists all come from the Brazilian catalogue, and the layer root is always
SINA_HOR, independent of the country profile (see Notes). The codes and their descriptions are listed on the Portuguese edition of this page. On any other country profile, use Marking Strip instead: it draws the same geometry from a parametric library that ships definitions for fifteen countries.
Three constructions, three results
The chosen code decides how many lines come off each base:
- Double-line codes — the base is offset to both sides by half the internal distance for double lines (Opções tab), and the two parallels are drawn. Outside the newer paradigm, the second layer, where there is one, becomes the central stud line instead of the second parallel.
- Continuous-plus-broken codes — continuous on one side, broken on the other: also two parallels, each on its own layer.
- Every other code — a single line, on the resolved layer.
Workflow
- Run
CAPCAD_MARKING_STRIP_CONTRAN. The form opens modeless, beside the drawing. - On the Faixas tab, pick the code in the list on the left. The combos in the middle repopulate with the colours, cadences, widths and device cadences that code allows, and the preview changes.
- Adjust colour, cadence, width, device and material. Watch the layer name assemble itself in the Layer box.
- Pick the action in the lower left frame: Implantar, Manter, Remover or Revitalizar (implant, keep, remove, refurbish).
- Pick the input mode on the inner Modo and Outros tabs.
- Click Selecionar e converter ("select and convert"). The form hides, the command asks for whatever the mode requires, draws, and the form returns with the count in its status bar and on the command line.
The form stays open for the next marking: changing two fields and clicking again is the normal working cycle.
The form
This form has no English captions: it is shown in Portuguese in every language. The captions below are quoted in Portuguese as the software shows them, with an English gloss. The screenshots were captured in a Portuguese session, and the orange circles number the controls of each image — the numbering restarts per image, exactly as on the Portuguese edition, so the two pages stay comparable. An English render pass will replace the captures.
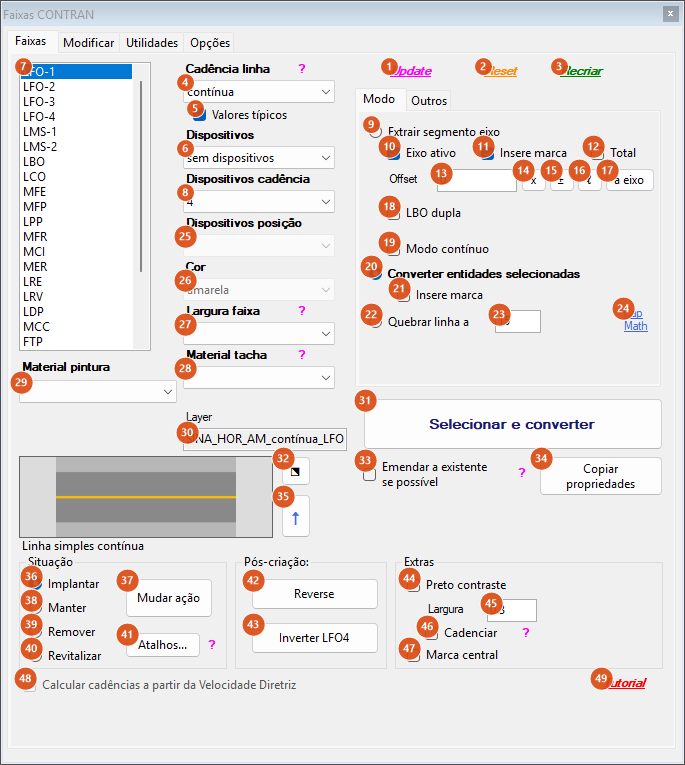
The Faixas tab: the catalogue on the left, the attributes in the middle, the input modes on the right and, below, the action and the extras.
Catalogue and marking attributes
| # | Control | What it does |
|---|---|---|
| 7 | (code list) | The norm code. Picking one repopulates every combo beside it and the preview. |
| 4 | Cadência linha (line cadence) | Mark and gap, in metres (4x8 = 4 m mark, 8 m gap). contínua for a solid line. This is what becomes the layer's linetype. |
| 5 | Valores típicos (typical values) | Ticked (the default), it restricts Cadência linha and Dispositivos cadência to that code's typical set; unticked, it opens the full list. |
| 6 | Dispositivos (devices) | Stud, big stud, delineator, cone or supercone — or none. In this version it enters only the layer name. |
| 8 | Dispositivos cadência (device cadence) | The device spacing, in metres. Also only part of the layer name. |
| 25 | Dispositivos posição (device position) | esq, dir, ambas or centro (left, right, both, centre). |
| 26 | Cor (colour) | The marking colour. Disabled when the code allows only one colour. |
| 27 | Largura faixa (strip width) | The polyline width, in metres: 0.10, 0.15 or 0.20, or blank for zero width. |
| 28 | Material tacha (device material) | The device material, which enters the layer name. |
| 29 | Material pintura (paint material) | The paint material. The list changes with the active paradigm. |
| 30 | Layer | Read-only. The name assembled from everything above. |
Under the preview sits the description of the chosen code and, for the codes that are there only for reference, a note saying that the marking has a command of its own or is not available in this version. Those cross-references point at the crossings, the area fill and the chevrons.
Input modes — inner Modo tab
| # | Control | What it does |
|---|---|---|
| 9 | Extrair segmento eixo (extract alignment segment) | The base is a stretch of an alignment. The command asks for the alignment entity and then two points on it; the stretch between the two stations is extracted. |
| 10 | Eixo ativo (active alignment) | Ticked by default. No effect in this version: the alignment is always asked for in the drawing, even with the box ticked. |
| 11 | Insere marca (insert mark) | No effect in this version. |
| 12 | Total | Uses the whole alignment instead of the stretch between two points — with it ticked, the two points are not asked for. |
| 13 | Offset | Offset of the extracted base, in metres. Positive shifts to the left of the stationing direction. |
| 14–17 | x · ± · ℓ · a eixo | Helpers for the offset field (multiply, flip the sign, measure a length, snap to the alignment). Not available in this version: they answer with a warning in the status bar. |
| 18 | LBO dupla (double edge line) | With the edge-line code selected, this path is not available in this version: the command warns and does not draw. |
| 19 | Modo contínuo (continuous mode) | No effect in this version. |
| 20 | Converter entidades selecionadas (convert selected entities) | The default mode. The command asks for a selection and converts each selected curve into the described marking. |
| 21 | Insere marca (insert mark) | No effect in this version. |
| 22 | Quebrar linha a (break line at) | It would break the line at the distance in 23. Not available in this version: the command answers Nada selecionado. |
| 23 | (break distance) | The value used by 22. Default 15. |
| 24 | CapMath | Not available in this version. |
Actions, preview and situation
| # | Control | What it does |
|---|---|---|
| 1 | Update | Not available in this version. |
| 2 | Reset | Not available in this version. |
| 3 | Recriar (recreate) | Not available in this version. |
| 31 | Selecionar e converter (select and convert) | Runs. It validates the choices, hides the form, asks for the base according to the mode, creates the layer and draws. |
| 32 | ⬔ | It would switch the preview to 3D. Not available in this version. |
| 33 | Emendar a existente se possível (join to the existing one if possible) | No effect in this version. |
| 34 | Copiar propriedades (copy properties) | Works. Asks for a marking already drawn, reads its layer (and the polyline's constant width) and fills in the list, the colour, the cadence, the device, the device cadence, the position and the width. If the layer does not match a catalogue marking, it warns in the status bar. |
| 35 | ↑ | It would apply the preview. Not available in this version. |
| 36 | Implantar (implant) | The default action: no suffix is added to the layer name. |
| 37 | Mudar ação (change action) | Not available in this version. To change the action of markings already drawn, see Sign actions, which also handles surface marking. |
| 38 | Manter (keep) | Adds _MAN to the layer name. |
| 39 | Remover (remove) | Adds _REM. |
| 40 | Revitalizar (refurbish) | Adds _REV. |
| 41 | Atalhos… (shortcuts…) | Not available in this version. |
| 42 | Reverse | Not available in this version. |
| 43 | Inverter LFO4 (flip the continuous side) | Not available in this version. |
| 44 | Preto contraste (black contrast) | No effect in this version. For contrast backing, use Contrast painting. |
| 45 | Largura (contrast width) | No effect, like 44. Default 0.3. |
| 46 | Cadenciar (cadence the contrast) | No effect, like 44. |
| 47 | Marca central (central mark) | No effect in this version. |
| 48 | Calcular cadências a partir da Velocidade Diretriz (compute cadences from the design speed) | Not available in this version. |
| 49 | Tutorial | Opens the CapCad learning area (CAPCAD_LEARN), described in Help and community. |
Input modes — inner Outros tab
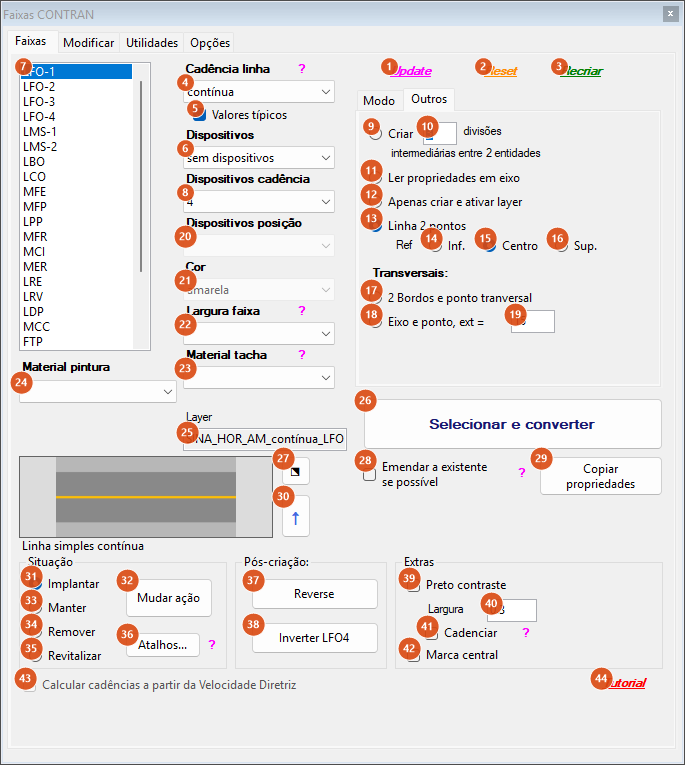
The remaining input modes. Circles 1–8 and 20–44 in this image mark the same controls already described above; the numbering restarts in each image.
| # | Control | What it does |
|---|---|---|
| 9 | Criar … divisões intermediárias entre 2 entidades (create intermediate divisions between 2 entities) | It would create mean curves between two entities. Not available in this version: the command answers Nada selecionado. |
| 10 | (number of divisions) | The value used by 9. Default 3; below 2 the command refuses with mínimo 2 divisões. |
| 11 | Ler propriedades em eixo (read properties from the alignment) | Not available in this version. |
| 12 | Apenas criar e ativar layer (only create and activate the layer) | It would create the resolved layer and leave it current, drawing nothing. Not available in this version: it answers Nada selecionado and does not create the layer. |
| 13 | Linha 2 pontos (2-point line) | Works. The default mode of this tab: the command asks for two points — Ponto 1, bordo ESQUERDO and Ponto 2, bordo DIREITO (point 1, LEFT edge; point 2, RIGHT edge) — and draws the marking over the line between them. |
| 14 | Ref → Inf. | The clicked line is the lower edge of the marking: it is shifted half a width to the right of the direction from the first point to the second. |
| 15 | Ref → Centro | The clicked line is the centre of the marking — no shift. This is the default. |
| 16 | Ref → Sup. | The clicked line is the upper edge: shifted half a width to the left of that direction. |
| 17 | 2 Bordos e ponto transversal (2 edges and a transverse point) | Not available in this version. |
| 18 | Eixo e ponto, ext = (alignment and point, extent =) | Not available in this version. |
| 19 | (transverse extent) | The value used by 18. Default 15. |
Modificar tab
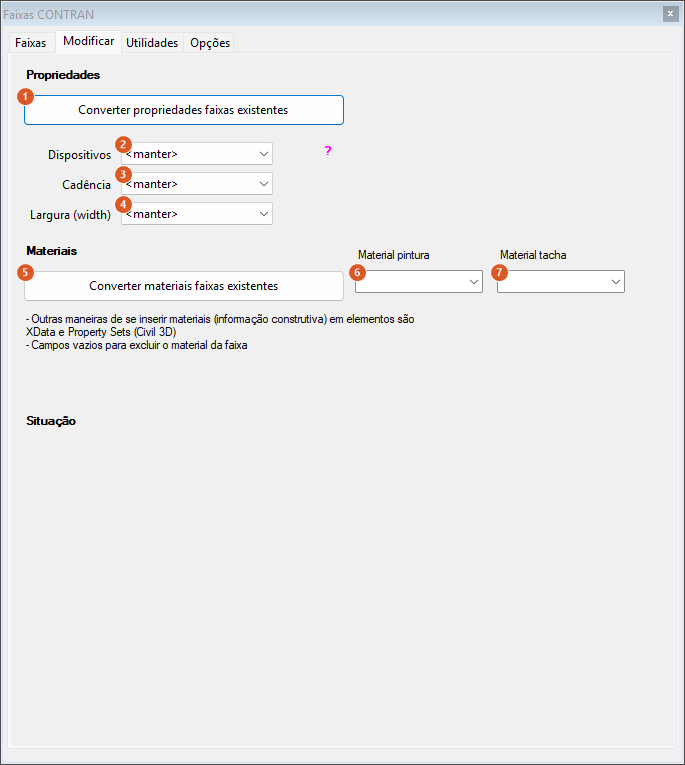
Converts the properties and materials of markings already drawn, without redrawing them. In this version neither button is available: both answer with a warning in the status bar.
| # | Control | What it does |
|---|---|---|
| 1 | Converter propriedades faixas existentes (convert properties of existing markings) | It would apply the three values below to the selected markings. Not available in this version. |
| 2 | Dispositivos (devices) | The new device, or <manter> (keep) to leave it alone. |
| 3 | Cadência (cadence) | The new cadence, or <manter>. |
| 4 | Largura (width) | The new width, or <manter>. |
| 5 | Converter materiais faixas existentes (convert materials of existing markings) | It would apply the two materials below to the selected markings. Not available in this version. |
| 6 | Material pintura (paint material) | The new paint material. An empty field would remove the material from the layer name. |
| 7 | Material tacha (device material) | The new device material, under the same rule. |
The tab's text reminds you that material can also be stored as XData and as a property set.
Utilidades tab
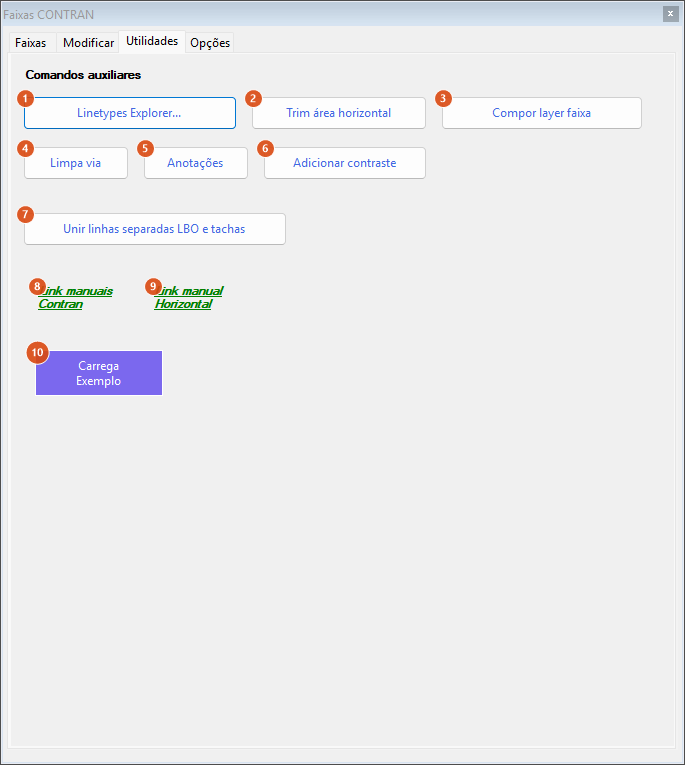
Shortcuts to neighbouring commands. Three work; the rest report that they are not available in this version.
| # | Control | What it does |
|---|---|---|
| 1 | Linetypes Explorer… | Works. Runs CAPCAD_LINETYPE_MANAGER — see Linetypes. |
| 2 | Trim área horizontal (trim horizontal area) | Not available in this version. |
| 3 | Compor layer faixa (compose the marking layer) | Not available in this version. |
| 4 | Limpa via (clear the carriageway) | Works. Runs CAPCAD_ALIGNMENT_TRIM_BREAK — see Drawing on the alignment. |
| 5 | Anotações (annotations) | Not available in this version. |
| 6 | Adicionar contraste (add contrast) | Works. Runs CAPCAD_MARKING_CONTRAST_BACKING — see Contrast painting. |
| 7 | Unir linhas separadas LBO e tachas (join separate edge lines and studs) | Not available in this version. |
| 8 | Link manuais | Opens the learning area (CAPCAD_LEARN). |
| 9 | Link manual Horizontal | Opens the learning area (CAPCAD_LEARN). |
| 10 | Carrega Exemplo (load sample) | Not available in this version. |
Opções tab
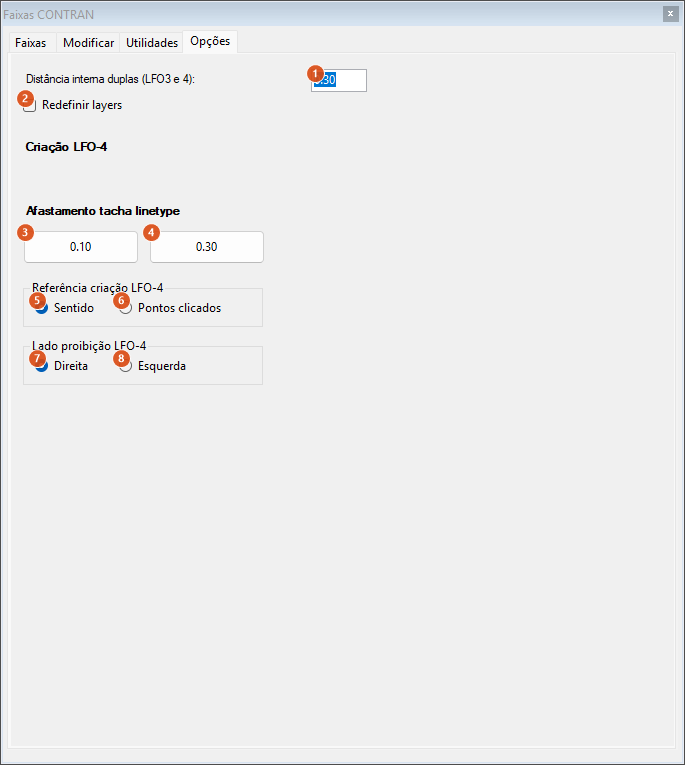
| # | Control | What it does |
|---|---|---|
| 1 | Distância interna duplas (internal distance for double lines) | The total distance between the two lines of a double construction, in metres. The command offsets the base by half of it to each side. Default 0.30. |
| 2 | Redefinir layers (redefine layers) | Ticked, it reapplies the colour and linetype to a layer that already exists; unticked, an existing layer is only created-if-missing and switched on, with its appearance untouched. |
| 3–4 | 0.10 · 0.30 | Stud setback in the linetype. Not available in this version. |
| 5–6 | Referência criação / Sentido · Pontos clicados | They would decide which side the continuous line of a continuous-plus-broken construction falls on. No effect in this version (see Notes). |
| 7–8 | Lado proibição / Direita · Esquerda | The same situation as 5–6. |
How the choices become a layer
The name comes out of the SINA_HOR grammar in this order:
SINA_HOR _ <colour token> _ <cadence><device code> _ <material> _ <CODE> [_ <action>]
- The colour token is the two-letter one:
AMyellow,BRwhite,PRblack, and so on. - The cadence is lower-case when it contains
x(4x8), and the device code is glued to it (4x8TA4). - The code loses its hyphen:
LFO-3becomesLFO3. - The action appends
_MAN,_REMor_REV; Implantar appends nothing.
The layer is then created with the colour resolved from the token by the active style's colour rules, and with a linetype generated to fit the cadence — mark and gap in their real proportion, the same mechanism described in Linetypes. None of this is written by hand by the command.
Remembered between sessions
Nothing. The form saves no preferences: every opening returns to the initial state — the first code selected, Valores típicos ticked, Converter entidades selecionadas as the mode, Implantar as the action, 0.30 internal distance.
The form itself is a per-session singleton: closing and reopening it brings back the same window, with whatever was filled in.
Notes
- Most of the buttons are not available in this version. This version covers the three main input modes — alignment stretch, convert selection and two-point line — and the drawing of the marking. Everything else answers in the status bar saying it is not available. The tables above mark them one by one.
- On the other four hosts, only the convert-selection path works. On BricsCAD, GstarCAD, ZWCAD and ARES Commander the input-mode choice does not exist: any click on Selecionar e converter asks for a curve selection. And there every other button — Copiar propriedades, Linetypes Explorer, Limpa via and Adicionar contraste included — answers "not available yet".
- The continuous-side radio buttons on the Opções tab have no effect. The command never consults the side decision; the continuous line always comes out on the same side. The Inverter LFO4 button is not available in this version either.
- The action suffix accumulates on a multi-segment polyline. Drawing a double line over a curve with more than one element reapplies the suffix per segment: the second lands on
..._REM_REM, the third on..._REM_REM_REM. For a marking with an action other than Implantar, prefer a single-segment base. - Devices are not drawn. Stud, big stud, delineator, cone and supercone enter the layer name and the linetype; no block is inserted. To insert devices, see the road library.
- The layer name is always the Brazilian one. Unlike the rest of CapCad, this form assembles the name with a fixed
SINA_HORroot, independent of the country profile: an English or Spanish country profile will still seeSINA_HOR_…in the box. That is consistent for a command that is bound to one norm by definition, but it is worth knowing when mixing it with the other commands. - The
DFalias exists only in the Portuguese alias file. It is not defined in the English or Spanish ones; use the full command name or the ribbon button. - For the same marking from a ready-made definition, use Marking Strip, which brings a library of parametric definitions for fifteen countries instead of field-by-field entry.
CAPCAD_LINEARSET — the line-definition editor
CAPCAD_LINEARSET is the other route to the same result, and the reason it sits on this page: it is the reusable-line-definition approach, meant to replace the field-by-field form above. Instead of combos, you write — or load from a file — the definition as text, and the command draws its lines over a base curve.
It has no ribbon button and no shortcut: only the command name.
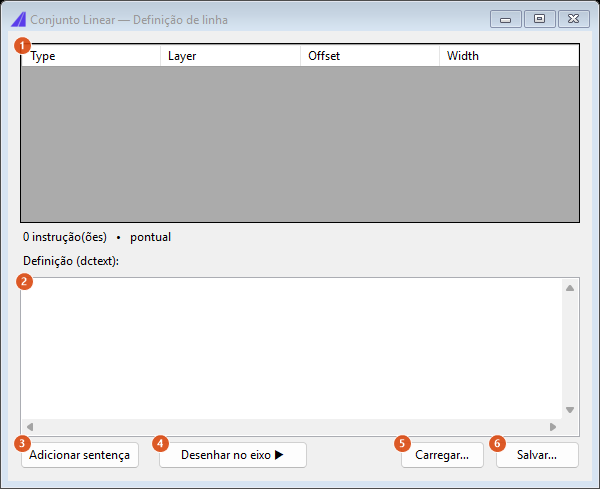
| # | Control | What it does |
|---|---|---|
| 1 | (Type / Layer / Offset / Width grid) | Read-only. Shows, live, the statements the text below has produced. |
| 2 | Definition (dctext) | The definition text. It is the source of truth: the grid and the summary line are recomputed on every keystroke. |
| 3 | Add statement | Appends a model line f, LAYER, 0, 0.10 to the text, for you to edit. |
| 4 | Draw on alignment ▶ | Closes the editor and moves to drawing: the command asks for the base line and draws. |
| 5 | Load… | Reads a definition from a .dc or .txt file. |
| 6 | Save… | Writes the definition to a .dc or .txt file. |
Between the grid and the text, a summary line says how many statements were read, whether the definition is point or linear, how many variables it declares and what its description is.
After Draw on alignment ▶, the command asks Select the base line: — any curve will do, it does not have to be the project alignment — and draws each strip statement (f) as an offset polyline, on the layer the statement names, creating the layer if it is missing. Block definitions declared in the definition are loaded into the drawing.
What it does not do: distribute signs and blocks along the path. That is the job of CAPCAD_ROAD_SET and its composer, which also explain the dctext grammar in detail — the same grammar summarised in Marking Strip. If what you want is to apply a whole cross-section, use that command; CAPCAD_LINEARSET is for writing and testing a line definition quickly.
Two observations:
- Cancelling the editor cancels the command. Only the Draw on alignment ▶ button leads to the drawing step; closing the window with the X ends without drawing.
- The editor's own captions are in English, and so are its prompts (
Select the base line:,No statements to draw.).
See also
- Marking Strip — the same marking from a library definition, with fifteen countries built in.
- Layers and the layer catalogue and Linetypes — the name grammar and the generation of cadences.
- Contrast painting — the black backing, which here exists only as a disabled box.