| Commands | CAPCAD_GIS_BR_LIBRARY (preset library), CAPCAD_GEO_ARCGIS_SERVER (any ArcGIS REST server), CAPCAD_GEO_OSM_IMPORT (OpenStreetMap) and CAPCAD_GEO_CONVERT_DATA (KML and GPX files) |
| Shortcut | none |
| Ribbon | CapCad tab › Geo panel › Data split button › ArcGIS Server Assistant, OpenStreetMaps Extractor and GPS Files Converter (KML, GPX etc). The GIS Library, which is a Brazilian preset collection, has a button only in the Brazil profile, where the panel is called Geo Tools BR and carries all four |
| Category | GeoData |
| Forms | GisLibraryForm, title "GIS Library"; EsriServerForm, title "ArcGIS Server Assistant"; OsmForm, title "Open Street Maps Extractor", three tabs; GeoDataConverterForm, title "Geo Data Converter". All modeless on AutoCAD |
| Hosts | all four commands exist on AutoCAD, BricsCAD, GstarCAD, ZWCAD and ARES Commander — with restrictions on the last four, see Notes |
| Licence | CAPCAD_GEO_OSM_IMPORT requires the Highway module. The other three are not licence-gated |
| Also opened by | The ArcGIS assistant… button of the GIS Library and the ArcGIS Online server button of the OSM extractor open CAPCAD_GEO_ARCGIS_SERVER. The DNIT SNVs button of the GIS Library opens the SNV assistant |
The boundary of the district, the street network of the city and the survey track come into the drawing already in the right system. No downloading a shapefile, opening it in a GIS, exporting and checking the projection: CapCad talks to the servers directly and converts vertex by vertex as it draws.
- Any ArcGIS server. Paste the URL of a folder, a service or a layer and browse: services → layers → fields → values, building the
whereclause by clicking. - A whole city from OpenStreetMap. Roads, buildings, land use, waterways and aerodromes, each family on its own layer, with the roads already at the width you set.
- An alignment corridor, not just a rectangle. OSM can be fetched in a band around the project's alignment, not only inside a rectangle.
- KML and GPX become drawing. The file from the GPS or from Google Earth becomes points and lines — and, if you want, an elevation profile projected onto the alignment.
- The system comes with it. The project's coordinate system is filled in for you, and the file converter even detects the zone from the coordinates themselves.
- A library of ready presets for one country, served from the CapCad server: choose, filter by a field, send it to the CAD.
What it does
The four commands on this page solve the same problem by different routes: putting geometry that was born in geographic coordinates into the drawing. All of them need to know the output coordinate system — see Coordinates and the coordinate system, and in particular What actually converts, because the system list here offers far more than the converter resolves. For the opposite direction (the drawing leaving as KML, GPX or GeoJSON) see KMZ, geo formats and map links.
CAPCAD_GEO_ARCGIS_SERVER opens the ArcGIS Server Assistant, the general-purpose importer: you supply the URL. The assistant recognises whether it is a folder, a service (MapServer / FeatureServer) or a layer, and fills the corresponding lists. This is the tool to reach any public dataset your own country publishes.
CAPCAD_GIS_BR_LIBRARY opens the GIS Library, which is the same importer with a catalogue in front of it. On opening, the command fetches the list of categories and presets from the CapCad server. Each preset is an already-tested ArcGIS layer address, with a suggested default field and default layer. The presets shipped today are Brazilian; outside the Brazil profile the command has no ribbon button, and the ArcGIS Server Assistant is the route to use instead.
Both end in the same import run, described in How the options combine.
CAPCAD_GEO_OSM_IMPORT opens the Open Street Maps Extractor: you define the area (screen, two-point rectangle or a corridor around an alignment), tick the feature families you want, and the command queries the Overpass API, converts everything into the drawing's system and draws each feature on the layer of its OSM tag, with the road width you set.
CAPCAD_GEO_CONVERT_DATA opens the Geo Data Converter: you point at a .kml or .gpx file, the command reads the points and the lines, suggests the zone and draws them — in plan or, in profile mode, projecting each point perpendicularly onto the project's alignment to form a station × elevation profile.
Workflow
Bringing in a layer from any ArcGIS server
- Run
CAPCAD_GEO_ARCGIS_SERVER. - Paste the URL into Url (43) and click Read (44) — or choose one of the presets (42). The label beside the button says what was recognised: folder, service or layer.
- Walk down the tree: clicking in Services (48) fills Layers (49), clicking a layer fills Fields (50) and the feature count.
- Select a field and click View values (52). Tick values (the All (53) and Clear (54) shortcuts help) and Add condition (55) writes
field='value' OR …into Where: (56). - Choose the coordinate system (57) and the area (60, 61 or 62), and click Generate CAD data (63).
Bringing in a ready base from the GIS Library
- Run
CAPCAD_GIS_BR_LIBRARY. The form opens and fetches the library from the server; with no network, it warns and opens empty. - Choose the Category (1) and the Preset (2). The Fields list (3) and the feature count are filled at once, by querying the server.
- Choose the field that will name the layers. With Auto values (8) on, the Values list (4) comes filled and sorted; otherwise, click View values (5).
- Select the values you want — box (6) filters the list — and click Add condition (9). The clause appears in Where: (12).
- Check the Output coordinate system (17) and choose the Insertion area (21, 22 or 23).
- Add to CAD (26).
Extracting OpenStreetMap
- Run
CAPCAD_GEO_OSM_IMPORT. The form opens with the project's coordinate system already at (64). - In the Include column (69 to 83), tick the feature families. The All (86) and None (87) shortcuts tick and untick everything.
- Choose the area: Entire screen (70), 2 point rectangle (71) or Align. (72). The big button (66) changes its caption to match.
- On the other tabs, adjust what comes out (95, 96) and the road widths (104 to 115).
- Click the big button (66). In alignment mode, the command asks for the alignment and then for the corridor radius (the value at 98 is the prompt's default).
- A progress bar follows the query and the processing; Cancel works. When it finishes, the command line reports how many roads and how many features were drawn.
- Not happy with the result? Reset (67) erases everything the last run drew.
Converting a KML or GPX file
- Run
CAPCAD_GEO_CONVERT_DATA. - Choose the file at … (117) or paste the path into (116) — surrounding quotes are stripped for you, and the box stays red while the path does not exist. Enter, or Read (118), processes it.
- The form reports what it detected (kml or gpx), how many points and how many lines it loaded and, when the coordinates point at a single possible zone, turns the coordinate-system box green and fills it in.
- Choose Draw in plan (123) or Profile onto the alignment (125), tick the layer suffixes (122, 124) if you want, and click Draw (127).
The forms
The numbers are unique on this page: 1 to 41 in the GIS Library, 42 to 63 in the ArcGIS Server Assistant, 64 to 115 in the OSM Extractor and 116 to 128 in the Geo Data Converter. All the captures are of a Portuguese session; the numbering is the same in both editions, and the tables give the English captions.
GIS Library — CAPCAD_GIS_BR_LIBRARY
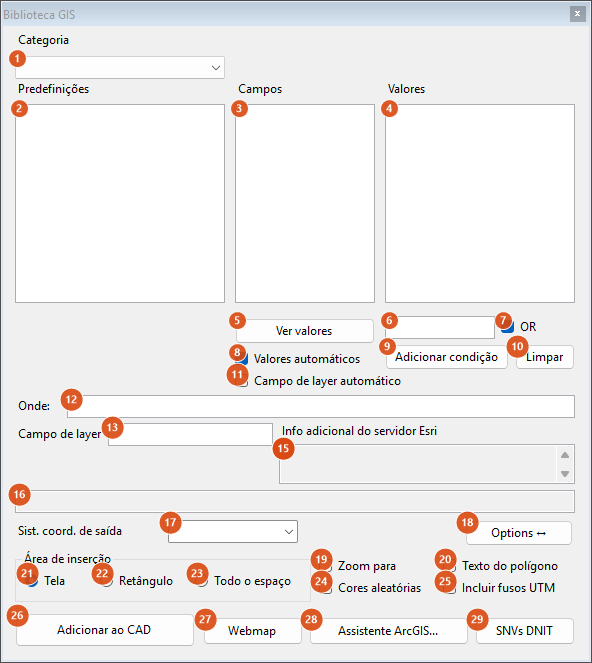
The form opens narrow; the Options ↔ button (18) reveals the right-hand half.
| # | Control | What it does |
|---|---|---|
| 1 | Category | The categories served by the CapCad server. The first is selected automatically on opening. |
| 2 | Presets | The presets in the category. Selecting one queries the Esri server and fills 3, 15, 16 and the feature count. |
| 3 | Fields | The layer's fields. The preset's default field comes selected. It is the field that names the layers. |
| 4 | Values | The distinct values of the chosen field, in alphabetical order. Multiple selection. |
| 5 | View values | Reloads 4 from the server. |
| 6 | (filter) | Filters list 4 by a fragment of text, without querying the server again. |
| 7 | OR | Ticked, the selected values are joined by OR; unticked, by AND — which, within one field, returns nothing. |
| 8 | Auto values | Selecting a field at 3 loads its values straight away. Ticked by default. |
| 9 | Add condition | Rewrites box 12 with field='v1' OR field='v2' …. With no values selected, it writes 1=1. |
| 10 | Clear | Empties box 12. |
| 11 | Auto layer field | Selecting a field at 3 also copies it into 13. |
| 12 | Where: | The where clause sent to the server. Empty — or holding the text all — means 1=1. It can be typed by hand. |
| 13 | Layer field | The field that goes into the layer name. It comes from the preset's default layer. |
| 14 | (comments) | Not available in this version. |
| 15 | Additional info Esri server | maxRecordCount and the layer description, as the server returns them. |
| 16 | (url) | The preset's layer URL, read-only. |
| 17 | Output coordinate system | The system the geometry will be drawn in. It comes from the alignment, the project or the last used in the session; when only WGS-84 is available it is left blank deliberately, and the command refuses to run until you choose. See Notes on which entries actually convert. |
| 18 | Options ↔ | Expands and collapses the right-hand half of the form (the Polygon data, Point data and Layer name frames). |
| 19 | Zoom to | Frames the view on what was drawn. Ignored with the Screen area (21) — you are already framed there. |
| 20 | Polygon text | Writes the field's value, as text of height 100, at each feature's centroid, on the feature's layer. |
| 21 | Screen | Envelope = the current view extent. Default. |
| 22 | Rectangle | Asks for two corners in the drawing. |
| 23 | Whole space | No envelope: the whole layer. Above 1,000 features the command asks for confirmation. |
| 24 | Random colours | Each feature gets an ACI colour drawn at random between 1 and 250. |
| 25 | Include UTM zones | Draws the zone meridians and zone numbers over the top. Only works in the Brazilian product — in any other culture the option has no effect. |
| 26 | Add to CAD | Runs the import. With a hydrology preset selected, it only refers you to CAPCAD_GEO_BR_DATA. |
| 27 | Webmap | Opens the preset's reference map in the browser. |
| 28 | ArcGIS assistant… | Opens CAPCAD_GEO_ARCGIS_SERVER. |
| 29 | DNIT SNVs | Opens the SNV assistant. |
The options panel
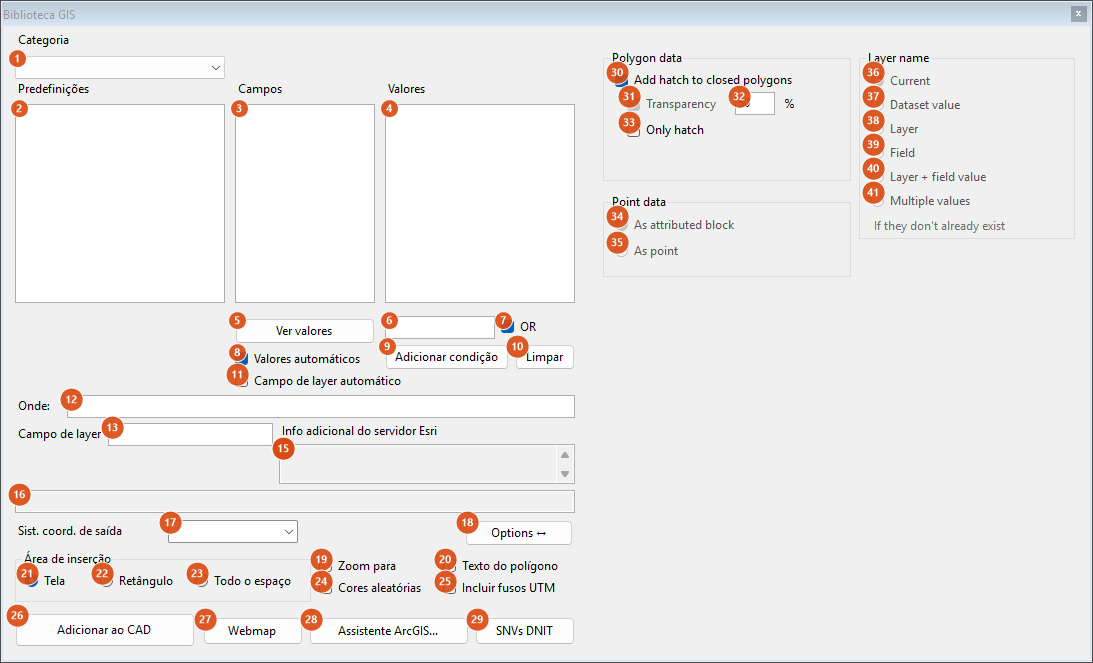
With Options ↔ clicked. Most of the controls in this panel are not available in this version.
| # | Control | What it does |
|---|---|---|
| 30 | Add hatch to closed polygons | Hatches closed polygons. Not available in this version. |
| 31 | Transparency | Disabled, with a tooltip explaining why: the transparency is applied regardless. |
| 32 | (transparency value) | The percentage actually applied to every entity imported by this form. Default 50. Values outside 1–90 switch the transparency off. |
| 33 | Only hatch | Hatch with no outline. Not available in this version. |
| 34 | As attributed block | Disabled: points are always drawn as POINTs (see below). |
| 35 | As point | The same. |
| 36–41 | Layer name: Current / Dataset value / Layer / Field / Layer + field value / Multiple values | Disabled: the layer name is always the dataset description, or field-value. |
ArcGIS Server Assistant — CAPCAD_GEO_ARCGIS_SERVER
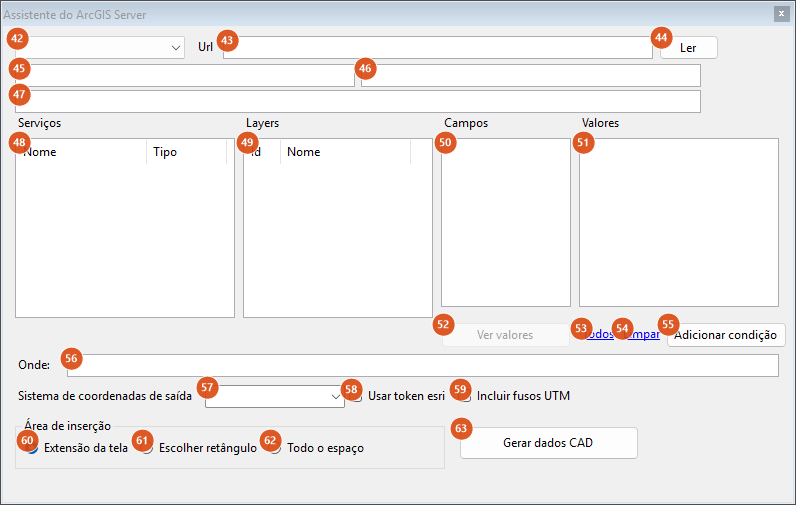
The three unlabelled boxes (45, 46, 47) hold the folder, service and layer URLs resolved by browsing.
| # | Control | What it does |
|---|---|---|
| 42 | (presets) | A handful of ready addresses: WORLD (countries of the world, which also selects the COUNTRY field, lists the values and asks you to build the condition), PERÚ, PERÚ-DEPARTAMENTOS, PERÚ-DISTRITOS, CHILE-REGIONES and COLOMBIA. Every other entry in the list answers that the preset is not available in this version. |
| 43 | Url | The REST address to read. |
| 44 | Read | Classifies the URL as a folder, a service or a layer and fills the corresponding list. The label on the right shows what was recognised. An unrecognisable URL gets a warning. |
| 45 | (folder url) | Filled when 43 is a folder; it is the base used to build the service URLs. |
| 46 | (service url) | Filled when reading a service or clicking a service at 48. |
| 47 | (layer url) | Filled when reading a layer or clicking a layer at 49. This is the URL the run uses. |
| 48 | Services | The name and type of each item in the folder. Clicking an item of type Folder descends a level; clicking a service fills 49. |
| 49 | Layers | The id and name of each layer in the service. Clicking one fills 50 and the count. |
| 50 | Fields | The layer's fields. Only the first selected one is used by the run. |
| 51 | Values | The distinct values of the field. Multiple selection. |
| 52 | View values | Queries the values. Only enabled with exactly one field selected. |
| 53 | All | Selects every value in the list. |
| 54 | Clear | Deselects them all. |
| 55 | Add condition | Appends the condition field='v1' OR … to the text at 56 (here the condition accumulates rather than being rewritten — unlike the GIS Library). A 1=1 already in the box is removed first. |
| 56 | Where: | The where clause. Empty means 1=1. |
| 57 | Output coordinate system | The system the geometry will be drawn in; it comes filled with the project's. |
| 58 | Use esri token | Adds CapCad's token to the queries, for servers that require one. |
| 59 | Include UTM zones | As 25 in the GIS Library, and just as restricted to the Brazilian product. |
| 60 | Screen extent | Envelope = the current view. Default. |
| 61 | Pick rectangle | Asks for two corners. |
| 62 | Whole space | The whole layer, with the same warning above 1,000 features. |
| 63 | Generate CAD data | Runs the import. This command always randomises the colours per feature and applies no transparency. |
Open Street Maps Extractor — CAPCAD_GEO_OSM_IMPORT
Tab 1: Main
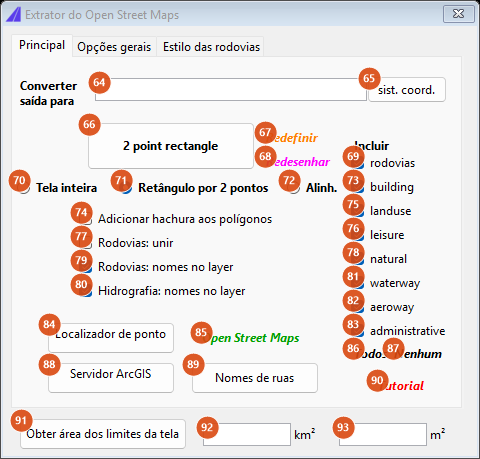
With the factory defaults: two-point rectangle, every family ticked, road names in the layer.
| # | Control | What it does |
|---|---|---|
| 64 | Convert output to | The drawing's coordinate system. It comes filled from the alignment, the project or the last used. Empty, the command refuses and tints the box pale blue. |
| 65 | coord sys | Opens the coordinate-systems form; on returning, 64 is refreshed. |
| 66 | (big button) | Runs. Its caption follows the chosen area: Entire screen, 2 point rectangle or Alignment. |
| 67 | Reset | Erases what the last run drew, hatches included, plus the group created by the road union. |
| 68 | Redraw | Not available in this version. |
| 69 | roads | Fetches the ways (highway). |
| 70 | Entire screen | Area = the current view extent. |
| 71 | 2 point rectangle | Area = a rectangle asked for in the drawing. Default. |
| 72 | Align. | Area = a corridor around a chosen alignment or polyline. |
| 73 | building | Buildings. Ticked, it tightens the area limits (see The OSM area limits). |
| 74 | Add hatch to polygons | An associative SOLID hatch on every closed feature whose family admits hatching — only natural, building and features with no tag at all. Roads, waterways, aerodromes, cycleways, footways and everything falling into "other" (land use and leisure included) are never hatched. |
| 75–76 | landuse, leisure | Land use and leisure. |
| 77 | Roads: unite | After drawing, turns each road into the outline of its width and unions the regions on layer GIS_OSM_HIGHWAY. See How the options combine. |
| 78 | natural | Natural features. |
| 79 | Roads: add names to layer | The road's layer becomes GIS_OSM_HIGHWAY_<TYPE>_<name>; unticked, every road falls into GIS_OSM_HIGHWAY. Ticked by default, and mutually exclusive with 77. |
| 80 | Waterway: add names to layer | The same for GIS_OSM_WATERWAY_<TYPE>_<NAME>. Ticked by default. |
| 81–82 | waterway, aeroway | Waterways and aerodromes. |
| 83 | administrative | Ticked by default; not available in this version — administrative boundaries are not fetched. |
| 84 | Geo point locator | Opens the coordinate identifier. |
| 85 | Open Street Maps | Opens openstreetmap.org at the midpoint of the last query. Before the first run it does nothing. |
| 86 | All | Ticks the eight boxes of the Include column. |
| 87 | None | Unticks all eight. |
| 88 | ArcGIS Online server | Opens CAPCAD_GEO_ARCGIS_SERVER. |
| 89 | Street names | Opens the street page of the labelling form. |
| 90 | Tutorial | Opens the CapCad video. Brazilian product only; in other cultures it does nothing. |
| 91 | Get screen boundaries area | Measures the current view and fills 92, 93 and 102. It is in the footer, visible on all three tabs. |
| 92 | (km²) | The view's area in square kilometres. |
| 93 | (m²) | The same area in square metres. |
Tab 2: General options
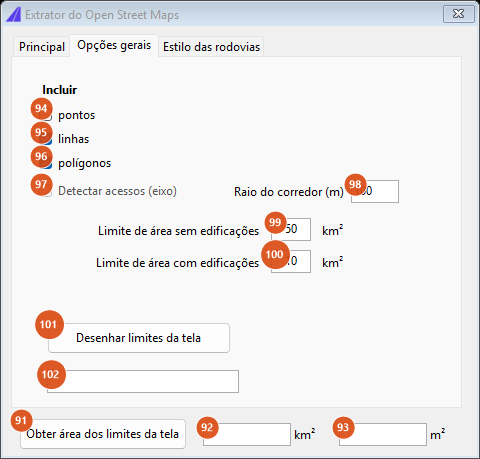
The area-limit boxes are informational: the limits the command applies are those in the table under How the options combine.
| # | Control | What it does |
|---|---|---|
| 94 | points | Not available in this version: loose OSM nodes are not drawn. |
| 95 | lines | Draws the open features. Ticked by default; unticked, only polygons come in. |
| 96 | polygons | Draws the closed features. Ticked by default. |
| 97 | Detect acessos (Align.) | Runs the access detector over the corridor and persists the result on the alignment, drawing the flow vectors on layer GIS_ACESSOS (colour 1). Only enabled in Align. mode (72). |
| 98 | Corridor radius (m) | The value the corridor prompt offers as its default. Default 100. |
| 99 | Area limit with no buildings | Shows 50. Informational — see Notes. |
| 100 | Area limit with buildings | Shows 10. Informational — see Notes. |
| 101 | Draw screen boundaries | Measures the view and draws the corresponding rectangle in the drawing. |
| 102 | (width, height) | The view's dimensions, filled by 91 and by 101. |
Tab 3: Roads styling
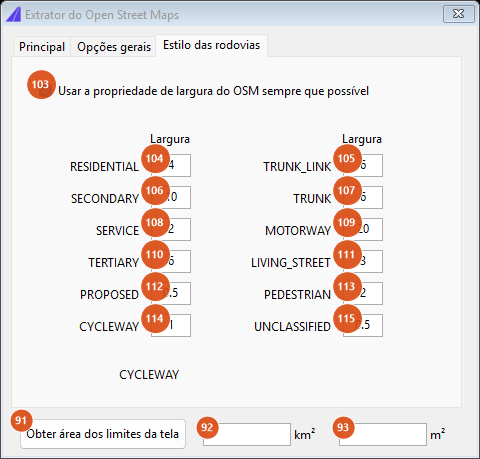
The widths become the drawn polyline's ConstantWidth. The factory values are the ones in the table below.
| # | Control | What it does |
|---|---|---|
| 103 | Take width property from OSM whenever possible | Ticked by default; not available in this version — the width always comes from this table. |
| 104–115 | RESIDENTIAL, SECONDARY, SERVICE, TERTIARY, PROPOSED, CYCLEWAY, TRUNK_LINK, TRUNK, MOTORWAY, LIVING_STREET, PEDESTRIAN, UNCLASSIFIED | The width, in drawing units, of each road type. A comma is accepted as the decimal separator. A road type not in this table — primary, for instance — gets 0.5. Zero is a valid value and means "no width". |
The factory widths: RESIDENTIAL 4, SECONDARY 10, SERVICE 2, TERTIARY 6, PROPOSED 0.5, CYCLEWAY 1, TRUNK_LINK 6, TRUNK 6, MOTORWAY 20, LIVING_STREET 3, PEDESTRIAN 2, UNCLASSIFIED 0.5.
Geo Data Converter — CAPCAD_GEO_CONVERT_DATA
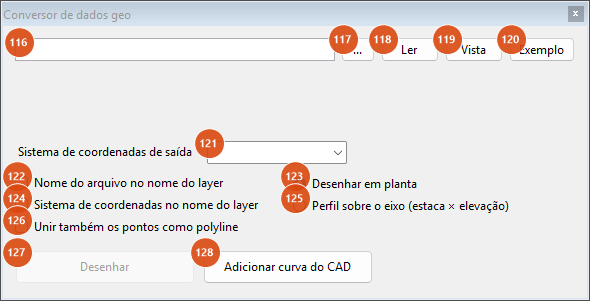
With no file loaded: Draw (127) is disabled.
| # | Control | What it does |
|---|---|---|
| 116 | (file) | The path of the .kml or .gpx. Quotes around a pasted path are stripped for you. The background is red while the file does not exist, white when it does. Enter processes it. |
| 117 | … | Opens the file dialog, filtered on *.kml;*.gpx, and processes what you choose. |
| 118 | Read | Processes the file at 116 again. |
| 119 | View | Opens the file in Notepad. |
| 120 | Sample | Downloads a sample GPX from the CapCad server into the Exports folder, points 116 at it and processes it. |
| 121 | Output coordinate system | The system the points and lines will be drawn in. Filled with the project's and, when the file's coordinates point at a single possible zone, overwritten by it with the box in green. Empty, Draw refuses. |
| 122 | File name in the layer name | Appends -<file name> to both layer names. |
| 123 | Draw in plan | Draws in plan. Default. |
| 124 | Coordinate system in the layer name | Appends -<system> to both layer names. Combined with 122, the two suffixes come in that order. |
| 125 | Profile onto the alignment (station × elevation) | Projects every loaded point perpendicularly onto the project's alignment (tolerance 100) and draws a station × elevation × 10 polyline, together with the profile's grid and planimetry. Requires an alignment in the project. AutoCAD only. |
| 126 | Also join the points as a polyline | Besides the points, draws a polyline through all of them, in file order, on the lines layer. |
| 127 | Draw | Runs. It is only enabled after a file has been read successfully (or a CAD curve has been added by 128). |
| 128 | Add curve from CAD | Asks for a curve in the drawing and adds it to the loaded set, keeping each vertex's elevation for profile mode. The curve is flagged as "already in the drawing's system" and is not reprojected. AutoCAD only. |
How the options combine
The ArcGIS import
The GIS Library and the ArcGIS Server Assistant share the same run:
- With no output coordinate system, nothing happens — the command asks you to choose one. Choosing
WGS-84, it confirms first (the drawing will be in degrees). - Envelope. In Screen and Rectangle modes, the two corners are converted to latitude/longitude and become the query's envelope. If that conversion fails, the command reports "Envelope conversion failed" and stops.
- Size guards. Whole space with more than 1,000 features asks for confirmation. A server answer above 100 MB is refused; above 10 MB, the command estimates the time and asks whether to carry on.
- The query always goes with
outSR=4326: the data arrive in WGS-84 and the conversion into the drawing's system is done here, vertex by vertex. - Layers. With a field chosen, each feature goes to
GIS_<field>-<value>. With no field chosen, the GIS Library uses the preset's description (GIS_<description>) and the ArcGIS Server Assistant, which has no description to offer, puts everything on a layer called simplyGIS_. Invalid layer-name characters are stripped. - Point layers (
esriGeometryPoint) become POINTs — and, in this version, on the current layer, with no colour and no transparency. - Colour and transparency. Random colours draw ACI 1 to 250 per feature. Transparency only comes through the GIS Library, always.
- UTM zones, when asked for and in the Brazilian product: the meridians go to
GIS_UTMZONES_<system>(colour 64) and the zone numbers toGIS_FUSOS_TXT(colour 51), both grey, with a text height of 2 in WGS-84 output and 200,000 in projected output. - At the end, a box reports how many items were drawn, in which system, and in how many seconds.
What OSM draws, and where
The feature's tag decides the layer, the width and whether it can be hatched. The order is the one below, and the first match wins:
| OSM tag | Layer | Colour (ACI) | Width | Hatch |
|---|---|---|---|---|
highway |
GIS_OSM_HIGHWAY_<TYPE>_<name> |
253 | from the Roads styling tab | no |
waterway |
GIS_OSM_WATERWAY_<TYPE>_<NAME> |
140 | 6 | no |
aeroway |
GIS_OSM_AEROWAY_<TYPE> |
131 | — | no |
natural |
GIS_OSM_NATURAL_<TYPE> |
141 if WATER, else 71 |
— | yes |
bicycle |
GIS_OSM_BICYCLE_<TYPE> |
0 | — | no |
foot |
GIS_OSM_FOOT_<TYPE> |
0 | — | no |
building |
GIS_OSM_BUILDING (or _<TYPE> when it is not yes) |
21 | — | yes |
| any other | GIS_OSM_OTHER_<KEY>_<VALUE> |
31 | — | no |
| no tag at all | GIS_OSM_OTHER_UNKNOWN |
31 | — | yes |
landuse and leisure features fall into the any other row, with the layer built from the feature's first tag.
The OSM area limits
The command measures the area before querying the server and refuses or asks according to the table. What changes everything is the building box (73): buildings multiply the volume of data.
| without buildings | with buildings | |
|---|---|---|
| Minimum area | 2,000 m² (below that, refused) | 2,000 m² |
| Above this, it asks | 5 km² | 1 km² |
| Above this, it refuses | 500 km² | 300 km² |
In corridor mode the area is estimated as alignment length × 2 × radius, and the same limits apply.
"Roads: unite"
With 77 ticked, after drawing, each road becomes the outline of its width:
- A road that is genuinely closed produces two rings: the larger enters the union, the smaller is left drawn on the road's layer, and the original polyline is erased.
- An open road with a width produces one outline, which enters the union, and the original is erased.
- A road with zero width is left as it is.
The gathered outlines go through a region union on layer GIS_OSM_HIGHWAY, with a "Merging roads…" bar, and the result receives a group id — which is what Reset (67) uses to erase the union. Roads that could not be outlined are counted on the command line and left as drawn.
What the file converter draws
.kml file |
.gpx file |
|
|---|---|---|
| Points | GEO_POINTS_KML<suffix>, RGB 246,90,90 |
GEO_POINTS_GPX<suffix>, RGB 245,222,92 |
| Lines | GEO_LINES_KML<suffix>, same colour, lineweight 0.50 |
GEO_LINES_GPX<suffix>, same colour, lineweight 0.50 |
Points are drawn at whatever elevation the file carries, and the PDMODE variable is set to 3 so that they appear as crosses. The view is only framed when at least one line was drawn — a points-only file does not move the screen.
Remembered between sessions
The GIS Library and the ArcGIS Server Assistant keep their options on closing (area, zoom, colours, polygon text, UTM zones, token, coordinate system). The OSM Extractor keeps practically everything — the ticked families, the general options and the twelve road widths; what is left out is the screen-reading boxes and the last link's coordinates. The Geo Data Converter keeps nothing: the file path, the zone and the boxes come back empty on every opening.
The coordinate system chosen in the GIS Library and in the Converter also becomes the session's "last used", which the other GIS commands pick up.
Notes
- Not every system in the list actually converts. The coordinate-system box of these forms offers
WGS-84,BNGand the 120 zonesUTM-01StoUTM-60N. Conversion, however, only covers SIRGAS 2000 and SAD 69 over zones 17 to 25 South and 11 to 22 North — South American coverage.WGS-84works because output in degrees goes through no conversion at all;BNGand any zone outside those bands do not convert, and the result is either an "Envelope conversion failed" or an import that discards every feature. In practice, useUTM-17StoUTM-25SandUTM-11NtoUTM-22N. See What actually converts. - The GIS Library always applies 50 % transparency. Even if you never open the options panel, everything this form imports enters the drawing at 50 % transparency. For full opacity you have to open Options ↔ and zero box 32. The ArcGIS Server Assistant applies no transparency at all.
- The GIS Library's hydrology presets do not import here. Those three entries refer you to
CAPCAD_GEO_BR_DATA. Selecting them disables Whole space and Screen and switches the mode to Rectangle; Add to CAD only shows the message. - Points imported from ArcGIS land on the current layer. Point-geometry layers are drawn as POINTs with no layer, colour or transparency assigned. Set the current layer before importing a point layer.
ANDin the GIS Library's condition builder returns nothing. Unticking OR (7) buildsfield='a' AND field='b', which no record satisfies. The button is only useful when you edit the clause by hand afterwards.- The two condition builders behave differently. In the GIS Library, Add condition (9) rewrites the box; in the ArcGIS Server Assistant, Add condition (55) accumulates. Clicking twice in the assistant duplicates the condition.
- Three OSM boxes are not available in this version: administrative (83), points (94) and Take width property from OSM whenever possible (103); nor is Redraw (68). The Roads styling tab has no
PRIMARYrow —primaryroads get the default width 0.5. - The OSM area-limit boxes (99 and 100) are informational. The limits applied are those in the table above (5 and 1 km² to ask, 500 and 300 km² to refuse); editing the boxes changes nothing.
- The cycleway and footway layers are created with colour 0 (ByBlock) —
GIS_OSM_BICYCLEandGIS_OSM_FOOT; adjust it in the layer manager if you need to. CAPCAD_GEO_OSM_IMPORTrequires the Highway licence module. The other three commands on this page are not licence-gated.- There is less command on the other four CADs. On BricsCAD, GstarCAD, ZWCAD and ARES Commander: the OSM Extractor opens modal and the big button only closes the form — the launchers (65, 84, 88, 89), Reset (67), the screen readings (91, 101) and the options for hatching, road union, names in the layer, widths and lines/polygons are not applied; the drawing uses a simplified layer name per tag. In the Geo Data Converter, the Sample (120) and Add curve from CAD (128) buttons are not available, and Profile mode answers that it only exists on AutoCAD. The GIS Library and the ArcGIS Server Assistant work on all five.
- The OpenStreetMap API is public and queues. The query goes to the public Overpass API with a 180 s timeout; if it fails, the command retries once silently before giving up. Only features of type
wayare fetched — isolated nodes and relations are left out. - The profile mode's elevation comes from the GPX file, not from the terrain: CapCad uses each point's
<ele>tag and exaggerates the vertical scale by 10×. - Several OSM Extractor strings are English-only in every language, including the big button's caption and all the progress messages (Sending query…, Processing Open Street Maps data n/3…, Merging roads…). The GIS Library's options panel is English-only as well.