| Command | CAPCAD_MARKING_LONGITUDINAL |
| Shortcut | none |
| Ribbon | CapCad tab › Traffic Control panel › Transverse split button › Longitudinal Obstacles |
| Category | Manage: Tools |
| Form | LongitudinalsForm "Longitudinais". Modeless: the drawing stays live while it is open |
| Hosts | AutoCAD. In ARES Commander the command exists and says it is not available yet; not available on BricsCAD, GstarCAD and ZWCAD |
| Also | none |
A stretch of rumble bars or a field of circles is not an array: it is a grid that follows the alignment. Copying circles with ARRAY only works on a straight; here the set follows the curve, because every row is measured on the alignment itself.
- Follows the active alignment. One point is enough: CapCad works out which alignment of the project runs there and measures everything from it.
- The length can be measured on screen. The ℓ button asks for two points and converts the distance measured along the alignment into a longitudinal length.
- Staggered grid ready made. Rows alternate by half a position on their own, with no counting circle by circle.
- Live preview. Every value you change erases the previous drawing and redraws it; Aceitar keeps it, Reset erases it.
- Where the set starts is a choice. Increasing, decreasing or centred on the clicked point, and left, right or on the alignment.
What it does
The command draws a longitudinal device — a stretch of marking that runs along the road rather than across it — in two shapes:
- Circles (Círculos): a staggered field of circles, used to mark alert areas and approach stretches.
- Rumble bars (Sonorizador): consecutive transverse bars, drawn as polylines with a constant width.
The input is always a path and a point on it. The path is the project's active alignment (the default) or an entity you select. With the active alignment, the clicked point decides which stretch of the alignment carries the set: CapCad looks for the nearest perpendicular foot and uses that element.
From there, three measurements define the set: the longitudinal length (how far it runs along the alignment), the transverse width (how far it reaches across it) and the radius of the circles or the thickness of the bars. Everything is a preview: each change erases the previous drawing and redraws it.
The form's title doubles as a status line: it becomes Longitudinais — 66 circle(s), Longitudinais — 8 strip(s), or the reason why nothing was drawn.
Workflow
- Run
CAPCAD_MARKING_LONGITUDINAL. The form opens beside the drawing. - Choose the input mode (1 or 2) and leave Usar Eixo ativo (3) on, or turn it off to select an entity.
- Choose Círculos (5) or Sonorizador (6) and set Raio (7), Proporção espaçamento (9), Extensão longitudinal (11) and Largura transversal (13).
- Click Selecionar / criar (the large button in the footer). The form hides; the command line asks for the path (if 3 is off) and for the point. In 2 pontos mode the second point measures the length and the set is centred on the middle of the span.
- Adjust the rest: Afastamento (16), the longitudinal orientation (17 to 19), the transverse orientation (24 to 26) and Extra (27). Click Update (22) to redraw.
- Choose the Layer (32) and click Aceitar (23) to keep the drawing. Reset (21) erases the preview and forgets the point; Zoom (20) frames the path.
The form
Numbers are the same in both pictures on this page. The form has no tabs; the only control that changes state is the Círculos / Sonorizador pair, which enables or disables Raio and Proporção espaçamento.
This form shows Portuguese captions in every language: every label is quoted below in Portuguese as the software shows it, with a gloss. The screenshots were captured in a Portuguese session; the control numbering is the same in both editions.
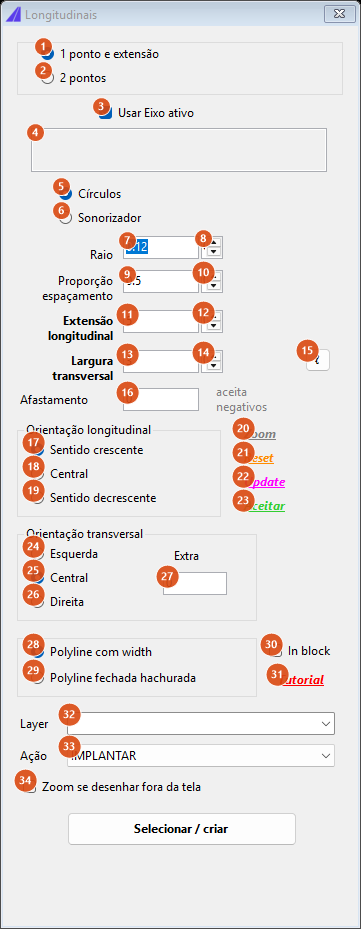
Opening state: 1 point and length, Usar Eixo ativo on, Círculos, radius 0.12, ratio 0.5, length 5, width 3.
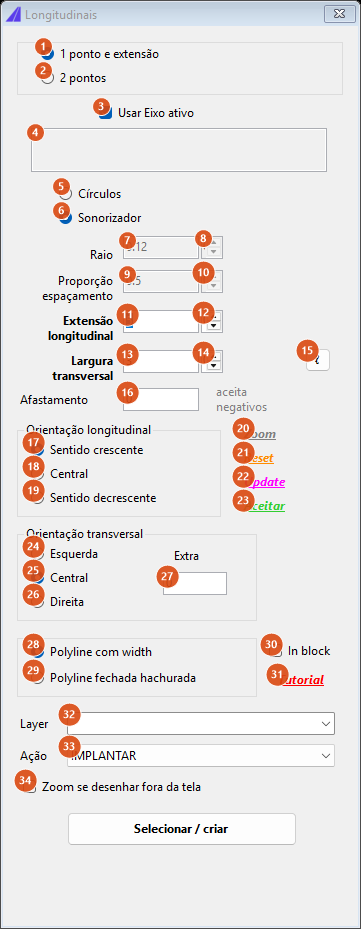
Sonorizador mode: Raio (7, 8) and Proporção espaçamento (9, 10) are shown disabled — but they are still read, see Notes.
Input
| # | Control | What it does |
|---|---|---|
| 1 | 1 ponto e extensão (1 point and length) | Default. A single click; the length comes from box 11. Prompt: Point.... |
| 2 | 2 pontos (2 points) | Two clicks. Both points are projected onto the path and the distance between the two stations is written into Extensão longitudinal (11); the set is then centred on the middle of the span. Prompts: Point 1..., Point 2.... If a point does not project onto the path: points do not project on the path. |
| 3 | Usar Eixo ativo (use the active alignment) | On by default. The path is the project's alignment: the clicked point chooses which element of it carries the set. With no alignment loaded: no active alignment; with the point far from the alignment: point is not near the alignment. Off, the command asks for an entity (Select the path:). |
| 4 | selection summary (read-only) | After each selection it writes Eixo ativo (active alignment) or Curva selecionada (selected curve), followed by the length and width in force. |
What is drawn
| # | Control | What it does |
|---|---|---|
| 5 | Círculos (circles) | Default. A staggered field of circles (see How the options combine). |
| 6 | Sonorizador (rumble bars) | Consecutive transverse bars along the length: each bar is the transverse width (13) long and radius × 2 thick, and the gap between bars is radius × 2 × ratio. |
| 7, 8 | Raio (radius) and its spin button | Radius of the circle, 0.12 by default; the button's step is 0.01. In rumble-bar mode it is half the thickness of each bar. |
| 9, 10 | Proporção espaçamento (spacing ratio) and its button | 0.5 by default, step 0.1. For circles it is the pitch between rows, measured in diameters. For rumble bars it is the gap between bars, also in diameters. |
| 11, 12 | Extensão longitudinal (longitudinal length) and its button | 5 by default, step 1. How far the set runs along the path. For circles this is not the length drawn, but what decides how many rows there are (see Notes). |
| 13, 14 | Largura transversal (transverse width) and its button | 3 by default, step 0.5. How far the set reaches across the path. |
| 15 | ℓ | Measures the length on screen: asks From: and To:, projects the two points onto the path and writes the distance between the stations into box 11. With no path selected: select the path first. |
| 16 | Afastamento (offset) | Shifts the whole set perpendicular to the path. Negative values are accepted, as the grey label beside it says. It is added to Extra (27) before the transverse orientation decides the sign. |
Longitudinal orientation
Where the set starts relative to the clicked point.
| # | Control | What it does |
|---|---|---|
| 17 | Sentido crescente (increasing) | Default. The set starts at the clicked point and runs in the direction of increasing stations. |
| 18 | Central | The clicked point sits in the middle of the set. |
| 19 | Sentido decrescente (decreasing) | The set ends at the clicked point. |
Transverse orientation
| # | Control | What it does |
|---|---|---|
| 24 | Esquerda (left) | The offset (16 + 27) is applied with a negative sign, whatever sign you typed. |
| 25 | Central | Default. The offset is applied exactly as typed — including zero, which leaves the set centred on the path. |
| 26 | Direita (right) | The offset is applied with a positive sign. |
| 27 | Extra | Added to Afastamento (16) before the orientation decides the sign. |
Command links
| # | Control | What it does |
|---|---|---|
| 20 | Zoom | Frames the selected path on screen. |
| 21 | Reset | Erases the preview and forgets the point. The path stays selected. |
| 22 | Update | Redraws the set with the current values. |
| 23 | Aceitar (accept) | Releases the preview: what is drawn stops being erased by the next pass. The title becomes Longitudinais — accepted. |
Output and layer
| # | Control | What it does |
|---|---|---|
| 28 | Polyline com width (polyline with width) | Default. The entities that carry a constant width (the rumble bars) are drawn with that width. Circles have no width, so nothing changes for them. |
| 29 | Polyline fechada hachurada (closed hatched polyline) | Saved with the form; not used by this version: the outline is always drawn without hatch. |
| 30 | In block | Saved with the form; not used by this version. |
| 31 | Tutorial | Opens the CapCad video in the browser. |
| 32 | Layer | The drawing layer. The list carries every layer in the drawing, in alphabetical order, and opens pre-filled with the speed-reduction-line layer of the active layer catalogue (ROAD_MARK_WH_LRV in an English session, SINA_HOR_BR_LRV in the factory Portuguese style). The layer is created if it does not exist. |
| 33 | Ação (action) | Saved with the form; not used by this version: the action suffix is not applied to the layer chosen in 32. |
| 34 | Zoom se desenhar fora da tela (zoom if drawn off screen) | Saved with the form; not used by this version. |
The large Selecionar / criar button in the footer is what triggers the selection; it gets no number in the screenshots.
How the options combine
The figures below were produced by the command's own engine on a straight path, with the point in the middle. The dashed line is the path.
The grid is built like this: each row is a transverse line across the path, with circles every two diameters; the width is first reduced to a whole number of diameters (int(width / diameter) − 1), so the row always finishes flush. Rows repeat along the path every diameter × ratio, and alternate rows start one diameter further along — which is what produces the stagger.
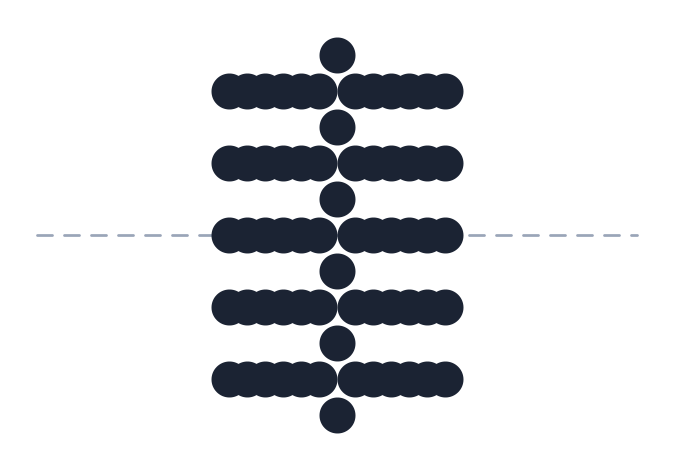
Opening values — radius 0.12, length 5, width 3, ratio 0.5: 66 circles. With the ratio at 0.5 the pitch between rows (0.12) is smaller than the diameter (0.24), so the circles overlap into continuous beads.
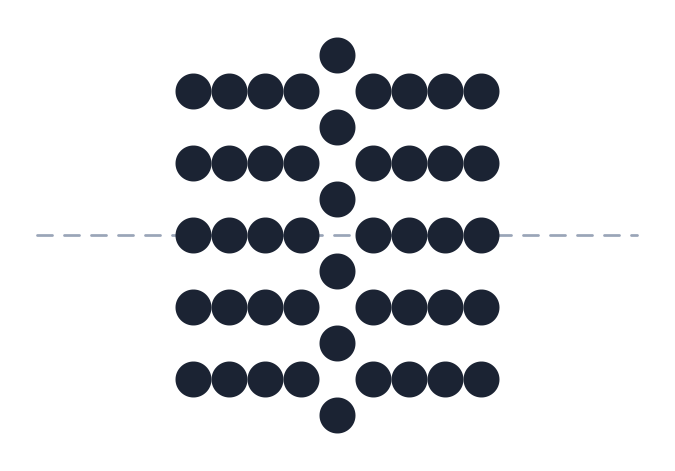
Ratio 1.0: the pitch between rows becomes a whole diameter and the circles are tangent. 46 circles.
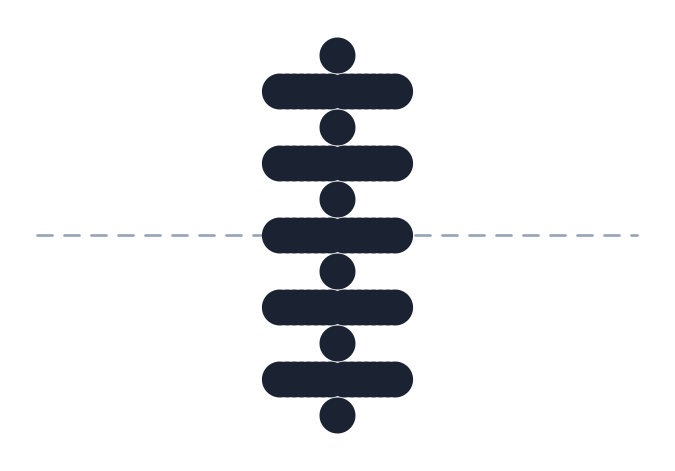
Ratio 0.2: rows closer together and more of them — 86 circles, almost touching.
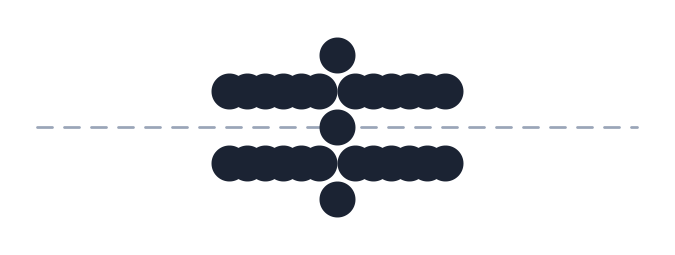
Transverse width 1.5 with the other opening values: the width is reduced to 5 diameters (1.2) and the grid is half as tall. 27 circles.
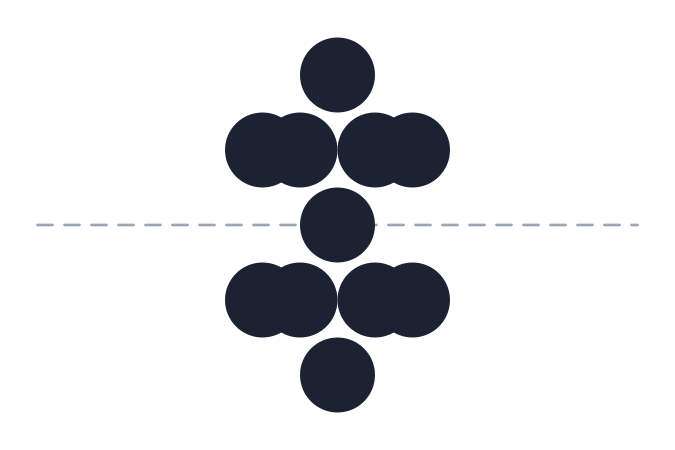
Radius 0.25 (diameter 0.5): both the transverse pitch (1.0) and the longitudinal one (0.25) grow, and the circle count drops to 11. This is the value to use when the circles should read as separate.
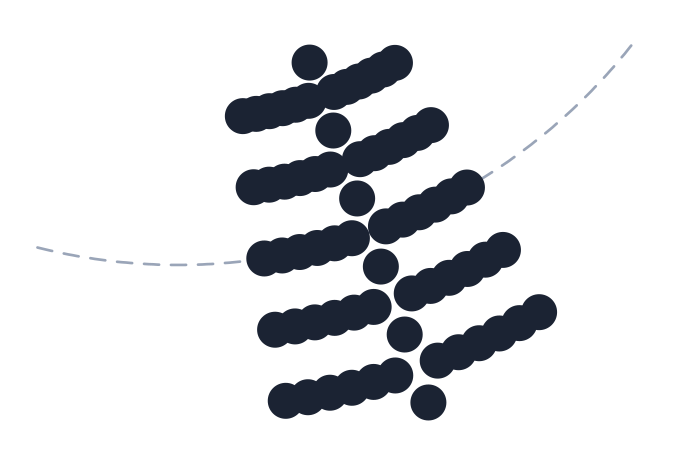
The same grid on a curved path: each row is perpendicular to the tangent at its own station.
The rumble bars have no figure here. The arrangement is the one described in 6: transverse bars, transverse width long and radius × 2 thick, repeated every radius × 2 × (1 + ratio) along the length, starting half the length before the anchor point.
Remembered between sessions
Almost everything. When the form closes, every check box, radio button, text box and combo box is written to the user preferences and restored the next time it opens: input mode, Usar Eixo ativo, Círculos/Sonorizador, radius, ratio, length, width, offset, extra, both orientations, the output, In block, the layer, the action and the Zoom box. The spin buttons (8, 10, 12, 14) are not saved — but the summary text box (4) is, so the next session can open showing the description of the previous selection.
Notes
- The longitudinal length is not the length drawn (circles). It decides the number of rows:
int(length / (diameter × (1 + ratio))) − 1, and the drawing spreads them everydiameter × ratio. With the opening values (length 5, radius 0.12, ratio 0.5) the field measures about 1.5 units, not 5. To cover the 5, raise the radius or the ratio — or measure the result and adjust the length until it comes out where you want it. - The width is rounded down too.
int(width / diameter) − 1diameters: with width 3 and diameter 0.24, the grid occupies 2.64. - Radius and ratio still count in rumble-bar mode. Both controls appear disabled while Sonorizador is selected, but the drawing still reads their values:
radius × 2is the bar thickness and the ratio is the gap between bars. To change them, go back to Círculos, adjust, and select Sonorizador again. - The default layer is the speed-reduction one. Change the layer before drawing if the device is not a speed-reduction line.
- The action does not reach the layer. Unlike other road-marking commands, the Ação box (33) does not add a keep/remove suffix to the layer name in this version.
- The point is always asked for. Even with Usar Eixo ativo on, the command asks for a point: it is the point that chooses the alignment element and the position of the set.
- The form's title, captions and status texts are in Portuguese in every language; the prompts and the title's status lines are in English.