| Commands | CAPCAD_COLOR_MAP (opens on the Area Color tab) and CAPCAD_COLOR_UTIL (opens on the Utils tab) |
| Shortcuts | none |
| Ribbon | CAPCAD_COLOR_MAP: CapCad tab › Geo panel › Topo split button › Color Map. CAPCAD_COLOR_UTIL: CapCad tab › CAD Utilities panel › Draw & Modify split button › Color Utilities |
| Category | Operational |
| Form | ColorUtilitiesForm (modal, two tabs); the palette editor ColorSelectionForm opens from inside it |
| Hosts | AutoCAD, BricsCAD, GstarCAD, ZWCAD, ARES Commander |
| Licence | CAPCAD_COLOR_MAP is not licence-gated; CAPCAD_COLOR_UTIL requires a licence |
Paint a whole map in one click, and repaint it as often as you like until it looks right. Selecting region by region and choosing hatch by hatch is an afternoon's work; here it is a single selection.
- Colours that do not repeat side by side. The regions are shuffled before they take a colour, so neighbours rarely come out the same.
- Nothing vanishes into the background. Random colours are held at a distance from the screen background colour — yours, read from the CAD.
- Repainting is one click. ReRun throws the hatches away and draws again, over the same selection.
- Three ways to apply it. A layer per colour, the hatch carrying the colour on the current layer, or recolouring the layers the regions already occupy.
- Open outlines do not stop the run. They are either closed for you, or counted and reported.
- An editable palette. Two ready-made presets and ten swatches you replace one at a time.
What it does
Two tools in one form, one per tab. The command only chooses which tab the window opens on; both stay available all the time.
Area Color (CAPCAD_COLOR_MAP) is the map-colouring tool: you select a set of closed polylines — districts, plots, land-take strips, sub-catchments, work sections — and CapCad lays a solid hatch of a different colour over each one. It is the classic thematic colouring: every region visually separated from its neighbour.
Utils (CAPCAD_COLOR_UTIL) solves the opposite problem: entities that inherit their colour from the layer (ByLayer) and that need to carry the colour on the object itself — typically before exporting to a format that knows nothing about layers.
Neither depends on an alignment, a project or a style.
Workflow
Colouring a map
- Run
CAPCAD_COLOR_MAP. - Choose where the colours come from: Color scheme (10) with one of the presets, or Random colors (13).
- Choose how the colour is applied, in the Filling Color frame (1, 6 or 7).
- Click Select polylines (27). The window disappears, you select the regions in the drawing and the window comes back.
- The hatches appear. Not happy? ReRun (24) erases the hatches and draws again, over the same selection. Reset (25) erases the hatches and stops there.
- Close the window. The hatches of the last run stay in the drawing.
Entities that are not valid curves are dropped from the selection silently.
Converting ByLayer into the object's own colour
- Run
CAPCAD_COLOR_UTIL. - Leave Use true color (RGB) (31) ticked if you want the colour stored as RGB.
- Click Make entities ByColor (30) and select the entities. The footer reports how many were changed.
The form
The numbers are the same in both screenshots of this page.
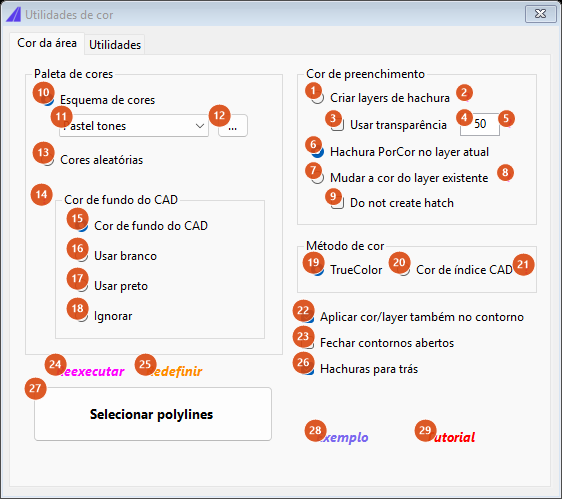
The screenshots on this page are of a Portuguese session; the numbering is the same in both editions, and the tables give the English captions. Area Color tab in its default state: Pastel scheme, hatch ByColor on the current layer, CAD background as the colour to avoid.
Area Color tab — Color palette frame
| # | Control | What it does |
|---|---|---|
| 10 | Color scheme | The colours come from the palette (11), walked in a cycle: the first region takes the first swatch, the second the second, and so on, starting over. Before that the order of the regions is shuffled, so neighbouring regions rarely get consecutive swatches. |
| 11 | Palette preset | Two presets: Pastel tones, ten light tones, and Vivid, six saturated colours. Changing the preset reloads the palette but does not repaint: use ReRun (24) to see the effect. |
| 12 | ... | Opens the palette editor (see below). |
| 13 | Random colors | Each region gets a drawn colour, held at a minimum distance from the background colour chosen in the next frame. In this mode there is no shuffling — the draw is enough on its own. |
CAD Background color frame
Sets which colour the drawn colours must keep away from, so that no region disappears into the screen background. It only has an effect in Random colors mode.
| # | Control | What it does |
|---|---|---|
| 14 | ? | Reminds you that CapCad takes a background colour into account and avoids colours close to it. |
| 15 | CAD background color | Reads the model-space background colour straight from the CAD's preferences (default). If the CAD does not answer, no colour is avoided. |
| 16 | Use white | Avoids the colours around (255, 2, 253), a magenta — see the note below. |
| 17 | Use black | Avoids the dark colours, for drawings with a black background. |
| 18 | Ignore | Avoids nothing: any colour can come out. |
Filling Color frame
The first three are mutually exclusive and decide where the colour lives.
| # | Control | What it does |
|---|---|---|
| 1 | Create hatch layers | For each colour CapCad creates two layers: one named COLOR_<r,g,b>, which takes the outline, and another COLOR_<r,g,b>-HATCH, which takes the hatch. The colour lives on the layers; outline and hatch stay ByLayer. This is the option that keeps the drawing organised and lets you switch each colour on and off. |
| 2 | ? | Explains the layer naming rule. |
| 3 | Use transparency | Applies the transparency from box 4 to the layers created. |
| 4 | transparency value | Transparency as a percentage. It only counts with box 3 ticked; without it the transparency is zero. |
| 5 | ? | Warns that applying transparency slows the process down. |
| 6 | Hatch ByColor in current layer | Default. No new layers: the hatch stays on the current layer and carries the colour on the object itself. Fast, but it mixes every colour into one layer. |
| 7 | Change existing layer color | Moves nothing: it recolours the layers the regions are already on. It is for putting colour into a layer structure you have already built. |
| 8 | ? | Reminds you that, for this mode to work, each colour needs a layer of its own — regions on the same layer compete for the same colour. |
| 9 | Do not create hatch | Only makes sense together with mode 7: the hatch is drawn and immediately discarded, leaving just the recoloured layers. |
Color method frame
| # | Control | What it does |
|---|---|---|
| 19 | TrueColor | — |
| 20 | CAD Index Color | — |
| 21 | ? | — |
This frame is saved with the form; not used by this version. The colours produced are always RGB.
General options and actions
| # | Control | What it does |
|---|---|---|
| 22 | Apply color/layer also in boundary | Ticked, the polyline itself goes to the colour's layer (mode 1) or takes the colour on the object (mode 6); unticked, the outline is left exactly as it was and only the hatch changes. It is disabled in mode 7, where it would make no sense. |
| 23 | Close open boundaries | Ticked, an open region is closed with a straight segment between its ends before being hatched. Unticked, it is only counted, and the footer reports how many were left out. |
| 24 | ReRun | Erases the hatches of the last run and redoes the colouring over the same selection, with the current options. It is the "again, until it looks good" button. With no selection yet, it has no effect. |
| 25 | Reset | Erases the hatches of the last run and stops. The layers created stay. |
| 26 | Hatchs to back | Ticked, at the end it sends every hatch in the drawing to the back of the display order, so they do not hide lines and text. |
| 27 | Select polylines | Hides the window, asks for the selection, stores each region's original layer and colour and runs the colouring. Cancelling the selection leaves the previous selection intact. |
| 28 | Sample | Asks for confirmation and opens a sample drawing, downloaded from the server the first time. |
| 29 | Tutorial | The video is not available in this version; the button says so. |
The footer, below the selection button, shows the result: how many regions were coloured, or how many were not closed.
Utils tab
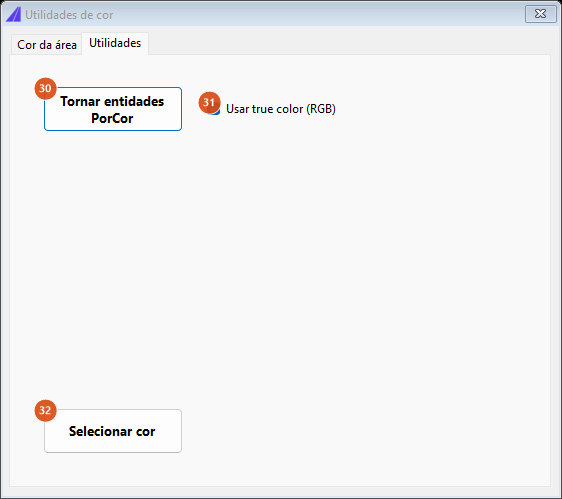
Utils tab: converting ByLayer entities into their own colour, and the colour picker. Portuguese session.
| # | Control | What it does |
|---|---|---|
| 30 | Make entities ByColor | Hides the window and asks for a selection. Every entity that is ByLayer takes its layer's colour written onto the object itself; those that already have their own colour do not change. The footer reports how many were changed. |
| 31 | Use true color (RGB) | Ticked, every selected entity — including those that already had their own colour — has its colour rewritten as RGB. That is what guarantees the exact colour in an export. |
| 32 | Select color | Opens the Windows colour picker and reports the chosen RGB in the footer. It does not change the drawing: it is for finding out a colour's value. |
The palette editor
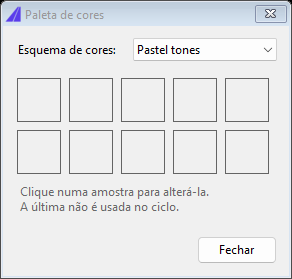
The palette's ten swatches and the preset combo. Portuguese session; the window is titled "Color Palette" in English.
Opened with the ... button (12). It shows the palette's ten swatches; clicking any of them opens the Windows colour picker and replaces that swatch. The combo at the top reloads a preset over the swatches. Changes take effect immediately, for the next run.
Two things to know about the swatches, and the window's own hint says the first of them:
- the colour cycle uses the first nine swatches; the tenth is editable but never reaches the drawing;
- the Vivid preset writes only the first six swatches — the rest keep whatever was there before (in practice the pastel tones), and swatches 7 to 9 do reach the drawing.
Remembered between sessions
Practically the whole form: palette mode, chosen preset, background colour to avoid, filling mode, transparency and its value, colour method, apply in boundary, close boundaries, hatches to back, do not create hatch, and the true colour of the Utils tab. Everything is written when the window closes and restored when it opens.
The colours edited in the palette are not saved: every time the form opens, the palette returns to the preset.
Notes
- The hatch created is solid and non-associative, built from the region's own vertices (curvatures included). Moving the polyline afterwards does not move the hatch.
- In Change existing layer color mode, the hatch goes to a
<layer>-HATCHlayer that nobody colours — only the region's own layer gets the new colour. That is why this mode is usually paired with Do not create hatch (9), which discards the hatch. - Each run remembers only the hatches of the last round: Reset and ReRun remove those, not the ones from earlier rounds.
- "Use white" avoids a magenta, not white. The colour the option keeps away from is (255, 2, 253). For a genuinely light background, leave CAD background color (15) selected and let CapCad read the real screen colour.
- Two captions stay in English in every language: Do not create hatch (9) and the palette preset names (Pastel tones, Vivid).
See also
- Draw and modify — the other drawing utilities.
- Layers and the layer catalogue — how CapCad names and organises layers.
- Preferences and working environment — the screen background colour, which this command reads.